

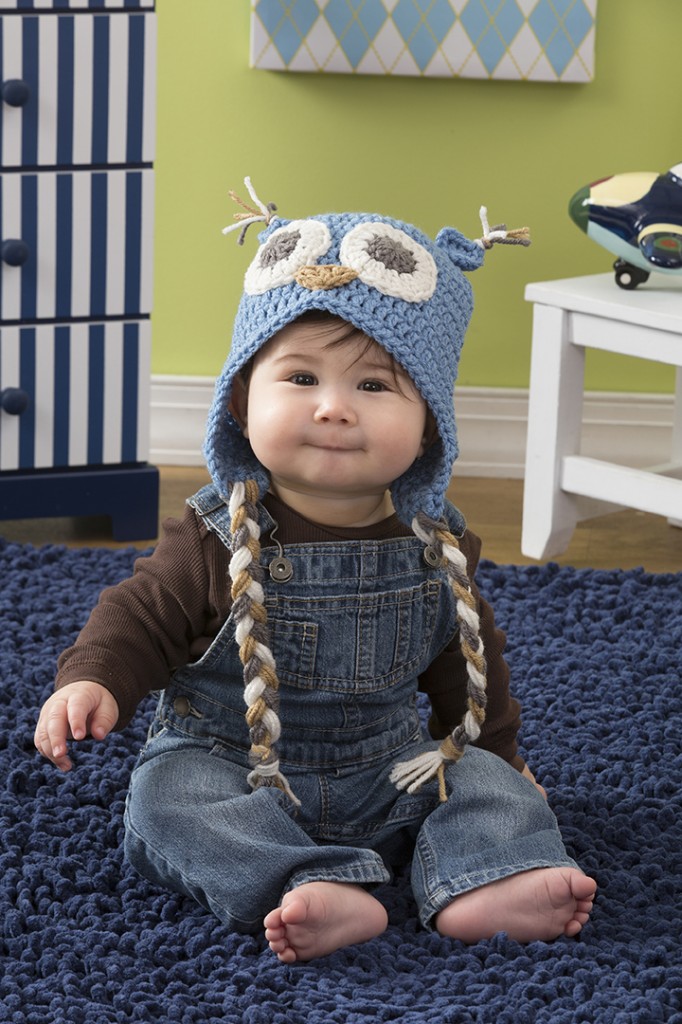
Whoooo’s adorable? This adorable baby hat is the perfect accessory to keep your child’s head warm this winter.
Skill Level: Easy
Size: Circumference: 14 (16, 18, 20)” (35.5 (40.5, 45.5, 50.5) cm); Length: 6 (6.5, 7, 7.5)” (15 (16.5, 18, 19) cm)
Gauge: 17 dc = 5″ [12.5 cm]; 9 rows dc = 5″ [12.5 cm]
Materials
Yarn: Red Heart With Love (100% acrylic; 370 yards [338 meters]/198 grams): #1805 Bluebell (A, 1 skein), #1401 Pewter (B, 1 skein), #1101 Eggshell (C, 1 skein), #1308 Tan (D, 1 skein)
Hook: US size I/9 (5.5 mm) hook
Notions: Stitch markers, yarn needle
Special Stitches
dc2tog: [Yarn over, insert hook in next stitch, yarn over and pull up loop, yarn over, draw through 2 loops] 2 times, yarn over, draw through all loops on hook.
Picot: Ch 3, slip st into first ch.
Adjustable Loop: With long side of yarn in the palm of your hand, wrap yarn around finger. Insert hook under the wrap, grab yarn and pull through; ch 1, release circle around finger gently, work the specified number of stitches; pull tail gently to tighten the ring.
Pattern Notes
The ch-1 worked at the beginning of a Round or a Row does not count as a stitch.
Pattern
With A, make an Adjustable Loop, ch 1.
Rnd 1: Work 12 dc in ring; slip stitch in first dc to join. (12 dc)
Rnd 2: Ch 1, 2 dc in each dc around; slip stitch in first dc to join. (24 dc)
Rnd 3: Ch 1, [dc in next dc, 2 dc in next dc] 12 times; slip stitch in first dc to join. (36 dc)
Rnd 4: Ch 1, [dc in each of next 2 dc, 2 dc in next dc] 12 times; slip stitch in first dc to join. (48 dc)
Rnds 5-10: Ch 1, dc in each dc around; slip stitch in first dc to join. (48 dc)
Do not fasten off; continue to make Right Ear Flap.
16″ Circumference Only
Rnd 5: Ch 1, [dc in each of next 7 dc, 2 dc in next dc] 6 times; slip stitch in first dc to join. (54 dc)
Rnds 6-11: Ch 1, dc in each dc around; slip stitch in first dc to join. (54 dc)
Do not fasten off; continue to make Right Ear Flap.
18″ Circumference Only
Rnd 5: Ch 1, [dc in each of next 3 dc, 2 dc in next dc] 12 times; slip stitch in first dc to join. (60 dc)
Rnds 6-12: Ch 1, dc in each dc around; slip stitch in first dc to join. (60 dc)
Do not fasten off; continue to make Right Ear Flap.
20″ Circumference Only
Rnd 5: Ch 1, [dc in each of next 3 dc, 2 dc in next dc] 12 times; slip stitch in first dc to join. (60 dc)
Rnd 6: Ch 1, [dc in each of next 9 dc, 2 dc in next dc] 6 times; slip stitch in first dc to join. (66 dc)
Rnds 7-13: Ch 1, dc in each dc around; slip stitch in first dc to join. (66 dc)
Do not fasten off; continue to make Right Ear Flap.
Right Ear Flap
Row 1: Ch 2 (counts as dc now and throughout), dc2tog, dc in each of next 4 dc, dc2tog, dc in next dc; turn. (8 dc)
Row 2: Ch 1, sc in each dc across; turn. (8 sc)
Row 3: Ch 2, dc2tog, dc in each of next 2 sc, dc2tog, dc in last sc; turn. (6 dc)
Row 4: Ch 1, sc in each dc across; turn. (6 sc)
Row 5: Ch 2, [dc2tog] twice, dc in last sc; turn. (4 dc)
Row 6: Ch 1, sc in each dc across. (4 sc)
Fasten off and weave in ends.
Note for 14″ (16″, 18″, 20″) Circumference
With Right Earflap facing, and Hat seam to the right, place a stitch marker 20 (22, 24, 26) spaces to the left of the last stitch from the Earflap.
Left Ear Flap
Join with A in marked stitch.
Rows 1-6: Repeat Rounds 1-6 for Right Earflap.
Border
Rnd 1: Join A in center back of Hat between Right and Left Earflaps; ch 1, sc evenly around by working one sc in each stitch and one sc in the end of each sc Row and 3 sc in the end of each dc Row; slip stitch in first sc to join. Fasten off and weave in ends.
Eyes (Make 2)
With B, make an Adjustable Loop, ch 1.
Rnd 1: Work 12 dc in ring; slip stitch in first dc to join. (12 dc)
Fasten off B.
Rnd 2: Join C; ch 1, 2 dc in each dc around; slip stitch in first dc to join. (24 dc)
Fasten off C, leaving a 3″ tail.
Nose
With D, leave a 3″ tail; make an Adjustable Loop, ch 3 (counts as dc).
Row 1: Work 3 dc into ring, ch 3, slip stitch into ring. Fasten off, leaving a 3″ tail.
Ears (Make 2)
With A, leave a 3″ tail; make an Adjustable Loop, ch 3 (counts as dc).
Row 1: Work 3 dc into ring, picot, work 3 dc into ring, ch 3, slip stitch into ring. Fasten off, leaving a 3″ tail.
Row 2: Cut a 6″ strand of each color B, C and D, fold in half and knot to picot in Ear. Trim ends evenly.
Braids (Make 2)
Cut three 28″ strands of each color B, C, and D. Separate each color. Referring to photograph for placement, evenly attach strands between stitches on last Row of Earflap. Braid together until 4″ of fringe remains, knot to fasten, trim ends evenly.
Attach Eyes
Use stitch markers to hold eyes in place, centered mid forehead between Earflaps. Use yarn needle and C to fasten into place.
Attach Nose
Cut two 4″ strands of D, knot one to the top of the first dc on the Nose, knot the second to the top of the 5th dc on the Nose. Using tail ends from all three sides of Nose, fasten to Hat where desired.
Attach Ears
Flatten Hat so that Eyes are facing and centered. Using Round 3 as a guide, place one stitch marker on either side of Hat as desired. Use the 3″ tails from each Ear to fasten to Hat where stitch markers are placed. 
I love this pattern, but the model sells it. I AM going to make this. I’m working on several different projects, but I keep coming back to this. I keep thinking about the happy face of the model. Thanks!
Love it!! Thanks so much!
Thank you, I will make this in different colours to go with a couple of baby blankets for relatives with babies due later this year. Love it. 🙂
Thank you for the free pattern tbis so Darling
Thank you for your generosity…I can’t wait to jump into this project!
I like it a lot
How cute! Thanks for the free pattern!
Itlooks soooo cute. I have to try it.
that looks soooo cute, I have to try it.
This is adorable.
What a cute little guy!
So cute…Thanks..:)
Very cute!!!!
Simple and easy to follow. Best regards
Lovely and easy to follow
Good. I like it very much
Why is it -if it’s a free pattern – I have to sign up and pay to subscribe?
Thank you !
Thank you so much.
Thank you so much for the free, really free pattern for this adorable owl hat.
thanks so much, nice baby hat to include with a blanket.