

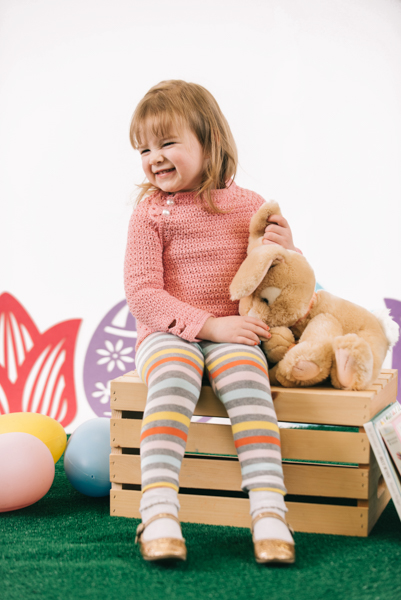
Adorable doesn’t even begin to describe this toddler long-sleeve tee. Little bows crocheted into the sleeves and the back make the top really special. Watch out though, she’ll be asking for one in all of her favorite colors!
Skill Level: Intermediate
Size: 3mo (6, 9, 12, 18, 2T)
Measurement Key
| Sizes | Starting Sleeve | Shoulder Length | Arm Length | Starting Neck | Panel Length |
| 3months | 2inches | 4.25 in | 8in | 2.75in | 4.25in |
| 6months | 2inches | 4.5in | 9in | 3.25in | 4.5in |
| 9months | 2.5 inches | 4.75in | 10in | 3.5in | 4.75in |
| 12months | 3inches | 5in | 10.75in | 3.75in | 5in |
| 18months | 3inches | 5.25in | 11in | 4.25in | 5.25in |
| 2T | 3inches | 5.5in | 11.5in | 4.5in | 5.5in |
Materials
Gauge: Your choice.
Yarn: Your choice.
Hook: Your Choice.
Notions: Removable markers; tapestry needle; two buttons (bigger than button-hole); measuring tape
Abbreviations
Sc flo = Single Crochet in front loop only
Sc blo = Single Crochet in back loop only
Sc2tog = Single Crochet 2 stitches together
Pattern Notes
This long sleeve shirt can be worked with yarn and hook size of your choice.
Measurements already allow for seams.
Garment has no obvious right side or wrong side. Pick whichever side you like prior to seaming.
If you need to block to the measurements, it’s easier to do so BEFORE sewing the pieces together.
When increasing (2 sc in the next st), work 1 sc in the back loop and the other sc in the front loop of the same st.
Pattern
Sleeves (make 2)
Row 1: Make an even numbered chain that matches starting sleeve measurement, ch 2 extra.
Row 2: Sc in 2nd ch from the hook, sc in each ch across, ch 1, turn.
Note: This foundation row should equal the starting sleeve measurement.
Row 3: *Sc blo in next st, sc flo in next st; rep from * across, ch 1, turn.
Row 4: Rep Row 3.
Row 5: Sc blo in next st, 2 sc in next st, *sc flo in next st, sc blo in next st; rep from * across to last 2 sts, 2 sc in next st, sc flo in next st, ch 1, turn.
Rep Row 3 twice more, then rep Row 5.
Cont in this manner until Sleeve reaches shoulder length measurement.
Row 6: Sc blo in next st, sc in next 2 sts, *sc blo in next st, sc flo in next; rep from * across to last 3 sts, sc in next 2 sts, sc flo, ch 1, turn. Place a st marker in both sides of this Row, but in none of the repeats.
Row 7: *Sc blo in next st, sc flo in next; rep from * across, ch 1, turn.
Row 8: Rep Row 6.
Row 9: Rep Row 7.
Row 10: Rep Row 6.
Row 11: Rep Row 7.
Rep Row 7 until Sleeve reaches arm length measurement.
To make the bow in the Sleeve, work it in the 7 middle stitches. To calculate, count all the sts across, subtract 7, then divide that total by 2. This is the amount of sts you will have on each side of your bow.
Row 12: Alternate sc blo, sc flo across to 7 middle sts, ch 7, sk 7 sts, then go back to alternating sc blo, sc flo to end of row, ch 1, turn.
Row 13-14: Rep Row 12.
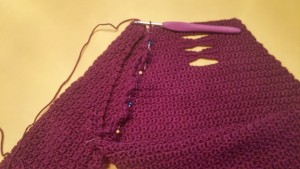
Row 15: Alternate sc blo, sc flo across 7 middle sts, ch 3, sc over the 3 chs made in the last 3 rows (See picture below), ch 3, then go back to alternating sc blo, sc flo to end of row, ch 1, turn.

Row 17: Alternate sc blo, sc flo across to 7 middle sts, sc in each ch, alternate sc blo, sc flo to end of row, ch 1, turn.
Row 16: Rep Row 12.
Row 18: Rep Row 7.
Fold Sleeve in half lengthwise and sl st (or sew) together to marker.
Fasten off and weave in ends. Re-attach yarn to the bottom of Sleeve.
Row 19: Sc all around Cuff of Sleeve, join with sl st, ch 1, turn.
Row 20: *Sc in next 4 sts, sc2tog; rep from * all around Cuff of Sleeve, (if you have extra sts, sc), join with sl st, ch 1, turn.
Row 21: Sc around Cuff of Sleeve, join with sl st or an invisible join.
Fasten off and weave in ends.
Back
Row 1: Make an even numbered chain equal to starting neck measurement, ch 1 extra, turn.
Row 2: Sc in each ch across, ch 1, turn.
Note: This foundation row should equal the starting neck measurement.
Row 3: Sc blo in next st, 2 sc in next st, *sc flo in next st, sc blo in next st; rep from * to last 2 sts, 2 sc in next st, sc flo in next st, ch 1, turn.
Row 4: *Sc blo in next st, sc flo in next st; rep from * across, ch 1, turn.
Row 5: Rep Row 3.
Note: The bows are worked into the center 9 stitches. To calculate that, count total stitches across, subtract 9 from the total, divide by 2. This will be the number of stitches needed to be worked before starting first chain. However, since every other row will be an increase row, the center 9 stitches will keep changing. Be sure to add a stitch after every increase row.
Row 6: Alternate sc blo, sc flo across to 9 middle sts, ch 9, sk 9 sts, alternate sc blo, sc flo to end, ch 1, turn.
Row 7: Sc blo in next st, 2 sc in next st, alternate sc blo, sc flo to 9 middle sts, ch 9, sk 9 sts, alternate sc blo, sc flo to last 2 sts, 2 sc in next st, sc flo in next st, ch 1, turn.
Row 8: Rep Row 6.
Row 9: Sc blo in next st, 2 sc in next st, alternate sc blo, sc flo to 9 middle sts, ch 4, sc over the 3 chs made in the last 3 rows, ch 4, alternate sc blo, sc flo to last 2 sts, 2 sc in next st, sc flo in next st, ch 1, turn.
Rows 10-13: Rep Rows 6-9.
Row 14: Sc blo in next st, 2 sc in next st, alternate sc blo sc flo to 9 middle sts, sc in each ch, alternate sc blo, sc flo to last 2 sts, 2 sc in next st, sc flo in next st, ch 1, turn.
Note: At this point, the shape of panel should start turning into a trapezoid. However, some types and weights of yarn produce a shape that is too narrow at the top. If you are working with one of these yarns, just adjust Row 3 repeats with 2 increases on each side instead of 1 to accommodate. Place a stitch marker in the row where you started doing this so you can replicate it in the same place when working the front panel. When you get to Row 16 repeats, you will do 3 increases.
Rep Rows 3-4 until piece meas same as panel length.
Row 15: Sc blo in next st, 2 sc in next 2 sts, *sc blo in next st, sc flo in next st; rep from * across to last 3 sts, 2 sc in next 2 st, sc flo in next st, ch 1, turn. Place a st marker in both sides of this Row, but in none of the repeats.
Row 16: *Sc blo in next st, sc flo in next st; rep from * across, ch 1, turn.
Rows 17-20: Rep Rows 15-16.
Front
Row 1: Make an even numbered chain equal to starting neck measurement, ch 1 extra, turn.
Row 2: Sc in each ch across, ch 1, turn.
Note: This foundation row should equal the starting neck measurement.
Row 3: Sc blo in next st, 2 sc in next st, *sc flo in next st, sc blo in next st; rep from * to 2 sts, 2 sc in next st, sc flo in next st, ch 1, turn.
Row 4: *Sc blo in next st, sc flo in next st; rep from * across, ch 1, turn.
Rep Rows 3-4 until piece meas same as panel length.
Row 5: Sc blo in next st, 2 sc in next 2 sts, *sc blo in next st, sc flo in next st; rep from * across to last 3 sts, 2 sc in next 2 sts, sc flo in next st, ch 1, turn. Place a st marker in both sides of this row, but in none of the repeats.
Row 6: *Sc blo in next st, sc flo in next st; rep from * across, ch 1, turn.
Rows 7-8: Rep Rows 5-6.
Row 9: Rep Row 5.
Row 10: *Sc blo in next st, sc flo in next st; rep from * across to end. Do not turn as you will now work up the side.
Row 11: Sl st up around the corner and pass stitch marker, sc in each st up the diagonal side to the corner where the diagonal first meets the Neckline, ch 1, turn.
Row 12: Sc in next st, ch 2, sk next 2 sts, sc in next 6 sts, ch 2, sk next 2 sts, sc in each st to the bottom of the diagonal, ch 1, turn – 2 buttonholes created.
Row 13: Sc in each st back up to the corner, including 2 sc in each ch-2 sp, ch 3 (counts as 1 dc), turn.
Row 14: work 3 dc in same st, ch 2, sk next 2 sts, *work 4 dc in next st, ch 2, sk next 2 sts; rep from * 3 more times.
Row 15: Ch 3, turn, work 3 dc in first dc, ch 2, *work 4 dc in first dc in the next dc-group, ch 2; rep from * until 5 bows are made.
Fasten off and weave in end.
Sewing
Step 1: With WS facing, take the Front and Back panels and sl st (or sew) them together from the bottom up to the stitch markers on each side. Remove st markers. Turn garment RS out to sew on sleeves.
Step 2: Starting at the Back, sl st (or sew) first Sleeve on the non-ruffled side of the garment to the Back panel all the way pass the armpit up to top of the Front panel. Make sure your seams on are the inside like the pins show in the picture below:
Step 3: Attach the other Sleeve in a similar way on the Back and the armpit, but instead of sl st to the Front panel, begin sc on diagonal part of Sleeve up to the corner, work sc in the corner, sc in each st around Neckline, ch 1, turn.
Step 4: Sc in each st around Neckline. When you get to each raglan Sleeve, sc2tog every other st, sc in each st back down the Sleeve panel, ch 1, turn.
Step 5: Sc in each st back up and around Neckline.
Fasten off. Weave in ends.
Step 6: Sew 2 buttons to correspond to the button-holes. Once buttoned, sew the Front panel to the Sleeve all the way up to the bottom of the bow ruffle.
Body
Row 1: Attach yarn to the bottom of garment under one of the sleeves, *sc blo in next st, sc flo in next st; rep from * around, join with sl st, ch 1, turn.
Row 2: *Sc blo in next st, sc flo in next st; rep from around, join with sl st, ch 1, turn.
Rep Row 2 until Body meas desired length.
Fasten off.
Finishing
Weave in ends. 
Where is the material list?
and what does it mean for gauge & Hook “your choice”
From the designer: Looking at my copy, it lists the sample as being made with a sport weight yarn and a G hook. There is a notation included which explains that it is a “Made to Measure” pattern “meaning you can use any hook or yarn that you like! As long as you measure this as you go using the measurements included in the chart, your fit should come out exactly how you want it too! It is pictured here using a sport weight yarn and a G hook. A heavier yarn will produce a more ‘sweater-like’ garment.”
Hope this helps! – Nicola, Editor