

““I cannot seem to make a motif more than four sides. My triangles are triangles and squares are squares. But when supposed to be five or more sides, mine end up round! What can I do?””
–Carol S.Crocheters love motifs. Motifs are fun, great little projects to carry around, and quick to complete for that instant gratification. They also offer so much versatility in shape, color, and texture. The possibilities are endless.
But motifs can be tricky to work. And Carol, you are not alone in your quest to make those corners not turn out round. This is something I see with crocheters all the time. To be honest, for a long time motifs were a challenge for me. Turning a circle into a square, a triangle, an octagon, or any shape with corners baffled me. How to get those defined corners, every time? After many years crocheting and studying various types of motifs here’s what I’ve discovered.
One of the likely reasons your motif are coming out round and not with defined corners is because there are not enough stitches to go around the corner. If you don’t have enough stitches to elongate the corners, then the fabric will not be able to stretch to the points as needed. Another reason could be that you are not working in the corner stitch every time, which can cause your finished motif points to shift and to look misshapen.
Some things to try:
Maybe you are not working the corner stitches in the exact corner point. If following a pattern, use removable stitch markers to make your corner stitches. This way you have a clear visual of the exact stitch placement to work the next row/round of corner stitches into.
If you are working in the corners but still getting curve edges, maybe there are not enough stitches being worked. Three techniques I use are: 1) increase stitches separated by chain stitches, 2) gradual increase and decrease in stitch height, and 3) blocking out the corner points.

1) With the “increase stitches separated by chain stitches” technique your corners are formed by working a few stitches in the corner with a chain (or 2) in the center.
Some examples of how to work the corner stitches: (sc, ch 1, sc), (2 dc, ch 1, 2 dc), (3 tr, ch 2, 3 tr).
2) With the “gradual increase and decrease in stitch height” method, start with the shortest stitch, then gradually increase the stitch height to the apex, then descent back to the shortest stitch.
An example of how to work this type of corner is: (sc, hdc, dc, hdc, sc) in same stitch.
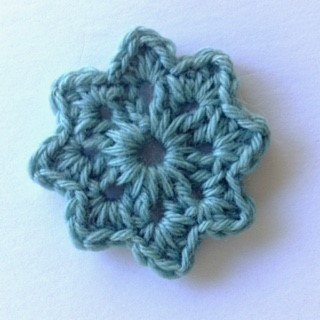
3) Finally, wash and block the motif, pinning out the points will further help the corners to stand out.
Give these tips a try on your next motif and see how much more defined your motif corners can be. 
Carrie whipped, this sounds like your tension may not be equal at all times. Many of us have problems with this, I use the rap around the fingers method, look on you tube to see different ways to hold your yarn. Hope it is okay to recommend you tube. My Gramdmother showed me how, if you have a knit shop or a local crafting shop or group meetings, these are wonderful ways to perfect your craft but meet others of a same mind.
I am having trouble keeping an oval placement always the same size. Can you send me a pattern for a simple double crochet oval placement?
Much appreciated.
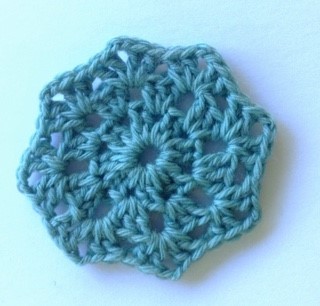
When you are increasing to make a circle, if you increase in the same spots each time you will end up with a hexagon or whatever depending on how many increases you make per round..