

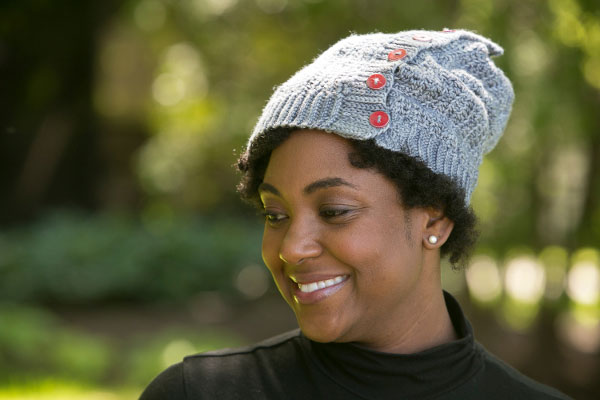
Soft shades of gray and vibrant red buttons work together to create the perfect fall hat. Pair it with your favorite sweater and jeans and you’ll be ready to take on the chilly weather.
Skill Level: Intermediate
Size: 20-24” inch head circumference
Gauge: 18 sts and 12 rows = 4” [10 cm] in hdc
Materials
Yarn: Sweet Georgia Yarns Superwash Worsted (100% superwash merino wool; 200 yards [182 meters]/115 grams): Silver (2 skeins)
Hook: US size G/6 (4.0 mm) hook
Notions: Six ¾” buttons, tapestry needle
Special Stitches
Ft lp: Of the two loops that make up the top of a crochet stitch, work stitch into the loop closer to you
Bk lp: Work stitch into the loop farther from you
Pattern Notes
The wavy stitch pattern is worked as a rectangle for the body of the hat, then slip stitch ribbing is added directly on to the sides and the top is gathered.
Pattern
Hat Body
Ch 44.
Row 1: Hdc in 3rd ch from hook, hdc in next ch *dc in next 2 ch, hdc in next 2 ch, sc in next 4 ch, hdc in next 2 ch; rep from *4 times. (42 sts)
Row 2 (Ft Lp): (Crochet in ft lp only) Ch 2, turn, hdc in next 2 sts, *dc in next 4 st, hdc in next 2 sts, sc in next 2 sts, hdc in next 2 sts; rep from * 4 times.
Row 3: Ch 2, turn, hdc in next 2 sts, *sc in next 2 sts, hdc in next 2 sts, dc in next 4 sts, hdc in next 2 sts; rep from * 4 times.
Row 4 (Ft Lp): Ch 2, turn, hdc in next 2 sts, *sc in next 4 sts, hdc in next 2 sts, dc in next 2 sts, hdc in next 2 sts; rep from * 4 times.
Row 5: Ch 2, turn, hdc in next 2 sts, *dc in next 2 sts, hdc in next 2 sts, sc in next 4 sts, hdc in next 2 sts; rep from * 4 times.
Repeat rows 2-5 13 times, then repeat row 2, or repeat until length measures 21in [53cm].
Do not fasten off.
Buttonhole Ribbing
Keep a tally on the number of rows worked in this section for creating buttonholes at equally spaced intervals.
Ch 9.
Row 1: Turn, sl st in bk lp of 2nd ch from hook and each ch across, sl st in last st of body of hat. (8 sts)
Row 2: Turn, sl st in bk lp of 2nd st from hook and each st across.
Row 3: Ch 1, turn, sl st in bk lp of 2nd st from hook and each st across, sl st in next 2 sts on body of hat.
Row 4: Turn, sl st in bk lp of 3rd st from hook and each st across.
Row 5: Ch 1, turn, sl st in bk lp of 2nd st from hook and each st across, sl st in next st on body of hat.
Repeat rows 2-4 once.
Row 9 (Buttonhole Row): Ch 1, turn, sl st in bk lp of 2nd st from hook and next 2 sts, ch 2, sk 2 sts, sl st in bk lp of next 3 sts, sl st in next st on body of hat.
Repeat rows 2-5 until end of hat; on the row after every 10 rows (1.5 in), replace a buttonhole (sl st in bk lp of next 3 sts, ch 2, sk 2 sts, sl st in bk lp of next 3 sts) for the 8 sl sts of each ribbing row.
When the end of the hat body is reached, repeat the following ribbing row; place last buttonhole in these rows 10 rows from previous buttonhole.
Ribbing Row: Ch 1, turn, sl st in bk lp of 2nd st from hook and each st across
After the last buttonhole is placed, repeat ribbing row 8 times.
Fasten off.
Brim Ribbing
Row 1: Attach yarn at bottom edge of hanging ribbing, sl st 10 up side of ribbing to bottom edge of hat, sl st into side of last body of hat row.
Row 2: Turn, sl st in bk lp of 2nd st from hook and each st across. (10 sl st)
Row 3: Ch 1, turn, sl st in bk lp of 2nd st from hook and each st across, sl st in next row of hat.
Repeat rows 2-3 until end of hat body. Fasten off.
Finishing
Attach buttons on opposite side from buttonholes. Gather top of hat by weaving yarn in and out of top edge of hat, not including the buttonhole ribbing. Pull tightly to close into a circle. Weave in all yarn ends securely. 
love this hat 🙂