


There are many ways in which crochet is different than knitting. For instance, crochet stitches can be short, tall or textured, and they can wrap around and go in many different directions. The look of crochet stitches are noticeable different from knitting stitches, but there is one traditional knitting technique that can be made in crochet, but it doesn’t get much attention at all: Fair Isle crochet.
Fair Isle is a method of changing colors in your work in order to create patterns or make pictures with your yarn. One stitch represents one pixel of color. Fair isle is similar to the more familiar tapestry crochet in the way that the colors are changed. In tapestry crochet, the stitches are worked around unused strands of color, but in Fair Isle crochet, the unused strands are held behind the work. By doing this, the finished piece of crochet has more stretch than a tapestry piece and is less stiff.
The following photo tutorial demonstrates working Fair Isle in the round with single crochet stitches worked only through the back loop. By working through the back loop and not both loops, the diagonal tendency of circular crochet is minimized. If you’re still confused by Fair Isle crochet, there’s a video tutorial at the very end of this tutorial that should clear things up for you.
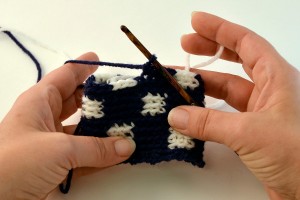
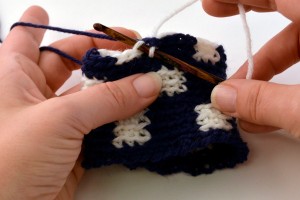
- Here is a piece of Fair Isle crochet in progress. There is one more navy single crochet (sc) to be worked before the next white sc. Notice that the navy color is held in the left hand while the white color is held in the right hand. It is also possible to hold both strands in the left hand, or to simply hold only the color that is being used. While it takes some getting used to holding a color in each hand, I find it is the most efficient way to do Fair Isle crochet.
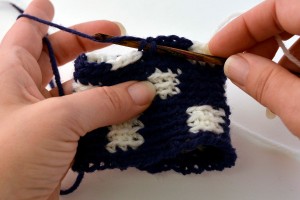
- To complete the last navy sc before the white section begins, complete the first half of this sc with navy. Insert the hook into the back loop of the stitch, yarn over, and pull through.
- Then, to complete this navy stitch, yarn over with white. Notice that the white yarn over is done by bringing the yarn around and over the top of the hook, which is opposite of the usual way of yarning over. It is easier to pull the yarn through the stitch from this direction when holding with the right hand.
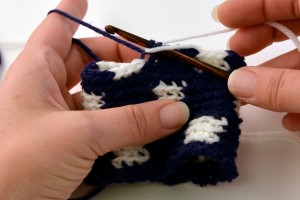
- The navy stitch is completed. Even though the last step of the navy sc was done using white, the post of the stitch and the top loops are navy.
- Continue working the white section with white only. On the last white stitch, the last half of the stitch will be completed with navy.
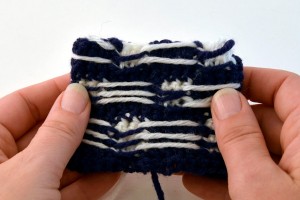
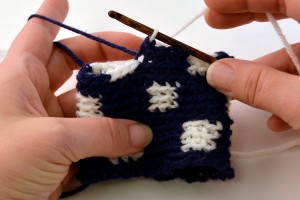
- This is what the inside of the piece looks like. Those long white strands are “floats” of unused color. They run the length of sections where navy was used but white was not. It is very important to make sure floats do not pull too tightly across the back of the work, nor should they be overly loose either.
Another note – when joining the end of a round, complete the stitch in the color of the sc, but join to the beginning of the round with the color that will be the first stitch of that next round.
Fair Isle crochet is a method that, once learned, can become fun and addictive! With practice, you can learn to make patterned sweaters (like the Ski Lodge Pullover on the next page), holiday ornaments, stockings, blankets and more!
Fair Isle in crochet is done in the round, not rows and only done on projects that have one side showing. You wouldn’t use Fair Isle on a baby blanket. That’s why there is no turning shown. Fair Isle in knitting is very different. For a project with two sides you would use intarsia or tapestry crochet.
I have never heard of this stitch..something new for me. Thanks
I love the look, and I understand the floaters. However, I don’t know what to do at the end of the row. Do we turn the project? But there would be floaters on both sides. Then, how do we not turn our work?
Why don’t you carry the other color along the back and work over it , as long as there are only two colors?
One of the things that would be helpful would be to show how to turn or not turn for the next row. How are the yarns carried up through out all the rows?
Hello Patricia! We’ve reached out to the designer for advice and she or I will reply as soon as possible. Thanks! – Nicola
Hi Barbara,
As one who’s knitted Fair Isle for years I agree, you’re right, it is quite “messy” on the reverse side. I’ve seen FI used on blankets, but only when they’ve been “reversible,” oftentimes with fleece on the reverse side. I’ve seen FI most successfully used on items tha have a natural inside like socks, stockings and hats, for all sizes and types. I hope this useful.
~~~c
I don’t get that part, either, Pat. The back of your project will look awful. Okay for hats, but not a baby blanket.
Right. To do this on a baby blanket, you would need to sew (or crochet) a backer on it. I did one once and added a piece of flannel on the back and it worked out well.
Never thought of it having a name. Just change color. Thank you.
Why didn’t she connect the yellow and blue yarn when she started??
I liked the video as I never knew how to change colors easily. However, do you just leave those floats? I still a little confused. Thx for reading my comment.