

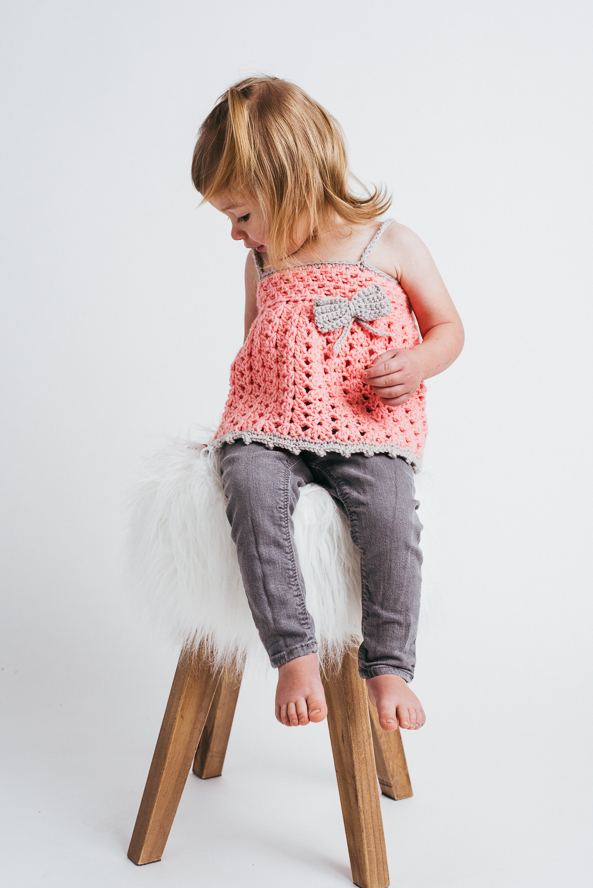
Mia is a versatile design that can be worn with a pair of shorts, jeans or a skirt. The shoulder strap is adjustable and has a tie at the back. Complete with a button closure, this piece is easy to wear and fun to make.
Skill Level: Easy
Size: 3 (6, 12, 18, 24) months, Finished Bust Size 17.5 (18.5, 19.5, 20.5, 22.5)” to fit bust 16 (17, 18, 19, 21)”
1.5” positive ease recommended.
Shown in size 6 months. Model is a tiny 1 year old.
Gauge: 7 hdc cl = 4”, 4 shells and 8 rows = 4.5”
Materials
 Yarn: Loops and Threads Snuggly Wuggly (100% Acrylic; 446 yards [408 meters]/141 grams):
#01419 Cotton Candy (MC, 1 (1, 1, 1, 2) balls), #01047 Soft Grey (CC, 1 (1, 1, 1, 1) balls)
Hook: US size 4.5mm
Notions: Markers, tapestry needle, one 0.25” button for back closure
Abbreviations
hdc cl: half double crochet cluster
scbl: single crochet back loop only
Special Stitches
Shell: (2 dc, ch 1, 2 dc) in same st.
Pattern Notes
The bodice is first worked as a long rectangle with button closure and then joined at the base. The skirt part is then worked in the round around the base of the bodice.
Pattern
Bodice
With MC, ch 59 (63, 67, 71, 77).
Row 1: Hdc in 3rd ch from hook (ch 2 counts as first hdc), *sk next ch, 2 hdc in next; rep from * to end, turn. (19 (21, 22, 24, 26) hdc cl)
Row 2: Ch 2 (counts as first hdc), sk next hdc, *2 hdc in next sp between hdc cl; rep from * across, sk next hdc, hdc in top of beg ch-2, turn. (18 (20, 21, 24, 25) hdc cl with 1 hdc on either end)
Row 3: Ch 2 (counts as first hdc), 1 hdc in the space between first hdc and hdc cl, *2 hdc in next sp between hdc cl; rep from * across until 1 sp rem, hdc in last sp, hdc in top of beg ch-2, turn. (19 (21, 22, 24, 26) hdc cl)
Rep Row 2-3 until there are 5 (6, 7, 8, 8) rows total.
Do not fasten off. Continue to work button band as given below.
Button Band
Note: The button band and the buttonhole bands are worked across row ends to form the back closure.
Row 1: Working along the shorter side of the rectangle, ch 1 (do not counted as st), 8 (9, 11, 12, 12) sc across, turn. (8 (9, 11, 12, 12) sc)
Rows 2-4: Ch 1, sc in each st across, turn. (8 (9, 11, 12, 12) sc)
Fasten off.
Buttonhole Band
Row 1: Sl st to corner of the opposite side of the rectangle near the last row of Bodice and not the foundation ch side, ch 1 (do not counted as a st here and throughout), 8 (9, 11, 12, 12) sc across, turn. (8 (9, 11, 12, 12) sc)
Row 2: Ch 1, sc in each st across, turn. (8 (9, 11, 12, 12) sc)
Row 3 (Buttonhole Row): Ch 1, sc in each st across to last 2 sts, ch 1, sk next st, sc in last st, turn. (7 (8, 10, 11, 11) sc, 1 ch-1)
Row 4: Ch 1, sc in first st, sc in next ch-1 sp, sc in each st across to end. (8 (9, 11, 12, 12) sc)
Do not fasten off.
Skirt
Notes: The shorter sides of the bodice are joined at the base of the Buttonhole Band, and then the Skirt is worked directly onto the Bodice and worked in rounds. There will be 2 less sc on the last row of the Bodice now as 2 sts will be concealed by the bands.
Rnd 1: Overlap Buttonhole Band over Button Band, ch 1 (do not counted as st), 2 sc in each st all around to back near Buttonhole Band, working through Buttonhole Band and Button Band underneath, work 3 (5, 7, 4, 7) sc across the base of bands to join them, sl st to first sc, do not turn, ending with 115 (125, 135, 140, 155) sc.
Rnd 2: Sl st to next st, (ch 3, dc, ch 1, 2 dc) in same st, sk 4 sts, *shell in next st, sk 4 sts; rep from * to end, sl st to top of beg ch-3, do not turn. (23 (25, 27, 28, 31) shells)
Rnd 3: Sl st in next dc and next ch-1 sp, (ch 3, dc, ch 1, 2 dc) in the same ch-1 sp, *shell in next ch-1 sp; rep from * across to end, sl st to top of beg ch-3, do not turn.
Rep Rnd 3 there are 10 (10, 11, 11, 12) shell rows, join CC and fasten off the MC.
Bottom Picot Edging
Note: The edging is worked over a multiple of 4 sts.
Row 1: With CC, ch 1 (do not counted as st), sc in each st and ch-1 sp across to end, while adding 1 (3, 1, 0 1) increases randomly, sl st to the first st, do not turn. (116 (128, 136, 140, 156) sc)
Row 2: Ch 1 (do not counted as st), sc in first 2 sts, *ch 3, sl st to the 3rd ch, sc in next 4 sts; rep from * to last 2 sts, sc in last 2 sts, sl st to first sc. (116 (128, 136, 140, 156) sc)
Fasten off.
Bodice Top Edging and Shoulder Straps
Note: The straps are worked while making the top edging. The straps are attached at the front and tied at the back to make them adjustable. Mark the 2 chains for the strap at the front of the bodice 4.5 (5, 5.5, 6, 6)” apart.
Row 1: With CC, sl st at the top corner of Buttonhole Band, work 4 sc across the top of Band, sc at the base of each hdc cl and each ch-sp across to first marker, ch 77 (79, 81, 83, 85) for the first strap, sl st to 4th ch from hook, first petal made, *ch 4, sl st to 4th ch from hook; rep from * twice more, sl st to the base of first petal to complete tiny flower, sl st in each ch across to end, sl st in the same ch-sp where the strap started, sc at the base of each hdc cl and each ch-sp across to next marker, ch 77 (79, 81, 83, 85) and repeat the steps for the first strap to make your second one, continue working 1 sc at the base of each hdc cl and each ch-sp to end, 4 sc across base of the button band.
Fasten off.
Bow
With CC, ch 14 (15, 15, 16, 16).
Row 1: Sc in 2nd ch from hook and each ch across to end, turn. (13 (14, 14, 15, 15) sc)
Row 2-7: Ch (does not counted as st), scbl in first st and each st across to end, turn.
Fasten off.
Use a small strand of CC, pinch the bow in the middle and tie, trim the excess off.
Ch 28 and fasten off.
Use the long chain and knot it around the middle of the bow.
Finishing
Weave in the tails.
Sew on the button for the back closure.
Pull the straps through the gaps between hdc cl at the back of Dress and tie them in a bow.