

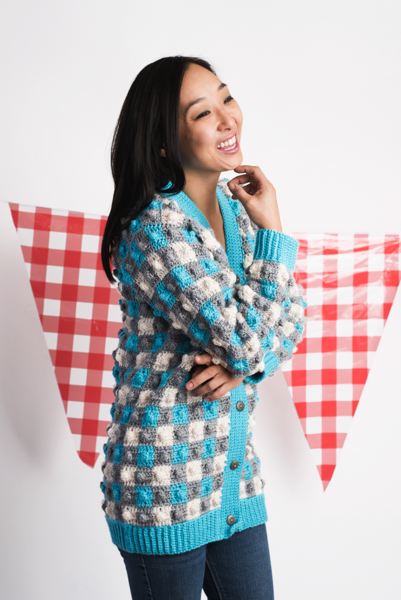
A classic style button down cardigan features a popcorn stitch in the center of each gingham square. This pattern is available for sizes Small – 2X and can be customized to any number of colors.
Skill Level: Intermediate
Size: Small (Medium, Large, XL, 2X); Finished Bust Size 37.5 (42.5, 47.5, 52.5, 57.5)” to fit bust 33 (38, 43, 48, 53)”
4.5” ease recommended.
Shown in size Small (37.5”)”
Gauge: 16 sts and 9 rows = 4” in pattern.
Materials
 Yarn: Red Heart Soft (100% Acrylic; 256 yards [234 meters]/141 grams): #2515 Turquoise (A, 3 (3, 4, 4, 5) balls), #9440 Light Gray Heather (B, 5 (6, 7, 8, 9) balls), #4601 Off White (C, 2 (3, 3, 4, 4) balls)
Hook: US size F/5 (3.75 mm)
Notions: Tapestry needle, stitch markers, five ¾” buttons, sewing thread, sewing needle
Special Stitches
Popcorn Stitch (PC)
Work 5 dc in next st, drop lp from hook, insert hook from front to back through top of first st made, place dropped lp on hook and pull through st, ch 1.
Reverse popcorn (RPC)
Work 5 dc in dc, drop lp from hook, insert hook from back to front through top of first st made, place dropped lp on hook and pull through st, ch 1.
Standing Double Crochet (Standing dc)
Yo, insert hook in next st, (yo, draw yarn through st, yo, draw yarn through 2 lps on hook) twice.
Pattern Notes
For every other row of popcorn stitches, work reverse popcorns so that all the popcorns stitches face the right side. On RS rows, work popcorns and on WS rows work reverse popcorns.
All pieces start with the ribbing and are worked up toward the neck edge.
On sleeves, use a standing dc instead of ch 3 to start rows where the change occurs in the first stitch of the new row.
Always carry unused across on wrong side until it is no longer needed.
Each box is made up of one group of 5 sts across and 3 rows deep.
Pattern
Back
Ribbing
With A, ch 12.
Row 1: Sc in 3rd ch from hook and in each ch across, turn. (11 sc)
Row 2: Ch 1, sc in BL of each st across, turn.
Rep Row 2 until Ribbing meas 18 (20.5, 23, 25.5, 28)” from beg, unstretched. Do not fasten off. Do not turn.
Body
Foundation Row: Ch 1, work 75 (85, 95, 105, 115) sc evenly spaced across long edge of ribbing.
Fasten off A.
Row 1 (RS): With RS facing, join B (C, B, C, B) with sl st in first st, ch 3 (counts as dc here and throughout), dc in each of next 4 sts, *complete last dc with C (B, C, B, C), drop current color to WS to be picked up later, with C (B, C, B, C) dc in each of next 5 sts, complete last dc with B (C, B, C, B), drop current color, dc in each of next 5 sts; rep from * across, turn. Row will start and end with the same color. First row of Back Chart complete. (15 (17, 19, 21, 23) boxes; 75 (85, 90, 95, 105, 115) sts)
Rows 2-36 (36, 39, 42, 42): Work in dc, PC, and RPC sts changing colors as indicated, following Back Chart to armhole. Fasten off all colors at end of last row. (55 (65, 70, 95, 85, 95) sts)
Row 37 (37, 40, 43, 43): Sk first 10 sts, join B (C, A, C, B) in next st, ch 3 (counts as dc), work following Back Chart across to last 10 sts, turn, leaving rem sts unworked.
Row 38-54 (38-57, 41-60, 43-63, 43-66): Work even following Back Chart.
Fasten off all colors at end of last row.
Right Front
Ribbing
With A, ch 12.
Row 1: Sc in 3rd ch from hook and in each ch across, turn. (11 sc)
Row 2: Ch 1, sc in BL of each st across, turn.
Rep Row 2 until Ribbing meas 8.75 (9.25, 10.5, 11.75, 13)” from beg, unstretched. Do not fasten off. Do not turn.
Foundation Row: Ch 1, work 35 (40, 45, 50, 55) sc evenly spaced across long edge of ribbing.
Fasten off A.
Row 1 (RS): With RS facing, join C with a sl st in first st, ch 3 (counts as dc), dc in next 4 sts, change to B, *with B, dc in next 5 sts, change to C, with C, dc in next 5 sts; rep from * across, ending with C (B, C, B, C), turn. First row of Right Front Chart is complete. (35 (40, 45, 50, 55) sts)
Rows 2-54 (57, 60, 66, 66): Work in dc, PC, and RPC sts changing colors as indicated, following Right Front Chart. (25 [30, 35, 40, 45] sts)
Fasten off all colors at end of last row.
Left Front
Work same as Right Front throughout Foundation Row.
Row 1 (RS): With RS facing, join C (B, C, B, C) in first st, ch 3 (counts as dc), dc in next 4 sts, change to B (C, B, C, B), *with B (C, B, C, B), dc in next 5 sts, change to C (B, C, B, C), with C (B, C, B, C), dc in next 4 sts; rep from * across, ending with C, turn. (35 (40, 45, 50, 55) sts)
Rows 2-54 (57, 60, 66, 66): Work in dc, PC, and RPC sts changing colors as indicated, following Left Front Chart. (25 (30, 35, 40, 45) sts)
Fasten off all colors at end of last row.
Buttonhole Band
With RS facing, join A at bottom edge of Right Front Ribbing, ch 1, sc in each st across Ribbing, work 2 sc in each row-end dc row across Right Front to Back, sc in each st across Back neck edge, work 2 sc in each row-end dc across Left Front edge, sc in each st across Ribbing, turn.
Rows 2-4: Ch 1, sc in each sc across, turn.
Place stitch markers for buttonhole placement on right-hand side of Button Band.
Place a marker for bottom button 1” from lower edge, and one for top button 1” from beg of V neck shaping. Place 3 more markers evenly spaced between the top and bottom markers.
Row 5: Ch 1, *sc in each st across to first marker, ch 2, sk next 2 sc; rep from * across to last marker, sc in each st across to bottom Left Front corner, turn.
Row 6: Ch 1, sc in each sc across, working 2 sc in each ch-2 sp, turn.
Rows 7-8: Ch 1, sc in each sc across, turn.
Fasten off.
Sew buttons to Left Front opposite buttonholes.
Right Sleeve
Ribbing: With A, ch 12, sc in 3rd ch from hook and in each rem ch across, turn. (11 sc)
Row 2: Ch 1, sc in BL of each st across, turn.
Rep Row 2 until Ribbing meas 9 (9, 10.5, 11.5, 11.5)” from beg, unstretched. Do not fasten off. Do not turn.
Foundation Row: Ch 1, work 40 (40, 44, 50, 50) sc evenly spaced across long edge of ribbing.
Fasten off A.
Row 1 (RS): With RS facing, join C (A, C, A, A) in first st, ch 3 (counts as dc), dc in next 4 sts, change to B, *with B dc in next 5 sts, change to C (A, C, A, A), with C (A, C, A, A) dc in next 4 sts; rep from * across, ending with B, turn. (40 (40, 44, 50, 50) sts)
Rows 2-36 (39, 42, 42, 45): Work in dc, PC, and RPC sts following Right Sleeve Chart, changing colors as indicated and increasing 1 dc at each end of next row and every other row thereafter until 60 (70, 70, 80, 80) sts are on work. Then work even for 16 (9, 16, 12, 15) rows following Chart.
Fasten off all colors at end of last row.
Left Sleeve
Work same as Right Sleeve through Foundation Row.
Row 1 (RS): With RS facing, join B in first st, ch 3 (counts as dc), dc in next 4 sts, change to C (A, C, A, A), *with C (A, C, A, A), dc in next 5 sts, change to B, with B, dc in next 4 sts; rep from * across, ending with C (A, C, A, A), turn. (40 (40, 44, 50, 50) sts)
Rows 2-36 (39, 42, 42, 45): Work in dc, PC, and RPC sts following Left Sleeve Chart, changing colors as indicated and increasing 1 dc at each end of next row and every other row thereafter until 60 (70, 70, 80, 80) sts are on work. Then work even for 16 (9, 16, 12, 15) rows following Chart. Fasten off all colors at end of last row.
Finishing
Easing in fullness, matching blocks to adjacent blocks on Fronts and Back, sew top edge of Sleeves into armhole.
Sew top 2 blocks on side edges of Sleeves to 10 skipped sts at underarm on Fronts and Back.
Sew Sleeve seams
Weave in all ends.
Good Morning from Australia, have just been looking at the lovely pattern for the classics check cardigan, that dropped into my email this morning,mis there any chance of seeing a picture of the inside of the cardigan please, I would like to know before I start that I am doing it correctly. Thankyou. Sonia
Hello Sonia! It does not look like we photographed the inside of this sample during our photo shoot. – Nicola, Editor
In the Download for the Classic Checks Cardigan Charts April 18 issue the Chart has 2 right sleeves for the 2X size. Is there a place I can get the left sleeve or a way to use the chart from another size for that sleeve?
Thanks for a great magazine.
Deborah
We’re reached out to the designer to assist.
I found it, thanks.
Where is a picture of this cardigan?