

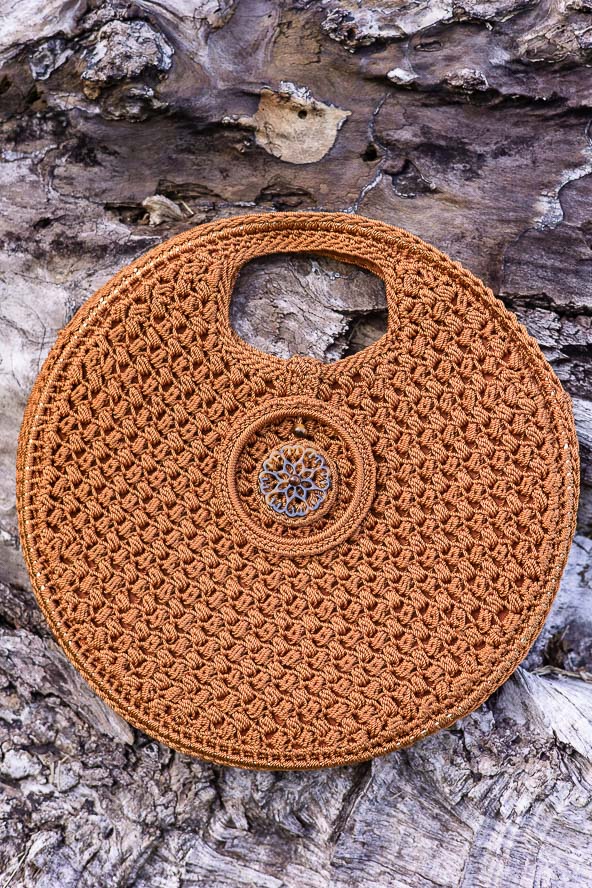
A tortoise shell mandala and tiger eye beads accent this unique round bag with cleverly stitched handle opening. This is a polished crochet bag that will elevate any fall outfit.
Time: Weekend Project
Skill Level: Intermediate
Size: 12.5” diameter
Gauge: 8 (bean st, ch 1) sts and 14 rows = 4” [10 cm]
Materials
 Yarn: Omega La Espiga size 18 nylon cord (7 oz/197 yds/200g per roll):
3 rolls #41 goldenrod from www.creativeyarnsource.com
Hook/Needles: Size F/5/3.75 mm crochet hook
Notions:
12” (#R12M) round brass ring, 2
3” (#R3M) round brass ring, 1
1.5” (#R05M) round brass ring, 1
Brass rings from www.pepperell.com
TOY002 Copper Kettle #0660 acrylic felt, 0.5 yd from www.nationalnonwovens.com
#62693 Zola Elements Tortoise shell acetate floral openwork mandala focal 40mm, 1
#49252 Tiger eye round (large hole) 8mm beads, 1
#49261 Tiger eye round (large hole) 6mm beads, 1
Zola element and beads from www.limabeads.com
# 12 wt. cotton thread: 1 spool #713-1056 Med.Tawny Tan from www.sulky.com
Scissors, tapestry needle, 12 safety pins, air-soluble marking pen, hand sewing needle, dental floss threader
Special Stitches
Bean stitch (bean st): Insert hook in indicated st, yo, pull up lp, [yo, insert hook in same st, yo, pull up lp] twice, yo, draw through all 6 lps on hook.
Bean stitch decrease (bean st dec): Insert hook in indicated st, yo, pull up lp, yo, insert hook in same st, yo, pull up lp, yo, insert hook in next st or ch-1 as indicated, yo, pull up lp, yo, draw through all 6 lps on hook.
Slip stitch join (sl st join): With lp on hook, insert hook in indicated stitch, yo, pull lp through st and lp on hook.
Single crochet join (sc join): With lp on hook, insert hook in indicated stitch or place, yo, pull up lp, yo, draw through both lps on hook.
Pattern Notes Chain-1 at beginning of rows or between stitches does not count as a stitch or space unless otherwise stated.
Weave in ends as work progresses.
Pattern
Lining
Make 2
Use marking pen to trace inside edge of ring onto felt and cut out. Set aside.
Front/Back
Make 2
Beg at bottom, ch 16,
Row 1: Bean st (see Special Stitches) in 2nd ch from hook, ch 1 (see Pattern notes), [sk next ch, bean st in next ch, ch 1] across, turn. (8 bean sts)
Row 2 (RS): Ch 1, bean st in last ch-1 made of prev row, ch 1, [bean st in next bean st, ch 1] across to last st, bean st in ch-1 to left of last bean st, ch 1, turn. (9 bean sts)
Rows 3-14: Rep row 2. (21 bean sts)
Rows 15-25: Ch 1, bean st in first bean st, ch 1, [bean st in next bean st, ch 1] across to last bean st, bean st in ch-1 to left of last bean st, ch 1, turn.
Row 26: Ch 1, bean st dec (see Special Stitches) over first 2 sts, ch 1, [bean st in next st, ch 1] across to last 2 bean sts, bean st dec over next bean st and in ch-1 to left of last bean st, ch 1, turn. (19 bean sts)
Rows 27-28: Rep row 15.
Handle first side edge
Row 29: Beg at outer edge, ch 1, bean st dec over first 2 sts, ch 1, [bean st in next bean st, ch 1] 3 times, turn. (4 bean sts)
Row 30: Rep row 15.
Row 31: Bean st dec over first 2 sts, ch 1, [bean st in next st, ch 1] twice, turn. (3 bean sts)
Row 32: Rep row 15.
Row 33: Ch 1, bean st dec over first 2 sts, ch 1, bean st in ch-1 to left of last bean st, ch 1. Fasten off. (2 bean sts)
Handle second side edge
Row 29: Sk next 9 sts of row 28, sl st join (see Special Stitches) in next bean st, ch 1, bean st in same st, ch 1, [bean st in next st, ch 1] twice, bean st dec over next bean st and in ch-1 to left of last bean st, ch 1 turn. (4 bean sts)
Row 30: Rep row 15.
Row 31: Ch 1, bean st in first bean st, ch 1, bean st in next st, ch 1, bean st dec over next bean st and in ch-1 to left of last bean st, ch 1, turn. (3 bean sts)
Row 32: Rep row 15.
Rnd 33: Ch 1, bean st in first st, ch 1, bean st dec over next bean st and in ch-1 to left of last bean st, ch 1, turn. (2 bean sts)
Row 34: Ch 1, bean st dec over first st and ch-1, ch 15, bean st dec over next st and ch-1 on Handle first side edge, ch 1, do not turn. (2 bean sts)
Border
Rnd 1 (RS): Working in ends of rows along left side, work 46 sc evenly sp increasing where necessary to bottom edge, place a maker in first sc made to mark beg of rnd, working in opposite side of foundation ch, sc in ch at base of first bean st, [sc in next sk ch, sc in ch at base of next bean st] 7 times, working in ends of rows along right side, work 46 sc evenly spaced increasing to where necessary to beg of row 34, sc in beg ch-1, sc in first bean st, sc in each of next 15 chs, sc in next bean st of Handle first side edge row 33, sc in next ch-1 to left of same bean st, join in marked sc. Fasten off. Place a safety pin in back lp of center sc of bottom edge and in 42nd sc on each side of center pin to mark gusset end placement. (126 sc)
Handle Opening
Rnd 1: With RS facing, inserting hook between sk bean sts of row 28, sc join (see Special Stitches) between last worked bean st and first sk bean st, sc in same place, [2 sc bet next 2 bean sts] 8 times, working in ends of rows along left side of handle opening, work 6 sc evenly spaced to row 35, working in opposite side of foundation ch, sc in each ch across, working in ends of rows along right side of handle opening, work 6 sc evenly spaced to row 28, join in back lp of beg sc. (45 sc)
Rnd 2: Ch 1, sl st in same st, sl st in each st around, join in first sl st. Fasten off. (45 sl sts)
Finishing
Rnd 1: With Front RS facing, [insert tip of safety pin through Border and around 12” ring, close pin] 12 times evenly spaced to pin Front to ring, using 2 strands and working in front lps of Border sts and over ring sc join in any st, sc in each st around securing panel to ring, join in first sc. Fasten off. Note: Do not rem center and gusset placement pins from back lps. (126 sc)
Gusset
Make 1
Ch 15,
Row 1 (RS): Working in back bar of chs, sc in 2nd ch from hook, sc in each ch across, turn. (14 sc)
Rows 2-108: Ch 1, sc in each st across, turn.
Row 109: Rep row 2, do not turn at end of row.
Side Edging
Row 1: Working in ends of rows, work 85 sl sts evenly spaced to Row 1. Fasten off. (85 sl sts)
Row 2: Working in ends of rows along opposite long edge, with RS facing, sc join in Row 1, work 85 sl sts evenly spaced to Row 109. Fasten off. (85 sl sts)
Ring Accent
Make 1
Rnd 1: Inserting hook through 3” ring and completing sts over ring, sc join in ring, work 74 sc evenly spaced around to cover ring, do not join. (75 sc)
Rnd 2: Sl st in first st and in each st around, join. Fasten off. (75 sl sts)
Mandala Base
Make 1
Rnd 1: Make a magic ring, ch 1, 12 sc in ring, do not join. (12 sc)
Rnd 2: With 1.5” ring behind last rnd, working in sts and over ring, 2 sc in first st, 2 sc in each st around, do not join. (24 sc)
Rnd 3: Sl st in first st and in each st around. Fasten off. (24 sl sts)
Tab
Make 1
Ch 7,
Row 1: Working in back bar of chs, sc in 2nd ch and in each ch across, turn. (6 sc)
Row 2: Ch 1, sc in each st across. Fasten off.
Assembly
- With Front RS facing, fold 1/8” of Tab over center bottom edge of handle opening and sew in place with needle and thread on WS. Sew opposite end of Tab to RS of Front.
- Divide an 18-inch length of yarn into 3 plies. Beg on WS of Mandala base with dental floss threader and one ply, insert threader up through center of Base, through center opening of mandala element and 6mm bead, thread back through center of mandala element and base to WS, knot ends tightly to secure. Using chenille needle and 2nd ply, beg on WS of Mandala Base, weave needle through base to outer sl st edge, insert needle through 8mm bead and through inside top edge of Ring Accent and from front to back through Tab edge to WS of Front, knot tightly to secure. Use sewing thread and hand sewing needle to tack Ring Accent and Mandala Base to Front where desired.
- Lay completed Front RS up on felt lining and use marking pen to trace around handle opening. Use scissors to cut felt approximately 1/4” larger than traced line. Use safety pins to pin lining piece to WS of Front. Use hand sewing needle and matching thread to sew outer edges of lining along unworked back lps of Front Finishing Rnd and lining handle opening to WS of handle rnds. Rep for Back.
- With Front and one long edge of gusset WS together, having center pins matching and gusset ends matching pins on each side edge, working with one strand yarn in both lps of Front and front lp of gusset, with Front RS facing, sl st join in first pinned st on left side, sl st in each st around ending in pin on right side edge. Fasten off. Rep to add Back to rem long edge of gusset in same manner.
Are there any corrections on this pattern? Has anyone actually made this handbag? I’m out $80 in materials/supplies for this, too late to return them, and have ended up with a small lopsided pear-shaped thingy. Any tips or helps would be greatly appreciated. Thank you.
Hello Christine! I’ve reached out to the designer for advice and she or I will reply as soon as possible. Thanks! – Nicola, Editor
Hi Christine! From the designer: Have you done a gauge swatch to see if you are stitching the correct gauge for this pattern?
If you are having difficulty stretching and pinning the front and back panels to the 12″ brass rings, then perhaps her gauge was too tight. You can try using a larger hook size to create front and back panels that will more easily stretch to the size needed.
Hope this helps! – Nicola, Editor
I haven’t received all the materials yet, so I have yet to begin this stunning pattern. However I wanted to mention that providing the SKU numbers along with the company name made ordering these supplies so simple. The website for the felt was somewhat difficult to navigate so had to buy the felt elsewhere. I am anxious to start & want to thank you so very much for this – and all the other lovely patterns – on this site. This one in particular is just lovely & I am hoping to make it in many colors.
Refreshing!! What an inspired piece. It wasn’t what I was expecting when I clicked on the pattern. I’m gonna have to find me some rings…. LOL
This is one of the few crochet bag designs that I love. Will Definitely be making this.
This is one of the most gorgeous purses I’ve ever seen. I have to make it – Immediately!! Thanks for giving us the pattern here – for free. So generous of you. Many Blessings!!