

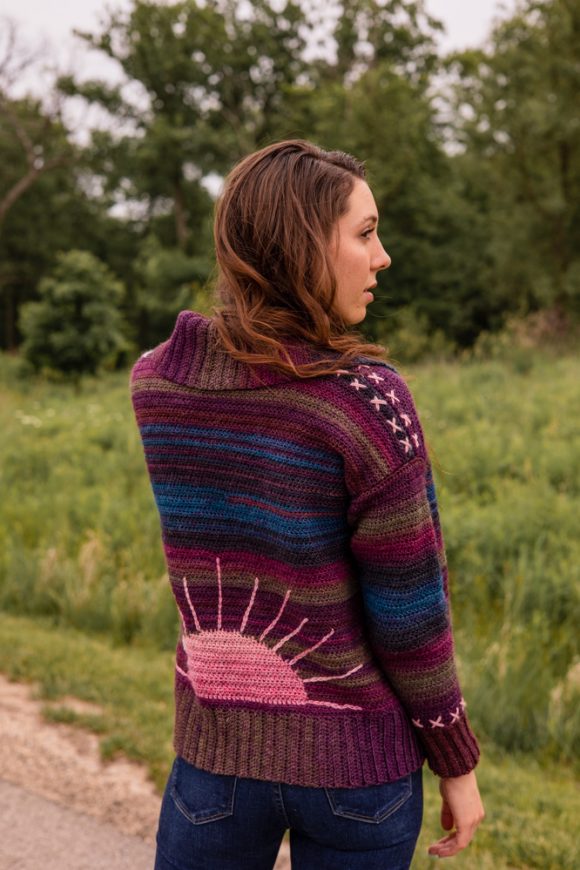
Alpenglow is a shawl-collar, open-front cardigan with a sunset motif and decorative embroidery detail. The embroidery is a simple, free-style embellishment that adds a bohemian flair to this piece. The name “Alpenglow” means “the rosy light of the setting or rising sun on high mountains” in German.
Time: 25-30 hrs
Skill Level: Adventurous Beginner
Size: 36 (40, 44, 48, 52, 56, 60)” finished garment chest circumference, intended
with 2-4” of positive ease.
Gauge: 18 hdc x 12 rows = 4 x 4”
Materials
 Yarn: Universal Yarn Colorburst (65% Superwash Merino Wool, 35% Acrylic, 660 yards, [600 meters]/ 200 grams), DK weight. MC – Bursa (119) 2 (2, 3, 3, 3, 3, 3) balls, CC – small amount of contrasting color yarn, approximately 10-15 grams for the Sun motif and embroidery detail. Sample made with Colorburst Romance (112.)
Hook: 3.5 mm (US size E)
Notions: tapestry needle, tape measure, scissors.
Downloads:
Special Stitches
Surface Slip Stitch – with yarn at the Back, insert hook from Front to Back, *draw yarn to Front and through loop on hook; insert hook into next stitch; repeat from * indicated number of stitches.
Pattern Notes
To maximize the color changes in the Colorburst yarn when working the lower body, begin by matching the colors from 2 balls of MC yarn, alternating between them on every other row. This will create a longer color transition in the lower body of the cardigan. After separating for Fronts and Back, continue to work with a single ball of yarn for each section. Work sleeves with a single ball of yarn, starting at a similar place in the color sequence. Cardigan is worked bottom up, in one piece to the underarm. Sunset motif is incorporated onto the Back using an Intarsia or Tapestry Crochet technique. The rest of the cardigan is worked in pieces and sewn together. After adding the shawl collar, embroidery is used around the cuffs and shoulder seams, and Sun rays made with Surface Slip Stitch technique.
Pattern
Ribbing
With MC and 3.5 mm hook ch 20.
Row 1 (RS): hdc into 3rd ch from the hook, and every ch across, turn. (18 hdc)
Row 2 (WS): ch 2, hdc in back loop of every hdc across, turn.
Rep Row 1 & 2 until ribbing measures 32 (36, 40, 44, 48, 52, 56)” long.
Body
Measure 7 (8, 9, 10, 11, 12, 13)” from each end of ribbing and pm to mark two Fronts and Back. Begin working the body in hdc, working the Sunset Motif across the Back following Diagram as follows:
Set-up Row 1 (RS): Ch 2, 35 (40, 45, 50, 55, 60, 65) hdc across the top of the ribbing to m, 80 (90, 100, 110, 120, 130, 140) hdc across the top of the ribbing to m, 35 (40, 45, 50, 55, 60, 65) hdc across the top of the ribbing to end. (150 (170, 190, 210, 230, 250, 270) hdc)
Set-up Row 2 (WS): Ch 2, hdc in each hdc across.
Row 1 (RS): Ch 2, hdc in each first 55 (65, 75, 85, 95, 105, 115) hdc, work Sunset Motif Chart across next 40 hdc, hdc in each next 55 (65, 75, 85, 95, 105, 115) hdc.
Continue to work in hdc as established, working the Sunset Motif Chart across 40 center-back hdc, until piece measures 16 (16, 16.5, 16.5, 17, 17, 17.5)” from the bottom of ribbing, ending with WS row.
Divide Fronts and Back
Row 1 (RS): Ch 2, hdc in each first 35 (40, 45, 50, 55, 60, 65) hdc, turn.
Row 2 (WS): Ch 2, hdc in each hdc across.
Right Front V-neck Shaping
Row 1 (RS): Ch 2, hdc2tog, hdc in each hdc across. 1 hdc dec.
Row 2 (WS): Ch 2, hdc in each hdc across.
Rep Row 1 & 2 another 9 (9, 10, 11, 12, 13, 14) times. (25 (30, 34, 38, 42, 46, 50) hdc)
Work even in hdc until Armhole measures 7.5 (7.5, 8, 8.5, 9, 9.5, 10)” from the separation. Fasten off.
Back
With RS facing, join MC after the Right Front separation.
Row 1 (RS): Ch 2, hdc in same and each next 79 (89, 99, 109, 119, 129, 139) hdc, turn.
Row 2 (WS): Ch 2, hdc in each hdc across. (80 (90, 100, 110, 120, 130, 140) hdc)
Work flat in hdc until Back measures 6.5 (6.5, 7, 7.5, 8, 8.5, 9)” from the separation, ending with WS Row.
Right Shoulder Shaping
Next Row (RS): Ch 2, hdc in each first 27 (32, 36, 40, 44, 48, 52) hdc, turn.
Dec Row 1 (WS): Ch 2, hdc2tog, hdc in each hdc across. 1 hdc dec.
Dec Row 2 (RS): Ch 2, hdc to each hdc across to last 2 hdc, hdc2tog. 1 hdc dec. (25 (30, 34, 38, 42, 46, 50) hdc)
Work even in hdc until Armhole measures 7.5 (7.5, 8, 8.5, 9, 9.5, 10)” from the separation. Fasten off.
Left Shoulder Shaping
With RS facing, join yarn into 27th (32nd, 36th, 40th, 44th, 48th, 52nd) hdc from the Left Armhole edge.
Row 1 (RS): Ch 2, hdc in first and each hdc across. (27 (32, 36, 40, 44, 48, 52) hdc)
Dec Row 1 (WS): Ch 2, hdc in each hdc across to last 2 hdc, hdc2tog. 1 hdc dec.
Dec Row 2 (RS): Ch 2, hdc2tog, hdc in each hdc across. 1 hdc dec. (25 (30, 34, 38, 42, 46, 50) hdc)
Work even in hdc until Armhole measures 7.5 (7.5, 8, 8.5, 9, 9.5, 10)” from the separation. Fasten off.
Left Front V-neck Shaping
With RS facing, join MC after Back separation.
Row 1 (RS): Ch 2, hdc in same and each hdc across. (35 (40, 45, 50, 55, 60, 65) hdc)
Row 2 (WS): Rep Row 1.
Row 3 (RS): Ch 2, hdc in each hdc to last 2 hdc, hdc2tog. 1 hdc dec.
Rep Row 2 & 3 another 9 (9, 10, 11, 12, 13, 14) times. (25 (30, 34, 38, 42, 46, 50) hdc)
Work even in hdc until Armhole measures 7.5 (7.5, 8, 8.5, 9, 9.5, 10)” from the separation. Break yarn.
Sleeves (Make 2)
Cuff
With MC and 3.5 mm hook ch 20.
Row 1 (RS): Hdc into 3rd ch from the hook, and every ch across, turn. (18 hdc)
Row 2 (WS): Ch 2, hdc in back loop of every hdc across, turn.
Rep Row 1 & 2 until ribbing measures 7.5 (8, 8.5, 9, 9.5, 10, 10.5)”
Sleeve Body
Set-up Row: Ch 2, 34 (38, 42, 46, 48, 54, 58) hdc across the top of the ribbing.
Row 1: Ch 2, hdc in first and each hdc across.
Work in hdc flat, working an Inc Row every 3rd Row as follows:
Inc Row: Ch 2, 2 hdc in first hdc, hdc in each hdc across to last hdc, 2 hdc into last hdc. 2 hdc inc’d. (36 (40, 44, 48, 50, 56, 60) hdc.)
Rep Inc Row another 15 (15, 16, 16, 17, 17, 18) times. (66 (70, 76, 80, 84, 90, 96) hdc)
Work even in hdc until sleeve measures 17.5 (17.5, 18, 18, 18, 18.5, 18.5)” from cuff.
Assembly
Join Shoulder with RS together, sewing from the WS, using a backstitch. Fold each sleeve in half lengthwise, with RS together, and sew from WS using backstitch. Turn the sleeve inside-out, with RS facing out. Turn the garment inside-out, with WS facing. Insert sleeve into sleeve opening, with RS facing each other, aligning the sleeve seam with the underarm. Pin in place, and sew around the armhole using backstitch. Repeat for the second sleeve.
Front Ribbing
With MC and 3.5 mm hook, join yarn into the bottom corner of the Right Front ribbing. Ch 20.
Row 1 (RS): Hdc into 3rd ch from the hook, and every ch across, 3 sl sts along the edge of the Right Front, turn. (18 hdc)
Row 2 (WS): Hdc in back loop of every hdc across, turn.
Row 3 (RS): Ch 2, hdc in back loop of first and each hdc across, 3 sl sts along the edge of the Right Front, turn.
Rep Rows 2 & 3 until beginning of V-neck shaping in the Right Front, ending with Row 2 (WS).
Shawl Collar Shaping
Inc Row 1 (RS): Ch 2, 2 hdc in back loop of first dc, dc in back loop of each hdc across, 3 sl sts along the V-neck edge of the Right Front, turn. 1 hdc inc’d. (19 hdc)
Inc Row 2 (WS): 2 hdc in back loop of first hdc, hdc in back loop of each hdc across, turn. 1 hdc inc’d. (20 hdc)
Rep Inc Rows 1 & 2 another 8 times. (36 hdc)
Place marker on the Left Front V-neck edge symmetrical to the current point of the Right Front V-neck edge. Continue to work even in hdc, up the Right Front V-neck edge, across Back neck edge, and down the Left Front V-neck edge, stopping at the marker.
Dec Row 1 (RS): Ch 2, hdc2tog, hdc in back loop of each hdc across, 3 sl sts along the V-neck edge of Left Front, turn. 1 hdc dec’d. (35 hdc)
Dec Row 2 (WS): Hdc2tog, hdc in back loop of each hdc across, turn. 1 hdc dec’d. (34 hdc)
Rep Dec Rows 1 & 2 another 8 times. (18 hdc)
Work even in hdc down the Left Front edge working Front Ribbing Rows 2 & 3. Break yarn.
Finishing
Weave in the ends. To make decorative cross-stitch embroidery detail on the sleeves and along the Shoulder seams, use 2 strands of CC yarn and work in a free-hand style cross-stitch pattern. To make sun rays, use Surface Slip Stitch working in a straight line out from the sun motif, alternating between longer (12 stitches) and shorter (10 stitches) rays.
Is there a video or more pictures to help understand the pattern? I am confused about the transition from the body to the divide front and back part
Hello! I’ve reached out to the designer for advice and she or I will reply as soon as possible. Thanks! – Nicola, Editor
Hello,
To divide for Fronts and Back you will begin by working across 35 (40, 45, 50, 55, 60, 65) stitches (see pattern section Divide Fronts and Back), and turn, leaving the rest of the stitches unworked. This will be your Right Front piece. You will continue to work just on this piece, doing the neck shaping as indicated in the pattern. After completion, yarn is joined again in the previous unfinished row, to work the Back piece. And after that, the same process repeated for working the Left Front piece.
Like the colours very much! Thank you, and have a nice Sunday!
Marianne