

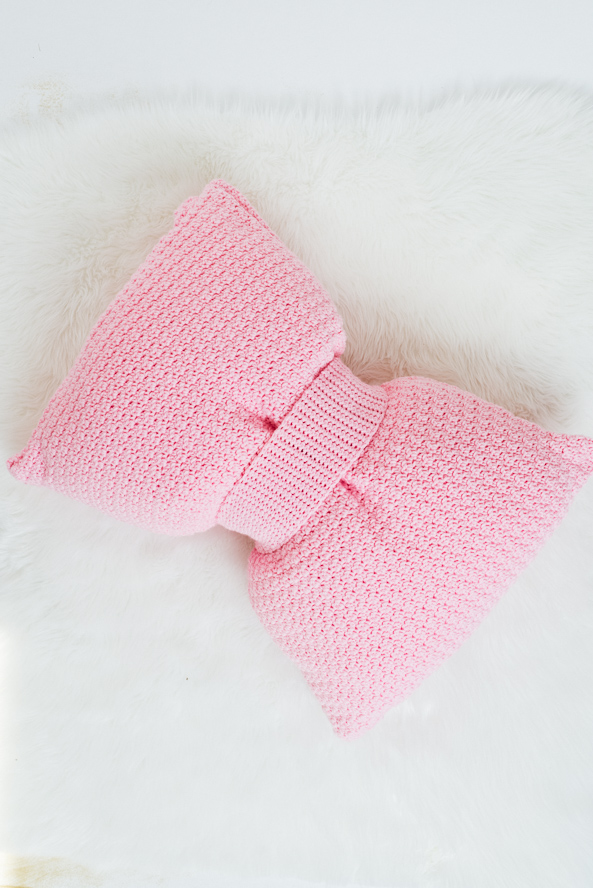
Dress up a standard pillow with this bow pillow case. The middle band cinches up the pillow and the entire case is removable for easy cleaning. It’s a big statement piece that will pretty up any bed.
Skill Level: Easy
Size: Finished Pillow Case Size (not on pillow) 19” wide x 26” long, finished pillow with case on 24” long, Bow Cinch 4.25” wide x 18” long
Gauge: 12 sts and 12 rows = 4” [10 cm] for pillow case, 16 sts and 14 rows = 4” [10 cm] for Bow Cinch, after gentle wet blocking
Materials
 Yarn: Caron One Pound (100% Acrylic; 812 yards [742 meters]/453.6 grams): 10513 Soft Pink (2 balls)
Hook: US size I/9 (5.5 mm)
Notions: One pillow form (17” wide x 28” long), tapestry needle, three 1” buttons
Special Stitches
Sc3tog fl – This stitch is worked in front loops only. (Insert hook in fl of next st and pull up a lp) 3 times (4 lps on hook), yo pull through all 4 loops. (1 sc3tog made, 2 sts dec’d)
Pattern Notes
Pillow case is made in 4 separate pieces: 2 large panels, button flap, and bow cinch.
Pattern
Large Panel (make 2)
Ch 61.
Row 1: Working in back bump of ch, sc in 2nd ch from hook, dc in next ch, *sc in next ch, dc in next ch; rep from * across. (60 sts at end of this row)
Rows 2-74: Ch 1, turn, sc in same st, dc in next st, *sc in next st, dc in next st; rep from * across, do not fasten off at end of Row 74.
Notes: Row 2 is right side. Also, you can rep Row 2 until panel is about 25” long.
Working Sides
Sc evenly down long side of panel keeping track of your stitch count, cut yarn when you get to the bottom of the panel. Attach yarn on other side of panel and work sc up the side making sure your stitch count matches other side.
End Flap
Ch 61.
Row 1: Working in back bump of ch, sc in 2nd ch from hook, dc in next ch, *sc in next ch, dc in next ch; rep from * across. (60 sts at end of this row)
Row 2 (RS): Ch 1, turn, sc in same st, work sc3tog fl, dc in next st, *sc in next st, dc in next; rep from * across to last 4 sts, work sc3tog fl, dc in last st. (4 sts dec’d, 56 sts at end of this row)
Row 3: Ch 1, turn, sc in same st, dc in next st, *sc in next st, dc in next st; rep from * across.
Rows 4-21: Rep Row 2 and 3. (20 sts at end of Row 21)
Row 22 (Buttonhole Row): Ch 1, turn, sc in same st, dc in next st, sc in next st, ch 3, sk next 3 sts, *sc in next st, dc in next st; rep from * to last 6 sts, ch 3, sk next 3 sts, dc in next st, sc in next st, dc in last st. (2 ch-3 sp, 14 sts)
Row 23: Ch 1, turn, sc in same st, dc in next st, *sc in next st, dc in next st; rep from * across working around the ch-3 sps. (20 sts at end of this row)
Row 24: Ch 1, turn, sc in same st, work sc3tog fl, *sc in next st, dc in next st; rep from * across to last 4 sts, work sc3tog fl, dc in last st. (16 sts at end of this row)
Row 25: Ch 1, turn, skipping first st, sc in each across to last 2 sts, skip next st, sc in last st. (14 sts at end of this row)
Fasten off.
Bow Cinch
Ch 17.
Row 1: Sc in 2nd ch, sc in each ch across. (16 sts at end of this row)
Rows 2-62: Ch 1, turn, sc in same st, sc in each st across.
Row 63 (Buttonhole Row): Ch 1, turn, sc in same st, sc in next 5 sts, ch 4, sk next 4 sts, sc in last 6 st. (1 ch-4 sp, 12 sts)
Row 64: Ch 1, turn, sc in same st, sc in each st across, working 4 sc around ch-4 sp. (16 sts at end of this row)
Rows 65-66: Ch 1 turn, sc in same st, sc in each st across. Fasten off at end of Row 66.
Stitching Panels Together
With RS of Large Panels touching, attach yarn at one end through both panels, sl st pieces together around, leaving opening at top, do not cut yarn.
With RS facing of End Flap, sl st across attaching flap to the bottom panel, cut yarn.
Turn pillow case right side out.
Finishing
Weave in all loose ends.
Sew buttons on back of Large Panel and on other side of Bow Cinch.
Insert pillow form in pillow case and use End Flap to button and close pillow.
Wrap Bow Cinch in middle of pillow, button in back.