

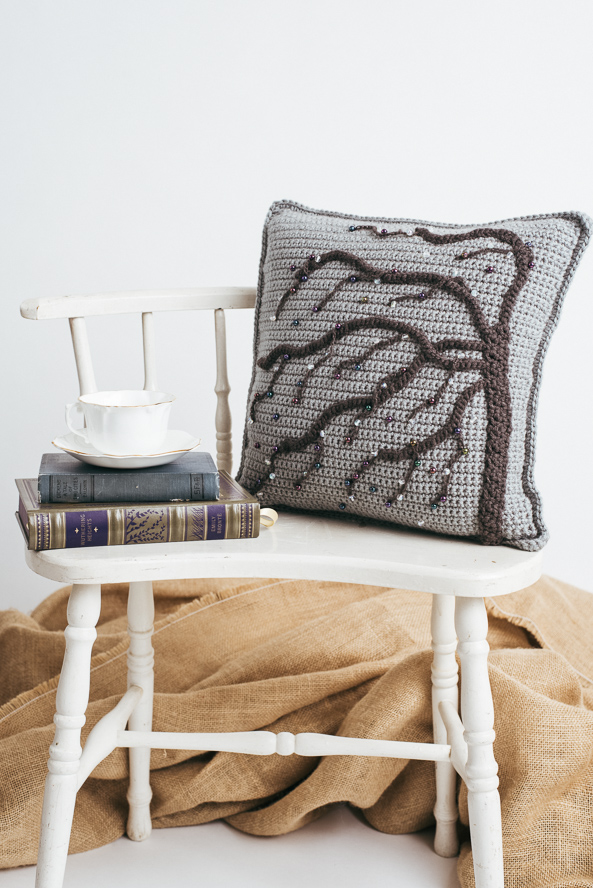
Cascading beads frost the limbs of a weathered tree to create a wintry themed pillow.
Skill Level: Easy
Size: Fits 14” x 14” pillow insert
Gauge: 16 sts and 20 rows = 4’ [10 cm] in sc using larger hook
Materials
 Yarn: Red Heart Supersaver (100% Acrylic; 364 yards [333 meters]/198 grams): #340 Dusty Grey (MC, 1 skein), Red Heart Super Saver Accent (100% Acrylic; 202 yards [184 meters]/113 grams): # 361Putty (CC, 1 skein)
Hook: US size F/5 (3.75 mm), US size H/8 (5.0 mm) or size needed to obtain gauge
Notions: Fairfield Poly-fil® Soft Touch® 14” x 14” pillow insert, LimaBeads Czech Glass Round 6 mm beads 11” strand (#24793 Iris Purple 2 strands, #24812 Crystal AB 1 strand), Darice® #324C Quilter’s Invisible .004 Nylon thread, sewing needle with a small eye that will go through beads, tapestry needle, removable markers.
Special Stitches
Dec – sc 2 (or 3) sts as indicated together
Pattern Notes
Ch-1 spaces of pillow edging Round 1 are corners.
Join to beginning of rounds with a slip stitch unless otherwise noted.
Slip stitches of branches are counted as stitches and included in stitch counts.
Pattern
Pillow
Front
Beginning at top of pillow with larger hook and MC, ch 53.
Row 1: Sc in 2nd ch from hook and in each ch across, turn. (52 sc)
Rows 2-65: Ch 1, sc in each st across, turn.
Edging Rnd 1: Ch 1, sc in each st across, do not turn at end of row, *use 3 markers to divide side edge into quarters, working in ends of rows, ch 1 (corner made), work 13 sc evenly spaced in each quarter* to bottom edge, ch 1, working in opposite side of foundation ch, sc in each ch across; rep from * to * once to top edge, ch 1, join with sl st to first sc of rnd. (208 sc)
Fasten off.
Back
Rep same as for Front, do not join or fasten off at end of Edging Rnd.
Tree
Row 1: With smaller hook and CC, ch 4, hdc in 2nd ch from hook, sc in next ch, sl st in next ch, turn. (3 sts)
Row 2: Ch 1, sc dec over first 2 sts, 2 sc in last st, turn. (3 sc)
Row 3: Ch 1, 2 sc in first st, sc dec over last 2 sts, turn.
Rows 4-21: Rep Rows 2-3. Continue to Branches.
Branches
Rnd 1: Ch 1, sc dec in next 2 sts, 2 sc in next st, ch 28, sl st in 2nd ch from hook and in each ch across, 2 sc in next sc, sc dec in last 2 sc, turn. (6 sc, 27 sl st)
Rnd 2: Ch 1, sc dec in next 2 sts, 2 sc in next sts, ch 61, sl st in 2nd ch from hook and in each ch across, 2 sc in next st, sc dec in last 2 sts, turn. (6 sc, 60 sl st)
Rnd 3: Ch 1, sc dec in next 2 sts, 2 sc in next st, ch 51, sl st in 2nd ch from hook and in each ch across, 2 sc in next st, sc dec over last 2 sts, turn. (6 sc, 50 sl st)
Rnd 4: Rep last rnd.
Rnd 5: Ch 1, sc dec in first 3 sts, ch 40, sl st in 2nd ch from hook and in each ch across, sl st in last st. (1 sc, 40 sl st)
Fasten off.
Leaf Vines (make 15)
1. Cut four 1-yd lengths of CC and divide each into 4 plies.
2. With 1 ply of CC and smaller hook, leaving a 8” tail, ch 20. Fasten off leaving an 8” tail.
Finishing
Assembly
1. Using photo as placement guide, arrange Tree and Branches on Pillow Front as shown or where desired.
2. Divide three 1-yd lengths of CC into 2 plies, using a 2-ply strand and tapestry needle, tack side edges of branches and tree to Pillow Front.
3. Use yarn tails and tapestry needle to sew Leaf Vine ends to Branches as shown on placement guide or where desired.
4. Use a double strand of invisible thread and small eye needle to randomly sew beads to Vines as shown on placement guide or where desired. Sew individual beads where desired onto Front around Tree to resemble falling leaves.
Border
Rnd 1: With Pillow Front and Back WS together and Front RS facing, using MC and larger hook and working through both layers of Edging, *sc in each st across to next ch-1 corner, 3 sc in corner ch-1 sp; rep from * around, inserting pillow form before completing final side, ending with 3 sc in last ch-1 corner, join to beg of rnd.
Rnd 2 (Faux Piping): Ch 1, inserting hook in same place at base of Rnd 1 sts and working over same sts of last rnd, *sc over each st around to next corner, work 2 sc over 3 sc of next corner; rep from * around, ending with 2 sc over sts in last corner, join to beg of rnd. Fasten off.
I love this pattern. but do you do tuturials on your patterns?
Hello Carole! So glad you love the pattern! There are some additional sewing instructional photos on the right hand side of the page which should help. At the moment, we don’t have a full tutorial for this project, but if needed I can reach out to the designer with specific questions. Let me know, thanks! – Nicola