

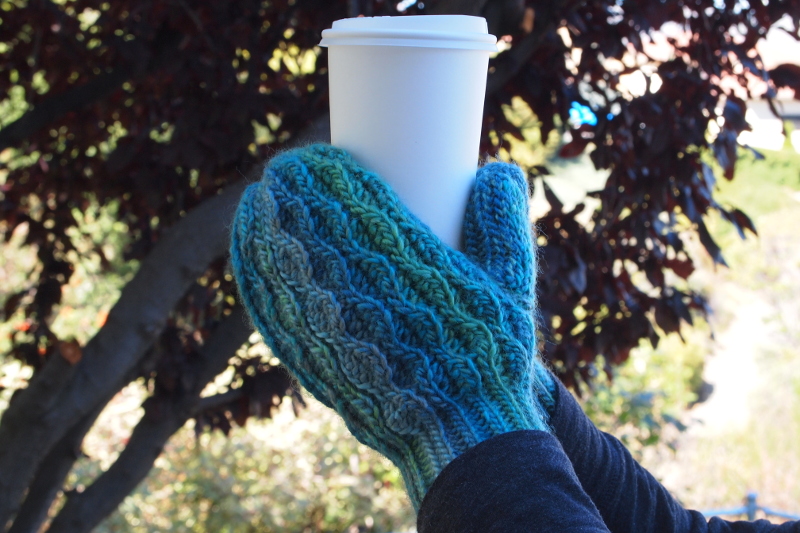
Keep your hands nice and toasty with these chunky, simple-to-make mittens. Make them as a heartfelt holiday gift or whip up a pair for yourself this festive season.
Skill Level: Intermediate
Size: Child and Teen / Adult
Materials:
- 2 Skeins of Red Heart Boutique Treasure in Mosaic (200 – 225 yards)
- 0 mm (H-8) crochet hook or size needed to obtain the gauge
- Yarn needle for weaving in ends
Gauge in HDC: 14 stitches and 11 rows = 4″ (10 cm)
Gauge in Wave Pattern: 8.5 stitches and 8 rows = 2″ (5 cm)
Gauge in Slip Stitch Cuff: 9 stitches and 12 rows = 2″ (5 cm)
After Row 8, your work should measure: 2″ across the Wave Pattern and 1.33″ across the Slip Stitch Cuff. If your cuff measurement is less, adjust your tension on the slip stitches so they are not as tight.
Abbreviations
ch(s) = chain(s)
sl = slip, st(s) = stitch(es)
hdc = half double crochet
RS = right side of work
Special Instructions:
The beginning chain-1 does not count as a stitch.
Start each row in the first stitch of the row.
I suggest using stitch markers to keep track of the first and last slip stitch of the row.
The instructions are the same for the left and right hands.
The cuff portion is worked completely in slip stitches. It will look small when complete, but stretches quite a bit if you keep your slip stitches loose.
Pattern
Size: Child (5-10 Years) • Palm circumference = 6″ – 7.5″
Row 1 (RS): Ch 40, working in the back bumps of the chain, sl st in 2nd ch from hook, sl st in next 14 chs, *hdc in next 3 chs, sl st in next 3 chs*, repeat between * to end, turn (39)
For the remainder of the pattern, work in the Back Loops only.
Row 2: Ch 1, sl st in first 3 sts, hdc in next 3 sts, *sl st in next 3 sts, hdc in next 3 sts*, repeat between * 2 more times, sl st in next 15 sts, turn (39)
Row 3: Ch 1, sl st in first 18 sts, *hdc in next 3 sts, sl st in next 3 sts*, repeat between * 2 more times, sl st in next 3 sts, turn (39)
Row 4: Ch 1, sl st in first 6 sts, *hdc in next 3 sts, sl st in next 3 sts*, repeat between * 2 more times, sl st in next 15 sts, turn (39)
Row 5: Ch 1, sl in first 15 sts, *hdc in next 3 sts, sl st in next 3 sts*, repeat between to end, turn (39)
Row 6 through Row 14: Repeat Row 2 through Row 5, ending with a repeat of Row 2
The next Row creates the thumb opening.
Row 15: Ch 1, sl st in first 18 sts, hdc in next 2 sts, ch 4, skip 4 sts, hdc in next 3 sts, *sl st in next 3, hdc in next 3*, sl st in next 6 sts, turn (39)
Row 16 – 17: Repeat Row 4 & Row 5
Row 18 through Row 28: Repeat Row 2 through Row 5, ending with a repeat of Row 4
With the Wrong Side facing out, bring the edges of the mitten together for seaming. Working through the front loops of the row closest to you and the back loops of the row furthest from you, slip stitch across. Fasten off, leaving a lengthy tail for seaming the top.
To close the opening at the fingertips, pass the tail through the end of every other row, inserting the needle from the outside-in and only catching one strand of yarn with each pass. Catching more than one strand will make it too bulky to close the hole completely. Pull gently on the tail as you go to draw the opening closed. Secure the tail, and weave in all ends. Turn the mitten right-side out to work the thumb.
Thumb
The thumb covering will be worked in short rows. Slip stitch to join in any stitch along the opening. Wherever you join will be the location of the seam, so I suggest joining at the top of the opening.
Row 1: Ch 11, working in the back bumps of the chain, sl st in 2nd ch from hook, sl st in next 9 chs, sl st in same st as your join, sl st in next st of the thumb opening, turn (10). The last 2 sts of Row 1 are not included in the stitch count, do not work into them when you work back across for Row 2. Only work the 10 counted stitches.
For the remainder of the pattern, work in the Back Loops only.
Row 2: Work 10 sl sts to end of row, turn (10)
Row 3: Ch 1, sl st in 10 sts, sl st to join in the next st on the thumb opening, sl st in next st again, turn (10)
Row 4 – 13: Repeat Rows 4 and 5
Fasten off leaving a lengthy tail for seaming. Seam the edges of the first and last row together, and then close the tip in the same manner as the mitten top.
Size: Teen / Adult • Palm circumference = 7.5″ – 9″
Finished mittens should fit most adults. For extra-large hands, go up one hook size from gauge.
Row 1 (RS): Ch 46, working in the back bumps of the chain, sl st in 2nd chain from hook, sl st in next 14 chs, *hdc in next 3 chs, sl st in next 3 chs*, repeat between * to end, turn (45)
For the remainder of the pattern, work in the Back Loops only.
Row 2: Ch 1, sl st in first 3 sts, hdc in next 3 sts, *sl st in next 3 sts, hdc in next 3 sts*, repeat between * 3 more times, sl st in next 15 sts, turn (45)
Row 3: Ch 1, sl st in first 18 sts, *hdc in next 3 sts, sl st in next 3 sts*, repeat between * 3 more times, sl st in next 3 sts, turn (45)
Row 4: Ch 1, sl st in first 6 sts, *hdc in next 3 sts, sl st in next 3 sts*, repeat between * 3 more times, sl st in next 15 sts, turn (45)
Row 5: Ch 1, sl in first 15 sts, *hdc in next 3 sts, sl st in next 3 sts*, repeat between to end, turn (45)
Row 6 through Row 16: Repeat Row 2 through Row 5, ending with a repeat of Row 4
The next Row creates the thumb opening.
Row 17: Ch 1, sl st in first 15 sts, hdc in next 3 sts, sl st in next st, ch 7, skip 7 sts, sl st in next st, *hdc in next 3, sl st in next 3*, repeat between * to end, turn (45)
Row 18 through Row 32: Repeat Row 2 through Row 5, ending with a repeat of Row 4
With the Wrong Side facing out, bring the edges of the mitten together for seaming. Working through the front loops of the row closest to you and the back loops of the row furthest from you, slip stitch across. Fasten off, leaving a lengthy tail for seaming the top.
To close the opening at the fingertips, pass the tail through the end of every other row, inserting the needle from the outside-in and only catching one strand of yarn with each pass. Catching more than one strand will make it too bulky to close the hole completely. Pull gently on the tail as you go to draw the opening closed. Secure the tail, and weave in all ends. Turn the mitten right-side out to work the thumb.
Thumb
The thumb covering will be worked in short rows. Slip stitch to join in any stitch along the opening. Wherever you join will be the location of the seam, so I suggest joining at the top of the opening.
Row 1: Ch 13, working in the back bumps of the chain, sl st in 2nd ch from hook, sl st in next 11 chs, sl st in same st as your join, sl st in next st of the thumb opening, turn (12). The last 2 sts of Row 1 are not included in the stitch count, do not work into them when you work back across for Row 2. Only work the 12 counted stitches.
For the remainder of the pattern, work in the Back Loops only.
Row 2: Work 12 sl sts to end of row, turn (12)
Row 3: Ch 1, sl st in 12 sts, sl st to join in the same stitch on thumb opening that you started in, sl st in next st on thumb, turn (12)
Row 4: Work 12 sl sts to end of row, turn (12)
Row 5: Ch 1, sl st in 12 sts, sl st to join in the next st on the thumb opening, sl st in next st again, turn (12)
Row 6 – 19: Repeat Rows 4 and 5
Fasten off leaving a lengthy tail for seaming. Seam the edges of the first and last row together, and then close the tip in the same manner as the mitten top.
View this post on Instagram
Love this pattern as I don’t know how to knit. I’ll really enjoy this great looking pattern.
Do you have mittens for beginners? That’s me.
Hi Roseanne!
These mittens are labeled easy:
https://www.ilikecrochet.com/magazine/crochet-mitten-and-glove-patterns/mitzi-mittens/
https://www.ilikecrochet.com/magazine/crochet-mitten-and-glove-patterns/kenai-mittens/
Hope this helps! – Nicola, Editor
Ran through Table of Contents…please put pictures of projects at top of page. Thanks.