

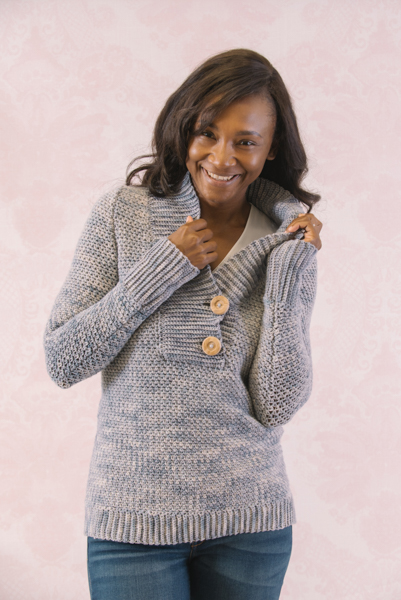
This shawl collared pullover features a deep V neckline with button accents, wide ribbing on sleeves and a textured stitch pattern.
Skill Level: Intermediate
Size: Finished Bust Size 34 (38, 42, 46, 50)” to fit bust 32 (36, 40, 44, 48)”
2” positive ease recommended.
Shown in size 34”
Gauge: 20 sts and 20 rows = 4” [10 cm] in pattern st after wet blocking
Materials
Yarn:
![]() Malabrigo Worsted (100% Merino Wool; 210 yards [192 meters]/100 grams): #009 Polar Morn, 8 (8, 9, 9, 10) balls
Malabrigo Worsted (100% Merino Wool; 210 yards [192 meters]/100 grams): #009 Polar Morn, 8 (8, 9, 9, 10) balls
Hook: US size J/10 (6.0 mm); US size G/6 (4.5mm)
Notions: Two 1½” (38 mm) buttons; tapestry needle
Special Stitches
Stitch Pattern (worked over an even number of sts)
Row 1: Ch 1, sc in first sc, *ch 1, sk next sc, sc in next ch-1 sp; rep from * to last 2 sts, sc in ch-1 sp, sc in last sc, turn.
Rep Row 1 for pattern.
Stitch Pattern (worked over an odd number of sts)
Row 1: Ch 1, sc in first sc, *ch 1, sk next sc, sc in next ch-1 sp; rep from *, ending with ch-1, sc in last st, turn.
Row 2: Sc in first sc, *sc in ch-1 sp, ch 1, sk next st; rep from *, ending with sc in ch-1 sp, sc in last sc, turn.
Rep Rows 1-2 for pattern.
Pattern Notes
On some areas, you will have to work the pattern stitch over an uneven number of stitches.
If working shaping on each side, the pattern is reversed, with 2 sc at the beginning and a ch-1, sc at the end. To keep the pattern consistent, always sc in a ch-1 sp and skip the sc unless it is at the end of a row.
Pattern
Back
Ribbing
With smaller hook, ch 13.
Row 1: Sc in 2nd ch from hook and in each ch across, turn – 12 sc.
Row 2: Ch 1, sc blo in each sc across, turn.
Rep Row 2 until Ribbing meas 17 (19, 21, 23, 25)”, ending with WS row. Do not turn at end of last row. Change to larger hook.
Body
Continue across long side of Ribbing as follows:
Row 1: Ch 1, sc 84 (94, 104, 114, 124) evenly across, turn.
Rows 2-76: Ch 1, work in Stitch Pattern to end, turn.
Shape Armholes
Row 1: Sl st in first 4 (4, 4, 6, 6) sts, ch 1, work in Stitch Pattern to last 4 (4, 4, 6, 6) sts, leave last 4 (4, 4, 6, 6) sts unworked, turn – 76 (86, 96, 102, 112) sts.
Row 2: Ch 1, work even in Stitch Pattern, turn.
Row 3: Ch 1, sc2tog, work in Stitch Pattern to last 2 sts, sc2tog, turn – 74 (84, 94, 100, 110) sts.
Rows 4-17: Rep Rows 2-3 – 60 (70, 80, 86, 96) sts.
Rows 18-38: Ch 1, work even in Stitch Pattern, turn.
Sizes 42 (46, 50) Only
Work 4 more rows even in Stitch Pattern.
All Sizes
Row 39: Sl st in first 8 (11, 12, 15, 20) sts, ch 1, work in Stitch Pattern to last 8 (11, 12, 15, 20) sts, turn, leaving remaining sts unworked – 44 (48, 56, 56, 56) sts.
Fasten off.
Front
Work same as Back to Row 53.
Row 54: Ch 1, work first 32 (37, 42, 47, 52) sts in Stitch Pattern, turn, leaving rem sts unworked – 32 (37, 42, 47, 52) sts.
Rows 55-76: Ch 1, work even in Stitch Pattern, turn.
Armhole and Neckline Shaping
Row 1: Sl st in first 4 (4, 4, 6, 6) sts, ch 1, work in Stitch Pattern to end – 28 (33, 38, 41, 46) sts.
Row 2: Ch 1, work even in Stitch Pattern, turn.
Row 3: Ch 1, sc2tog, work in Stitch Pattern to end, turn – 27 (32, 37, 40, 45) sts.
Row 4: Rep Row 3 – 26 (31, 36, 39, 44) sts.
Row 5: Rep Row 3 – 25 (30, 35, 38, 43) sts.
Row 6: Ch 1, work even in Stitch Pattern, turn.
Row 7: Ch 1, sc2tog, work to last 2 sts, sc2tog – 23 (28, 33, 36, 41) sts.
Row 8: Rep Row 6.
Rows 9-11: Rep Row 3 – 20 (25, 30, 33, 38) sts.
Row 12: Rep Row 6.
Row 13: Rep Row 7 – 18 (23, 28, 31, 36) sts.
Row 14: Rep Row 6.
Rows 15-17: Rep Row 3 – 15 (20, 25, 28, 33) sts.
Row 18: Rep Row 6.
Row 19: Ch 1, work in Stitch Pattern to last 2 sts, sc2tog – 14 (19, 24, 27, 32) sts.
Rows 20-21: Rep Row 6.
Row 22: Rep Row 3 – 13 (18, 23, 26, 31) sts.
Rows 23-24: Rep Row 6.
Row 25: Rep Row 19 – 12 (17, 22, 25, 30) sts.
Rows 26-27: Rep Row 6.
Row 28: Rep Row 3 – 11 (16, 21, 24, 29) sts.
Rows 29-30: Rep Row 6.
Row 31: Rep Row 19 – 10 (15, 20, 23, 28) sts.
Rows 32-33: Rep Row 6.
Row 34: Rep Row 3 – 9 (14, 19, 22, 27) sts.
Rows 35-36: Rep Row 6.
Row 37: Rep Row 19 – 8 (13, 18, 21, 26) sts.
Size 34 Only
Rows 38-39: Ch 1, work even in sc, turn.
Sizes 38 (42, 46, 50) Only
Row 38: Rep Row 3 – 12 (17, 20, 25) sts.
Row 39: Rep Row 19 – 11 (16, 19, 24) sts.
Sizes 42 (46, 50) Only
Row 40: Rep Row 3 – 15 (18, 23) sts.
Row 41: Rep Row 19 – 14 (17, 22) sts.
Row 42: Rep Row 3 – 13 (16, 21) sts.
Row 43: Rep Row 3 – 12 (15, 20) sts.
Fasten off.
Join yarn at opposite edge and repeat for second side.
Fasten off.
Sleeve
Ribbing
With smaller hook, ch 25.
Row 1: Sc in 2nd ch from hook and each ch across, turn – 24 sts.
Row 2: Ch 1, sc blo in each sc across, turn.
Rep Row 2 until Ribbing meas 7½ (8, 8½, 9½, 10½)”, ending with WS row. Do not turn at end of last row.
Change to larger hook.
Body
Row 1: Ch 1, sc 38 (40, 42, 48, 52) sts evenly across – 38 (40, 42, 48, 52) sts.
Rows 2-5: Ch 1, work even in Stitch Pattern, turn.
Row 6: Ch 1, 2 sc in first st, work in Stitch Pattern to last st, 2 sc in last st, turn – 40 (42, 44, 50, 54) sts.
Rows 7-56: Rep Rows 2-6, 10 times – 60 (62, 64, 70, 74) sts.
Rows 57-60: Ch 1, work even in Stitch Pattern, turn.
Shape Cap
Row 1: Sl st in first 4 (4, 4, 6, 6) sts, ch 1, work in st pat to last 4 (4, 4, 6, 6) sts, leave last 4 (4, 4, 6, 6) sts unworked, turn – 52 (54, 56, 58, 62) sts.
Row 2: Ch 1, sc2tog, work in Stitch Pattern to last 2 sts, sc2tog, turn – 50 (52, 54, 56, 60) sts.
Rows 3-4: Rep Row 2 – 48 (50, 52, 54, 58) sts.
Row 5: Ch 1, work even in Stitch Pattern, turn.
Row 6: Rep Row 2 – 46 (48, 50, 52, 56) sts.
Size 50 Only
Rows 7-26: Rep Rows 5-6 – 36 sts.
Row 27: Rep Row 2 – 34 sts.
Row 28: Rep Row 2 – 32 sts.
Row 29: Rep Row 2 – 30 sts.
Row 30: Rep Row 2 – 28 sts.
Sizes 34 (38, 42, 46) Only
Rows 7-30: Rep Rows 5-6 – 22 (24, 26, 28) sts.
All Sizes
Rows 31-32: Rep Row 2 – 18 (20, 22, 24, 24) sts.
Fasten off.
Finishing
Wet block all pieces.
Sew Front to Back at shoulder seams.
Collar
With smaller hook, join yarn with sl st at bottom left of placket.
Row 1: Ch 1, sc across 20 sts, sc2tog in last unworked st and side of right placket edge, turn.
Row 2: Ch 1, sc backloop only (blo) in each st across, turn.
Row 3: Ch 1, sc blo in first 19 sts, sc2tog in last st and side of right placket edge.
Rep Rows 2-3 around right placket, right front neck edge, back, and left front neck edge until you reach the bottom of the slanted left neck edge. Place buttons on right placket evenly.
After working Row 2 repeat, work buttonholes opposite buttons as follows:
Row 1: Ch 1, sc blo in first 3 sts, ch 4, sk 4 sc, sc blo to last st, sc2tog in last st and side of placket, turn.
Row 2: Ch 1, sc blo in first 12 sts, sc in next 4 ch, sc blo in next 3 sc, turn.
Continue edging until you reach bottom of left placket. Fasten off.
Sew left placket over right placket, matching buttons and buttonholes. Sew first inch of open edge of left placket in place.
Sew sleeves and side seams.
Weave in ends. 
What is sc2tog?
Hi Maureen! This is: single crochet 2 together
– Nicola, Editor
I just wanted to tell Ms. Saladin that her explanation of how to treat the ends of the rows with the Linen Stitch, in the Pattern Explanation, especially with an odd number of stitches, is the best I’ve ever seen. Too many pattern makers have gotten me confused on what to do when I get to the end of the WS row or a row with an odd number of stitches. She clarified the proper way to do this stitch brilliantly. Thank you! This is a beautiful sweater, too – I love making and wearing split-placket tops.
I just started the project and I completed the back ribbing. When I started row 1 of the back and I completed it, however, I didn’t get the same amount of stitches as the pattern. The length of the back ribbing is correct at 17″, too. I ended up with 60 stitches instead of 84 as the pattern explains.
Hello Chandra! I’ve reached out to the designer for advice and she or I will reply as soon as possible. Thanks! – Nicola, Editor
I wear like a 2x what size would that be
Hi Sheila!
These articles may be helpful:
https://www.ilikecrochet.com/daily/beginner-crochet/tips-tutorials-and-abbreviations/making-it-fit-adapting-crochet-patterns-for-plus-sizes-part-1/
https://www.ilikecrochet.com/daily/beginner-crochet/tips-tutorials-and-abbreviations/making-it-fit-adapting-crochet-patterns-for-plus-sizes-part-2/
-Nicola, Editor
I love this pattern. I hope to make it for granddaughters.. wish me luck…..at my age big projects are hard.
I am assuming bo means back loop only?
Hi there! “BO” usually means “bobble stitch” however, I’m not seeing that abbreviation in this particular pattern. Let me know if you need further assistance! – Nicola, Editor
I am having a problem with starting this pattern. It just said ch 1 and sc in first sc. Where is the first sc when you just made 1 ch?
Hi Theresa! I’ve reached out to the designer for advice and she or I will reply as soon as possible. Thanks! – Nicola, Editor
Hi Theresa! It looks like you might be getting confused by the stitch pattern instructions. They come first and do tell you to ch 1, Sc in first Sc, etc. You’ll need to look past that for the actual instructions to begin the sweater. Hope that helps! – Nicola, Editor
can you provide more pictures or the neckline shaping?
Hi Lauri! You can find additional photos on the right hand side of the page. Hope that helps! – Nicola
What about a video by chance? As many designers write patterns differently, I am having some difficulty with understanding some of the terminology.
Hi Jackie! Thank you for your feedback. At this time we do not have a video for this pattern but do let us know which terms or parts of the pattern you would like additional help with and we can reach out to the designer for clarification. Thanks! – Nicola
how can make this and other sweater when we can not ptint out the pattern
you can copy it, paste into a word document, and print. It comes to seven pages. I couldn’t copy the picture, so I took a photo, sent it from my camera to my computer and printed that out.
On my phone there are links at the bottom for sharing( Facebook, Twitter, Pinterest and Print right next to that.)
I really want to know how to make this at some point. Not that good yet but practice makes perfect