

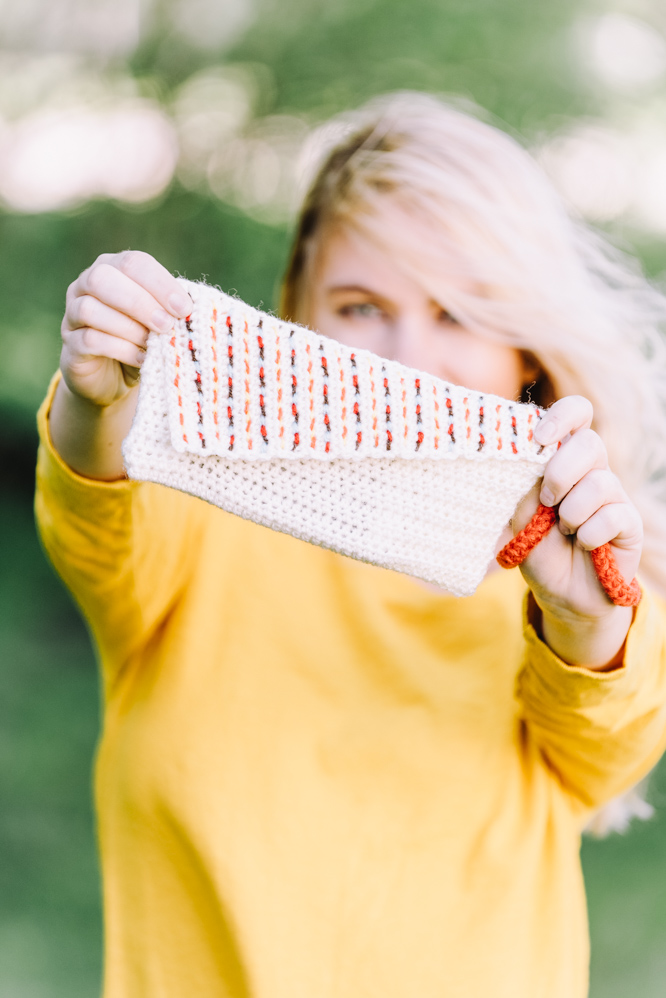
Boldly colored accessories are the perfect way to add excitement to your wardrobe as the summer season fades into fall. Start by making yourself this adorable clutch! Featuring a mix of bright colors and embroidered details, this is a must-have, eye-catching pattern for your project queue.
Skill Level: Easy
Size: 8” long x 4” tall
Gauge: 9 sts and 7 rows = 2” [5 cm] in hdc
Materials
 Yarn King Cole Pricewise (100% Acrylic; 310320 yards [282 meters]/100 grams): #46 Natural (MC, 1 ball), #87 Flame (CC1, 1 ball), #55 Gold (CC2, 1 ball), #273 Chocolate (CC3, 1 ball), #308 Cranberry (CC4, 1 ball), 201 Cloud (CC5, 1 ball).
Hooks: US size G/6 (4.00 mm), US size H/8 (5.00 mm)
Notions: Tapestry needle, one 5/16” sew-on snap (optional), sewing thread and needle to attach snap (optional)
Pattern Notes
Ch 2 at beginning of rows does not count as stitch.
Pattern
Using smaller hook and MC, ch 19.
Row 1: Hdc in 3rd ch from hook, hdc in each st across. Turn. (17 sts)
Row 2: Ch 2, hdc in next 16 sts, leave last st unworked. Turn. (16 sts)
Row 3: Ch 2, hdc in next 16 sts. Turn. (16 sts)
Row 4: Ch 2, hdc in next 15 sts, leave last st unworked. Turn. (15 sts)
Row 5: Ch 2, hdc in next 15 sts. Turn. (15 sts)
Row 6: Ch 2, hdc in next 14 sts, leave last st unworked. Turn. (14 sts)
Row 7: Ch 2, hdc in next 14 sts. Turn. (14 sts)
Row 8: Ch 2, hdc in next 13 sts, leave last st unworked. Turn. (13 sts)
Row 9: Ch 2, hdc in next 13 sts. Turn. (13 sts)
Row 10: Ch 2, hdc in next 12 sts, leave last st unworked. Turn. (12 sts)
Row 11: Ch 2, hdc in next 12 sts. Turn. (12 sts)
Row 12: Ch 2, hdc in next 11 sts, leave last st unworked. Turn. (11 sts)
Row 13: Ch 2, hdc in next 11 sts. Turn. (11 sts)
Row 14: Ch 2, hdc in next 10 sts, leave last st unworked. Turn. (10 sts)
Row 15: Ch 2, hdc in next 10 sts. Turn. (10 sts)
Row 16: Ch 2, hdc in next 9 sts, leave last st unworked. Turn. (9 sts)
Row 17: Ch 2, hdc in next 9 sts. Turn. (9 sts)
Row 18: Ch 2, hdc in next 8 sts, leave last st unworked. Turn. (8 sts)
Row 19: Ch 2, hdc in next 8 sts. Turn. (8 sts)
Row 20: Ch 2, hdc in next 7 sts, leave last st unworked. Turn. (7 sts)
Row 21: Ch 2, hdc in next 7 sts. Turn. (7 sts)
Row 22: Ch 2, hdc in next 6 sts, leave last st unworked. Turn. (6 sts)
Row 23: Ch 2, hdc in next 6 sts. Turn. (6 sts)
Row 24: Ch 2, hdc in next 5 sts, leave last st unworked. Turn. (5 sts)
Row 25: Ch 2, hdc in next 5 sts. Turn. (5 sts)
Row 26: Ch 2, hdc in next 4 sts, 3 hdc in last st. Do not turn. (7 sts)
Row 27: Working along jagged long end of work and hdc in hdc at end of row, [hdc in hdc at end of row, 2 hdc in ch-2 at end of row] 12 times. Turn. (36 sts)
Row 28: Ch 2, working in the third loop (horizontal bar at back of work), hdc in next 43 sts, hdc in last hdc of Row 32. Turn. (37 sts)
Rows 29-56: Ch 2, hdc in each st across. Turn. (37 sts)
Lay work flat with exposed sts of Row 28 up, fold bottom edge up to Row 27 (one row below third loop row).
Working through both layers, sc in the ends of each row down both sides. (14 sc)
Weave in ends. Turn Purse right side out.
Wrist Strap
Romanian Cord
Use larger hook. Hold together two strands of CC1.
Ch 2.
Row 1: Sc in second ch from hook. Rotate 90 degrees to right. (1 st)
Rnd 2: Sc in vertical loop behind sc. Rotate 90 degrees to right. (1 st)
Rnd 3: Sc in both vertical loops behind sc. Rotate 90 degrees to right. (1 st)
Rep Rnd 3 until Cord meas 12”.
Fasten off leaving long tail for sewing.
Using beginning and ending tail, attach Wrist Strap to purse at top corner, behind shortest end of flap.
Finishing
To embroider the stripes, start by threading CC1 up through every other stitch of the first row of the flap. At the end of the row, skip a row, and repeat in the opposite direction in the 3rd row. Repeat in every other row to the end of the flap.
Thread CC2 up through every other stitch of the first row of the flap, working in the alternating stitches with the CC1. Repeat in every other row to the end of the flap.
Thread CC3 up through every 3rd stitch of the 2nd row of the flap. At the end of the row, skip a row, and repeat in the opposite direction in the 4th row. Repeat in every other row to the end of the flap.
Thread CC4 up through every 3rd stitch of the 2nd row of the flap, working in one of the stitches showing between CC3 stitches. Repeat in every other row to the end of the flap.
Thread CC5 up through every 3rd stitch of the 2nd row of the flap, working in the remaining stitches showing between CC3 and CC4 stitches. Repeat in every other row to the end of the flap.
Weave in all ends.
Optional: Using sewing needle and thread, attach front of snap to inside of flap, 2 sts and 2 rows from the bottom corner. Attach back of snap to corresponding point on the pouch.
Row 27 of the Kelsey Clutch makes no sense. Please help. Is there a video?
Hi Mary, I’ve reached out to the designer for clarification. Stay tuned! 🙂
Hi Mary! I’d be glad to help. When you finished the slanted part of the clutch, it leaves a jagged edge on one side, on the ends of one side of the rows. When you look at the sides of the rows, every other row will have a ch-2 (the beginning of the row) and the alternating rows will have an hdc (the last st of the row). You need to work around these “first and last” sts of the rows as you work down the jagged side of the rows you just created. I hope that helps!
Do you have a printer friendly version of the patterns?
Hi Mary,
Unfortunately we don’t have a downloadable version of each pattern, but if you ctrl+A and ctrl+c and paste it into a word doc, you should be able to print the pattern with relative ease. Sorry that there isn’t a formal way of printing! It’s on our list of things to look into. Thanks!