

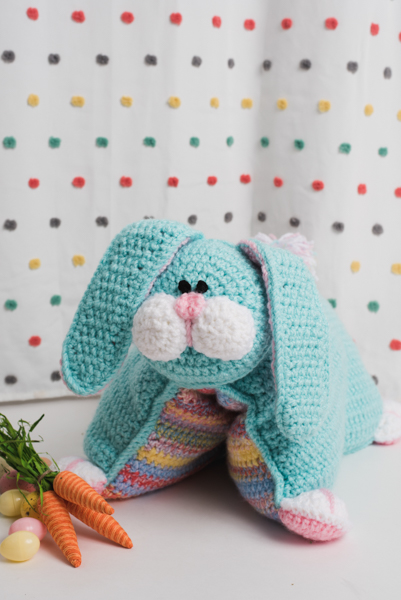
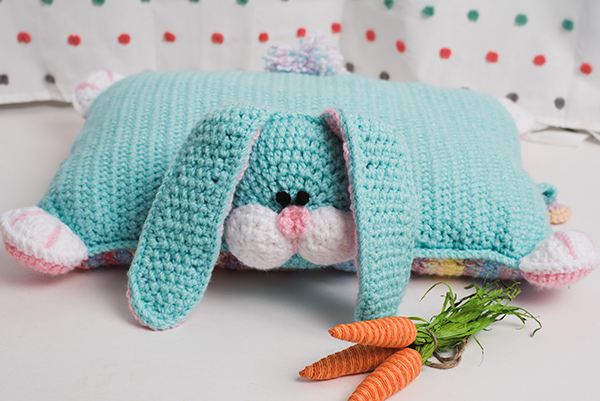
Petunia is a cuddly toy that easily unbuttons to be a pillow for naptime. She’s an excellent addition for car rides and sleepovers and is perfect for pairing with your children’s favorite Easter treats.
Skill Level: Easy
Size: Fits standard size bed pillow; 20” L x 15” W x 16” H, when folded as toy.
Gauge: 11 sts and 10 rows = approx. 4” [10 cm] in hdc
Materials
 Yarn: Premier Yarn Toy Box (100% Acrylic; 109 yards [100 meters]/100 grams): #1056-12 Frisbee (C1, 6 skeins), #1056-07 Silly Putty (C2, 3 skeins), #1056-10 Jump Rope (C3, 1 skein), #1056-11 Kite (C4, 1 skein)
 Premier Yarn Everday Bulky (100% Acrylic; 87 yards [80 meters]/86 grams): #1068-05 Black (C5, 5 yards)
Hook: US size J/10 (6.0 mm)
Notions: Tapestry needle, standard size bed pillow, Fairfield™ Poly-Fil® Premium Fiber Fil, 3 safety pins, 5” wide cardboard
Special Stitches
Sl st join: At beg of row, with sl knot on hook, insert hook in indicated st, yo, pull lp up and through lp on hook to complete as a sl st, sl st join is included in stitch count.
Sc join: With sl knot on hook, insert hook in indicated st, yo, pull up lp, yo, pull through both lps on hook to complete as a sc, sc join in included in stitch count.
Dec: Work 2 sts together.
Pattern Notes
Ch 2 at beg of rows or rnds does not count as a st.
Hdc stitches are worked in spaces between stitches of previous rows or rnds and not worked in the tops of stitches unless otherwise stated.
Join with a sl st to first stitch of rnd unless otherwise stated.
Pattern
Head Back
Rnd 1: With C1, ch 2 (does not count as hdc), 8 hdc in 2nd ch from hook, join to first hdc of rnd. (8 hdc)
Rnd 2: Ch 2, 2 hdc in sp between each st around, join to first hdc of rnd. (16 hdc)
Rnd 3: Ch 2, hdc in first sp, 2 hdc in next sp, [hdc in next sp, 2 hdc in next sp] around, join to first hdc of rnd. (24 hdc)
Rnd 4: Ch 2, 2 hdc in first sp, hdc in next 2 sps, [2 hdc in next sp, hdc in next 2 sps] around, join to first hdc of rnd. (32 hdc)
Rnd 5: Ch 2, hdc in first sp, hdc in next 2 sps, 2 hdc in next sp, [hdc in next 3 sps, 2 hdc in next sp] around, join to first hdc of rnd. (40 hdc)
Rnd 6: Ch 2, 2 hdc in first sp, hdc in next 4 sps, [2 hdc in next sp, hdc in next 4 sps] around, join to first hdc of rnd. (48 hdc)
Rnd 7: Ch 2, hdc in first sp, hdc in next 4 sps, 2 hdc in next sp, [hdc in next 5 sps, 2 hdc in next sp] around, join to first hdc of rnd. (56 hdc)
Rnd 8: Ch 2, 2 hdc in first sp, hdc in next 6 sps, [2 hdc in next sp, hdc in next 6 sps] around, join to first hdc of rnd. Fasten off. (64 hdc)
Head Front
Rnds 1-8: Work same as for Head Back, do not fasten off at end of Rnd 8.
Body Front
Row 1: Beg at sides of Body, with C1, ch 47, hdc in 3rd ch from hook (skipped first 2 chs do not count as hdc) and in each ch across, turn. (45 hdc)
Row 2: Ch 2, hdc in first sp, [hdc in next sp] across, turn.
Rows 3-62: Rep Row 2. Fasten off after last row.
Long Edge Border:
*With RS facing, use 3 safety pins to divide long edge of Body into 4 equal sections. Working in ends of rows with C1, sc join to first row at corner, work 16 sc evenly spaced to first pin, work 17 sc evenly spaced in each section across, ending at next corner. Fasten off. Rep from * to add Long Edge Border to ends of rows on opposite long edge of Body. (68 sc)
Body Back
Rows 1-62: With C2, rep Rows 1-62 same as for Body Front.
Long Edge Border
Note: This edging is not the same as the Body Front Long Edge Border. Work a sl st row, followed by a sc row, using C1.
Row 1: *With RS facing, use 3 safety pins to divide long edge of Body into 4 equal sections. With C1 and RS facing, working in ends of rows at sides, sl st join to end of first row at corner, work 16 sl st evenly spaced to first pin, work 17 sl sts evenly spaced in each section across, ending at next corner. Fasten off. Rep from * to add sl sts to ends of rows on opposite long edge of Body. (68 sl st)
Row 2: With C1 and last border row RS facing, working in tops of sl sts of previous row, sc join to sl st join of border, sc in each sl st across. Fasten off. Rep in same manner to sc across border Row 1 on opposite long edge of Body. Fasten off. (68 sc)
Joining Rnd: With Body Front and Back WS together and Front RS facing, using C1, working through both layers in tops of sts, sc join to first st of Row 62, sc in each st across to corner (do not add any sts or chs at corners), sc in each st across border to corner, sc in each ch along opposite side of foundation chain of Row 1 to corner, insert pillow into Body, sc in each st across border to corner, join to first sc of rnd. Fasten off. (158 sc)
Button Band
Row 1: With Body Front RS facing, use safety pin to mark center of one short end of Body, working in tops of sc sts, with C1, sl st join in 3rd st to right of pin, ch 2, hdc in same st as join, hdc in next 6 sts, turn. (7 hdc)
Row 2: Ch 2, working in sp between sts, [hdc in next sp] across, turn.
Rows 3-5: Rep Row 2.
Row 6: Ch 2, hdc dec over first 2 sps, ch 3, sk 3 sps (button hole), hdc dec over last 2 sps, turn. (2 hdc)
Row 7: Ch 1, sl st in first st, 3 sc in ch-3 sp, sl st in next st. Fasten off. (2 sl st, 3 sc)
Button Tab
Row 1: Rep Row 1 of Button Band to mark center and st on opposite short end of Body.
Row 2: Ch 2, hdc dec over first 2 sps, hdc in next 3 sps, hdc dec over last 2 sps, turn. (5 hdc)
Row 3: Ch 2, hdc dec over first 2 sps, hdc in next st, hdc dec over last 2 sps. Fasten off. (3 hdc)
Button
Rows 1-2: With C2, rep rnds 1-2 same as for Head. Fasten off leaving a 12” tail.
Paw Bottom (make 4)
Row 1: With C4, ch 2, 4 hdc in 2nd ch (center of paw) from hook, turn. (4 hdc)
Row 2: Ch 2, 2 hdc in first sp, [2 hdc in next sp] 3 times, turn. (8 hdc)
Row 3: Ch 2, hdc in first sp, 2 hdc in next sp, [hdc in next sp, 2 hdc in next sp] 3 times, turn. (12 hdc)
Row 4: Ch 2, hdc in first sp, hdc in next sp, 2 hdc in next sp, [hdc in next 2 sps, 2 hdc in next sp] 3 times, turn. (16 hdc)
Edging: Working in ends of rows along straight edge of Paw, ch 1, sc in end of Row 4, work 5 sc evenly spaced to just before center, 2 sc in center, work 5 sc evenly spaced to within last row, sc in top of beg ch-2 of last row. Fasten off leaving an 18” tail. (14 sc)
Paw Top (make 4)
Rows 1-4: With C3, make same as for Paw Bottom.
Edging: Work same as for Paw Bottom, do not fasten off at end of Edging.
Partial Joining Rnd: Place Paw Top and Bottom WS together, with Top RS facing, working through both layers, sc in side of last st made, sc in each st across Row 4, sc in side of last st made. Fasten off leaving an 18” tail. (16 sc)
Nose
Rnd 1: With C4, rep Rnd 1 of Head.
Fasten off
Cheeks (make 2)
Rnds 1-3: With C3, rep Rnds 1-3 of Head.
Fasten off.
Ear (make 2 using C1 for Ear Backs and 2 using C4 for Ear Fronts)
Row 1: Beg at ear top, ch 3, hdc in 2nd ch from hook, 2 hdc in last ch, turn. (3 hdc)
Row 2: Ch 2, hdc in sp between each st across, turn.
Row 3: Ch 2, 2 hdc in first sp, hdc in next sp, 2 hdc in next sp, turn. (5 hdc)
Rows 4-21: Ch 2, [hdc in each sp] across, turn.
Row 22: Ch 2, hdc dec over next 2 sps, hdc in next sp, hdc dec over last 2 sps, turn. (3 hdc)
Row 23: Ch 2, hdc dec over rem 3 sps (ear tip), do not fasten off. (1 hdc)
Edging: Working in ends of rows along left side edge, work 32 sc evenly spaced in ends of rows to center of Row 1 (ear top), work 32 sc in same manner along opposite side of ear to tip. (64 sc)
Fasten off.
Finishing
Tail Pom Pom
- Cut 1 strand C1, 1 strand C2, 3 strands C3, and 1 strand C4, each into 5-yard lengths. Wrap lengths around a 5” wide piece of cardboard. Remove from cardboard and tie in center with an 18” length of C1. Cut loops at each end and trim as desired.
Assembly
- Divide 1 yard of C3 into 2 plies. Referring to photo for placement, use 1 ply and tapestry needle to sew cheeks WS up onto Head slightly below center or where desired. Add a handful of fiberfill under cheeks before closing.
- With RS of Nose facing, pull yarn tails of Nose through Head between and slightly above cheeks and tightly knot on WS of head to secure. Using photo as placement guide, thread remainder of one yarn tail through needle, *insert needle from WS to RS through Head to make 1 long straight stitch between cheeks; rep from * to make 2nd long stitch over first. Knot to secure on WS. Use remaining yarn tail to sew additional, tacking stitches around nose where desired.
- With WS of eyes facing, pull yarn tails of eyes through Head slightly above Nose and knot tightly on WS of Head to secure. Thread remainder of yarn tails through needle and use to sew additional, tacking stitches around eyes where desired.
- Place Ear Front and Back WS together, working in tops of sts, sl st join C1 through both layers at center top of ear, sl st in each st to center of ear tip, ch 1, sl st around opposite side of ear, join to first st. Fasten off.
- With Head Front and Back WS together and Front facing, working loosely, keeping an even tension, sl st through both layers in each st around to within desired ear placement at top of Head, *position one ear RS facing between layers, [insert hook through next st of front, ear and back, yo, pull lp through lp on hook to complete as a sl st] 3 times**, [sl st in next st of Head] 4 times; rep from * to **, to add 2nd ear, sl st in each rem st around, stuffing Head with fiberfill before closing, join to first sl st. Fasten off.
- With Body and Paw Top RS facing, insert any Body corner into Paw, use tapestry needle and C3 yarn tail to sew Paw Top to Body Front. Place a large handful of fiberfill under Paw Front. Flip Body over, use C4 yarn tail to sew Paw Bottom to Body Back. Rep in same manner to add Paws and fiberfill to remaining 3 corners of Body.
- Use yarn tails to sew Pom Pom to center of 1 long edge of Body.
- Use C1 to sew head to opposite long edge of Body.
- Use yarn tails to sew Button to center of Button Tab. Fold Bunny Body in half and insert Button through button hole in Button Band.
How do I print a pattern??? Thanks for your help. Laurie
I’m having the same problem. Did you ever get an answer?
Hello! To print this pattern, click the print icon on the left hand side of the pattern page. Let me know if you have any questions! – Nicola