

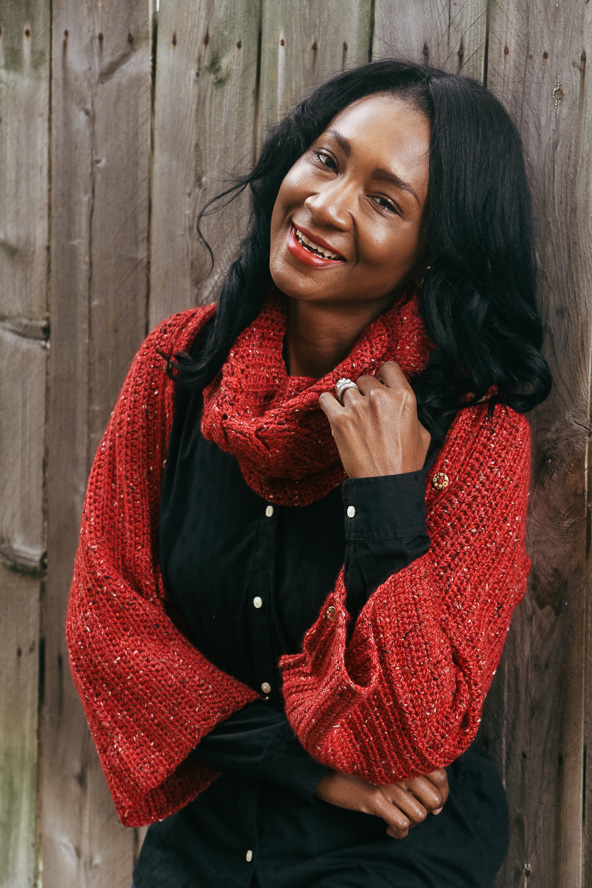
The Heathered Coral Set features a warm and cozy wrap that can also be worn as a shrug and an equally cozy cowl. Both pieces feature a chunky cable design and popcorn stitches as well as decorative buttons. Worn together or separately, these pieces make excellent additions to your winter wardrobe.
Skill Level: Advanced
Size: Wrap = 52 x 20”; cowl = 20 (22, 24)”
Gauge: 14 sts and 8 rows = 4” [10 cm] in hdc after wet blocking
Materials
Yarn:
![]() Knit Picks City Tweed DK (55% merino wool, 25% superfine alpaca, 20% donegal tweed; 123 yards [112 meters]/50 grams): #24545 Romance (9 balls for wrap/shrug, 3 balls for cowl)
Knit Picks City Tweed DK (55% merino wool, 25% superfine alpaca, 20% donegal tweed; 123 yards [112 meters]/50 grams): #24545 Romance (9 balls for wrap/shrug, 3 balls for cowl)
Hook: US size G/6 (4.25 mm) and H/8 (5.0 mm) hooks
Notions: Yarn needle, 21 ¾” buttons (17 for wrap, 4 for cowl)
Abbreviations
Bpdc: Back post double crochet
Flo: Front loop only
Fpdc: Front post double crochet
Popcorn: Pop
Special Stitches
Popcorn (pop): 5 dc in indicated st, remove hook from loop, insert hook through top of first dc then through loop, draw yarn through both loop and first dc.
Pattern Notes
Please read pattern through before beginning and ensure you have all the requirements needed to complete the piece. This pattern is worked in rows from the bottom up.
The slip stitches may be created using the 5.0 mm hook if necessary to keep the stitches loose.
Cable: The cable is created as instructed within the pattern by creating 4 tabs as shown in the diagram and crossing those tabs over each other in the order given within the pattern. Make sure the tabs are worked either in front of work or behind work as instructed to give the distinctive look of the cable. Always work the stitches in the usual order unless instructed otherwise.
Wrap Pattern
With size 5.0 mm hook, ch 201. Change to size 4.25 mm hook.
Row 1: Sc in 2nd ch from hook, sc in each ch to end of row, turn. (200 sts)
Row 2: Sl st in flo of each st to end of row, turn.
Row 3: Ch 1, sc in flo of each st to end of row, turn.
Rows 4-5: Ch 3, sc in each st to end of row, turn.
Row 6: Rep Row 2.
Row 7: Ch 1 (doesn’t count as st here and throughout), hdc in flo of each st to end of row, turn.
Row 8: Ch 1, hdc in next 80 sts, [fpdc in next st, pop in next st, fpdc in next 2 sts, pop in next st, fpdc in next st], hdc in next 2 sts, * fpdc in next 6 sts, turn, ch 2, bpdc in same 6 sts, turn, ch 2, fpdc in same 6 sts, ch 2, sl st in top of ch-2, ch 1, sl st in top of fpdc from first 6 fpdc; rep from * 3 more times, hdc in next 2 sts; rep from [ to ] once more, hdc in each st to end of row, turn.
Row 9: Ch 1, hdc in next 80 sts, [bpdc in next st, hdc in next st, bpdc in next 2 sts, hdc in next st, bpdc in next st], hdc in next 2 sts, * work behind A and into B, 6 bpdc, work into A, 6 bpdc, work in front of C and into D, 6 bpdc, work into C, 6 bpdc, hdc in next 2 sts; rep from [ to ] once more, hdc in each st to end of row, turn.
Row 10: Ch 1, hdc in next 80 sts, [fpdc in next st, pop in next st, fpdc in next 2 sts, pop in next st, fpdc in next st], hdc in next 2 sts, fpdc in next 24 sts being careful to keep them in correct order, hdc in next 2 sts; rep from [ to ] once more, hdc in each st to end of row, turn.
Row 11: Ch 1, hdc in next 80 sts, [bpdc in next st, hdc in next st, bpdc in next 2 sts, hdc in next st, bpdc in next st], hdc in next 2 sts, bpdc in next 24 sts being careful to keep them in correct order, hdc in next 2 sts; rep from [ to ] once more, hdc in each st to end of row, turn.
Row 12: Rep Row 11.
Row 13: Rep Row 12.
Rows 8-13 form pattern. Rep pattern 6 more times, finishing last repeat at Row 12.
Row 49: Ch 1, sc in each st to end of row, turn.
Row 50: Sl st in flo of each st to end of row, turn.
Row 51: Ch 3 (counts as first dc), dc in flo of each st to end of row, turn.
Row 52: Rep Row 51.
Row 53: Ch 1, sc in flo of each st to end of row.
Fasten off and weave in ends.
Finishing
Buttons: Place buttons evenly along edge created by Rows 1-7. Sew in place. The corresponding edge created by Rows 50–53 functions as the buttonholes.
Cowl Pattern
With size 5.0 mm hook, ch 41. Change to size 4.25 mm hook.
Row 1: Sc in 2nd ch from hook, sc in each ch to end of row, turn. (40 sts)
Row 2: Sl st in flo of each st to end of row, turn.
Row 3: Ch 1, sc in flo of each st to end of row, turn.
Rows 4-5: Ch 3, sc in each st to end of row, turn.
Row 6: Rep Row 2.
Row 7: Ch 1 (does not count as st here and throughout), hdc in flo of each st to end of row, turn.
Row 8: Ch 1, hdc in next 10 sts, [fpdc in next st, pop in next st, fpdc in next st], hdc in next 2 sts, fpdc in next 10 sts; rep from [ to ] once more, hdc in each st to end of row, turn.
Row 9: Ch 1, hdc in next 10 sts, [bpdc in next st, sc in next st, bpdc in next st], hdc in next 2 sts, bpdc in next 10 sts; rep from [ to ] once more, hdc in each st to end of row, turn.
Row 10: Ch 1, hdc in next 10 sts, [fpdc in next st, pop in next st, fpdc in next st], hdc in next 2 sts, * fpdc in next 5 sts, turn, ch 2, fpdc in same 5 sts, turn, ch 2, fpdc in same 5 sts, ch 2, sl st in top of ch-2 from previous 5 sts, ch 1, sl st in top of fpdc from first 5 fpdc; rep from * once more; rep from [ to ] once more, hdc in each st to end of row, turn.
Row 11: Ch 1, hdc in next 10 sts, [bpdc in next st, sc in next st, bpdc in next st], hdc in next 2 sts, work behind A and into B, 5 bpdc, work into B, 5 bpdc, hdc in next 2 sts; rep from [ to ] once more, hdc in each st to end of row, turn.
Rows 8-11 form pattern. Rep pattern 11 (12, 13) more times, then rep row 8.
Row 56 (60, 64): Ch 1, sc in each st to end of row, turn.
Row 57 (61, 65): Sl st in flo of each st to end of row, turn.
Row 58 (62, 66): Ch 3 (counts as first dc), dc in flo of each st to end of row, turn.
Row 59 (63, 67): Rep Row 51.
Row 60 (64, 68): Ch 1, sc in flo of each st to end to end of row.
Fasten off and weave in ends.
Finishing
Place buttons evenly along edge created by Rows 1–6. Sew in place. The corresponding edge created by Rows 57–60 functions as the buttonholes.