


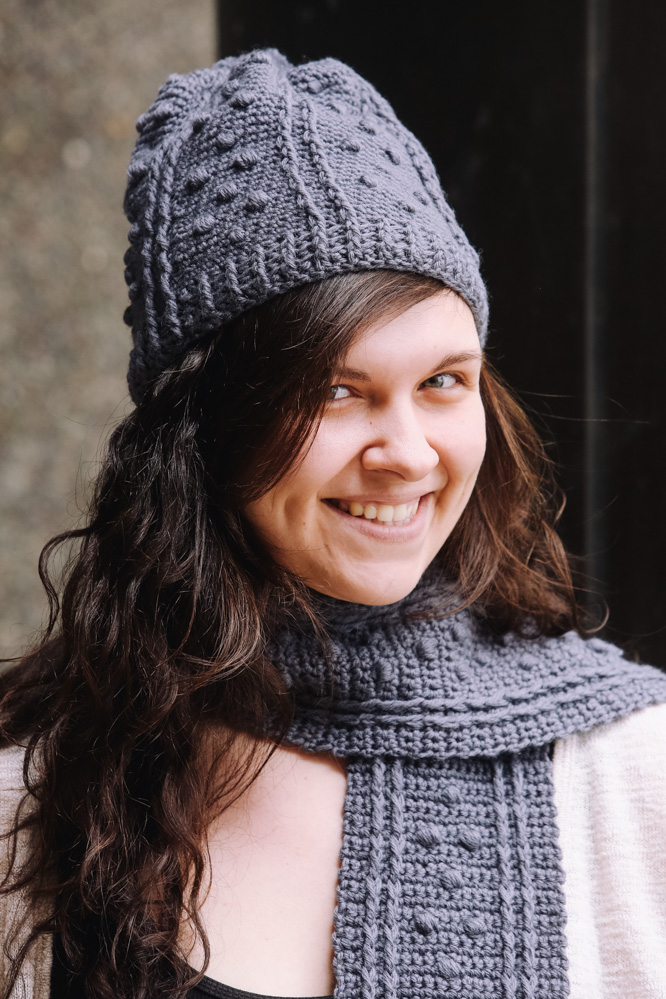
Accessorize your wardrobe with this gorgeous beanie and scarf set, featuring strong vertical lines softened by puff stitches. Easy to make, this cozy set is sure to be your go-to winter accessory.
Skill Level: Easy
Size: Hat = 19” circumference x 9½” tall (blocked); Scarf = 60” long x 5” wide (blocked)
Gauge: 16 sts and 16 rows = 4” [10 cm] in sc after wet blocking
Materials
Yarn:
 Knit Picks Wool of the Andes Worsted Weight (100% peruvian highland wool; 110 yards [101 meters]/50 grams): #23438 Mist (5 balls)
Hook: US size H/8 (5.0 mm) hook
Notions: Removable markers, tapestry needle, pom pom maker (optional)
Abbreviations
BPdc: Back Post Double Crochet
Fdc: Foundation Double Crochet
FPdc: Front Post Double Crochet
Special Stitches
FPtr (Front Post Triple Crochet): YO twice, working in front, place hook under indicated stitch, YO, pull up a loop, (yo, draw through 2 loops) 3 times.
Puff Stitch: (YO, draw up a loop) 4 times in same space, YO, draw through all 9 sts on hook.
Pattern Notes
The scarf is worked flat in rows beginning and ending with ribbed stitches. The hat is worked in the round beginning with a ribbed brim, continues up to the patterned body and finished with an optional pompom. Work FPtr sts in the row below as indicated in the directions, skipping the sc st behind the FPtr st just made.
Scarf Pattern
Ch 22.
Row 1: Dc in 3rd ch from hook and in each ch across, turn. (20 dc)
Row 2: Ch 2, dc in first st, *FPdc in next dc, BPdc in next dc; rep from * across to last st, dc in last st, turn.
Row 3: Ch 2, dc in first st, *BPdc in next st, FPdc in next st; rep from * across to last st, dc in last st, turn.
Rows 4-5: Rep Rows 2-3.
Rows 6-8: Ch 1, sc in each st across row, turn.
Row 9: Ch 1, sc in first 2 sc, FPtr in first FPdc in Row 5, sk 1 sc, sc in next sc, FPtr in 2nd FPdc in Row 5, sk 1 sc, sc in next 4 sc, work a Puff Stitch in next sc, sc in the next 4 sc, FPtr in 7th FPdc in Row 5, sk 1 sc, sc in next sc, FPtr in 8th FPdc in Row 5, sk 1 sc, sc in last 3 sc, turn.
Rows 10-12: Ch 1, sc in each sc across row, turn. (20 sc)
Row 13: Ch 1, sc in first 2 sc, FPtr in FPtr 3 rows below, sk 1 sc, sc in next sc, FPtr in next FPtr 3 rows below, sk 1 sc, sc in the next 2 sc, work a Puff Stitch in next sc, sc in the next 2 sc, work a Puff Stitch in next sc, FPtr in the next FPtr 3 rows below, sk 1 sc, sc in next sc, FPtr in the next FPtr 3 rows below, sk 1 sc, sc in last 3 sc, turn.
Rows 14-16: Ch 1, sc in each st across row, turn. (20 sc)
Row 17: Ch 1, sc in first 2 sc, FPtr in FPtr 3 rows below, sk 1 sc, sc in next sc, FPtr in next FPtr, sk 1 sc, sc in next 4 sc, work a Puff Stitch in next sc, sc in the next 4 sc, FPtr in next FPtr, sk 1 sc, sc in next sc, FPtr in next FPtr, sk 1 sc, sc in last 3 sc, turn.
Rows 18-20: Ch 1, sc in each st across row, turn. (20 sc)
Rep Rows 13-20 until Scarf measures about 55” or desired length.
Repeat Rows 2-3 twice.
Fasten off.
Finishing
Weave in all ends and lightly block.
Beanie Pattern
Fdc 72, join with sl st for working in the round, taking care not to twist.
Rnd 1: Ch 2, *FPdc in next st, BPdc in next st; rep from * around, join with sl st. (72 sts)
Rnds 2-3: Rep Rnd 1.
Rnds 4-6: Ch 1, sc in each st to end of rnd, join with sl st.
Rnd 7: Ch 1, *FPtr in first FPdc 3 rows below, sk 1 sc, sc in next sc, FPtr in second FPdc 3 rows below, sk 1 sc, sc in the next 4 sc, work a Puff Stitch in next sc, sc in the next 4 sc; rep from * to end of rnd, join with sl st.
Rnds 8-10: Ch 1, sc in each st to end of rnd, join with sl st.
Rnd 11: Ch 1, *FPtr in first FPdc 3 rows below, sk 1 sc, sc in next sc, FPtr in second FPdc 3 rows below, sk 1 sc, sc in the next 2 sc, work a Puff Stitch in next sc, sc in the next 3 sc, work a Puff Stitch in next sc, sc in the next 2 sc; rep from * to end of rnd, join with sl st.
Rnds 12-14: Ch 1, sc in each st to end of rnd, join with sl st.
Rep Rnds 7-14 until Hat measures about 8” or desired length, ending after working a Rnd 10.
Crown
Rnd 1 (Dec): Ch 1, *FPtr in first FPdc 3 rows below, sk 1 sc, sc in next sc, FPtr in second FPdc 3 rows below, sk 1 sc, sc2tog, sc2tog, work a Puff Stitch in next sc, sc2tog, sc2tog; rep from * to end of rnd, join with sl st.
Rnd 2 (Dec): Ch 1, *sc in next 3 sc, sc2tog, sc in the next sc, sc2tog; rep from * to end of rnd, join with sl st. (36 sts)
Rnd 3: Ch 1, sc in each sc to end of rnd, join with sl st.
Rnd 4 (Dec): Ch 1, *FPtr in first FPdc 3 rows below, sk 1 sc, sc in next sc, FPtr in second FPdc 3 rows below, sk 1 sc, sc2tog, sc in next sc; rep from * to end of rnd, join with sl st.
Rnd 5: Ch 1, sc2tog around in continuous spiral (do not join) until top closes.
Fasten off.
Finishing
Weave in all ends and lightly block.
Make and attach pompom (optional).