


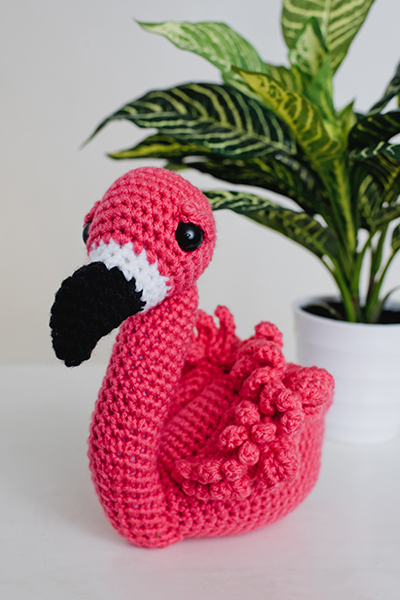
Ingo is a sweet little crochet bird who wants to brighten your day. She makes a wonderful addition to a colorful nursery.
Size: 8” tall x 8” long
Gauge: not necessary with amigurumi
Materials
 Yarn: Red Heart with Love (100% Acrylic; 370 yards [338 meters]/198 grams): Papaya (C1, 1 ball), Black (C2, 1 ball), White (C3, 1 ball).
Hook: US size G/6 (4.5 mm)
Notions: Tapestry needle, two 15-mm black safety eyes, polyfil stuffing, removeable stitch markers (optional)
Abbreviations
Inc: Work 2 sc in same st
Dec: Sc 2 sts togther
Pattern Notes
Work in continuous round. Do not slip stitch to join unless otherwise specified.
Use whip stitch to attach all parts.
Amigurumi attachment experience recommended.
Pattern
Head
With C2, ch 2,
Rnd 1: Work 6 sc in second ch from hook. (6 sts)
Rnd 2: Sc in each st around. (6 sts)
Rnd 3: (Sc in next st, inc) 3 times. (9 sts)
Rnd 4: Sc in each st around. (9 sts)
Rnd 5: Work 3 inc, sc in next 6 sts. (12 sts)
Rnd 6: Sc in each st around. (12 sts)
Rnd 7: (Inc, sc in next st) 3 times, sc in next 6 sts. (15 sts)
Rnd 8: Sc in next 3 sts, 3 inc, sc in next 3 sts, 3 dec. (15 sts)
Rnd 9: Change to C3, sc in next 3 sts, 3 inc, sc in next 3 sts, 3 dec. (15 sts)
Rnds 10-11: Sc in each st around.
Rnd 12: Change to C1, (sc in next 2 sts, inc) 5 times. (20 sts)
Rnd 13: (Sc in next 3 sts, inc) 5 times. (25 sts)
Rnd 14: (Sc in next 4 sts, inc) 5 times. (30 sts)
Rnds 15-19: Sc in each st around.
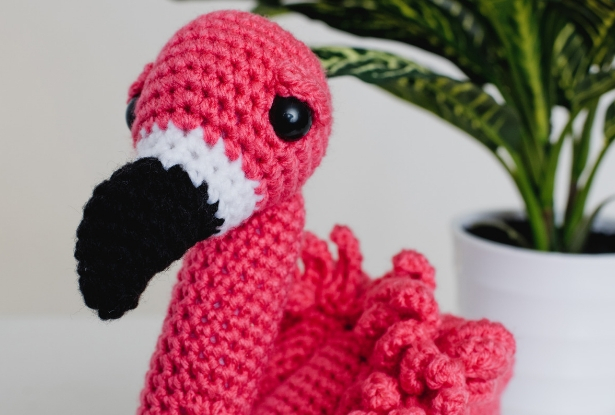
Insert safety eyes between Rnds 15 and 16, 10 sts apart. Make sure beak is pointing down and eyes are evenly spaced above it.
Begin stuffing.
Rnd 20: (Sc in next 3 sts, dec) 6 times. (24 sts)
Rnd 21: (Sc in next 2 sts, dec) 6 times. (18 sts)
Rnd 22: (Sc in next st, dec) 6 times. (12 sts)
Finish stuffing.
Rnd 23: Work 6 dec. (6 sts)
Fasten off, leaving long tail for sewing. Thread yarn through front loops of rem 6 sts. Pull tight to close.
Eyebrows (make 2)
With C1, ch 6.
Row 1: Sc in 2nd ch from hook, sc in next 4 sts, sl st in last ch.
Fasten off, leaving long tail for sewing.
Neck
With C1, ch 2.
Rnd 1: Work 6 sc in second ch from hook. (6 sts)
Rnd 2: (Sc in next st, inc) 3 times. (9 sts)
Rnd 3: (Sc in next 2 sts, inc) 3 times. (12 sts)
Rnd 4: (Sc in next 3 sts, inc) 3 times. (15 sts)
Rnds 5-16: Sc in each st around.
Rnd 17: (Work 2 inc, sc in next 5 sts, 2 dec, sc in next 4 sts. (15 sts)
Rnd 18: Sc in each st around.
Rnd 19: Sc in next st, 2 inc, sc in next 5 sts, 2 dec, sc in next 3 sts. (15 sts) Updated 9/23/2021
Rnd 20: Sc in each st around.
Rnds 21-28: Rep Rnd 19.
Rnd 29: Sc in next st, 7 dec. (8 sts)
Fasten off, leaving long tail for sewing.
Thread yarn through front loops of remaining 8 stitches. Pull tight to close.
Body
With C1, ch 2.
Rnd 1: Work 6 sc in second ch from hook. (6 sts)
Rnd 2: Work 6 inc. (12 sts)
Rnd 3: (Sc in next st, inc) 6 times. (18 sts)
Rnd 4: (Sc in next 5 sts, inc) 3 times. (21 sts)
Rnd 5: (Sc in next 6 sts, inc) 3 times. (24 sts)
Rnd 6: (Sc in next 7 sts, inc) 3 times. (27 sts)
Rnd 7: (Sc in next 8 sts, inc) 3 times. (30 sts)
Rnd 8: (Sc in next 9 sts, inc) 3 times. (33 sts)
Rnd 9: (Sc in next 10 sts, inc) 3 times. (36 sts)
Rnd 10: (Sc in next 11 sts, inc) 3 times. (39 sts)
Rnds 11-18: Sc in each st around.
Rnd 19: (Sc in next 11 sts, dec) 3 times. (36 sts)
Rnd 20: (Sc in next 10 sts, dec) 3 times. (33 sts)
Rnd 21: (Sc in next 9 sts, dec) 3 times. (30 sts)
Rnd 22: (Sc in next 8 sts, dec) 3 times. (27 sts)
Rnd 23: (Sc in next 7 sts, dec) 3 times. (24 sts)
Rnd 24: Work 5 dec, sc in next 12 sts, dec. (18 sts)
Rnd 25: Sc in each st around.
Rnd 26: Work 4 dec, sc in next 6 sts, 2 dec. (12 sts)
Rnds 27-28: Sc in each st around.
Rnd 29: Work 6 dec. (6 sts)
Fasten off. Thread needle through front loops of remaining 6 stitches. Pull tight to close. Weave in ends.
Wings (make 2)
With C1, ch 2.
Rnd 1: Work 6 sc in second ch from hook. (6 sts)
Rnd 2: Work 6 inc. (12 sts)
Rnd 3: (Sc in next st, inc) 6 times. (18 sts)
Rnd 4: (Sc in next 2 sts, inc) 6 times. (24 sts)
Rnd 5: (Sc in next 3 sts, inc) 6 times. (30 sts)
Rnd 6: (Sc in next 4 sts, inc) 6 times. (36 sts)
Rnd 7: Sl st in next st, (ch 7, hdc in 2nd ch from hook, hdc in next 5 chs, sl st in next st) 3 times, (ch 6, hdc in 2nd ch from hook, hdc in next 4 chs, sl st in next st) 3 times, (ch 5, hdc in 2nd ch from hook, hdc in next 3 chs, sl st in next st) 3 times, (ch 4, hdc in 2nd ch from hook, hdc in next 2 chs, sl st in next st) 3 times, (ch 3, hdc in 2nd ch from hook, hdc in next ch, sl st in next st) 3 times, (ch 2, hdc in 2nd ch from hook, sl st in next st) 6 times, (ch 3, hdc in 2nd ch from hook, hdc in next ch, sl st in next st) 3 times, (ch 4, hdc in 2nd ch from hook, hdc in next 2 ch, sl st in next st) 3 times, (ch 5, hdc in 2nd ch from hook, hdc in next 3 chs, sl st in next st) 3 times, (ch 6, hdc in 2nd ch from hook, hdc in next 4 chs, sl st in next st) 3 times, (ch 7, hdc in 2nd ch from hook, hdc in next 5 chs, sl st in next st) 3 times.
Fasten off, leaving long tail for sewing.
Fold across axis from first st to 18th, overlapping feathers so there are two distinct layers of feathers. Fold one Wing with the long feathers to the left and one Wing with the long feathers to the right.
Finishing
Assembly
Sew Eyebrows to face slightly overlapping tops of eyes.
Set Body on a flat surface with tail pointed up. Sew decrease end of Neck to Body from the underside of Body at Rnd 4 across the center point and to Rnd 4 on the other side. Make sure it is in line with the tail so they both point up. The Neck will set on the ground, tilting back over Body and Body will tilt up a slight angle.
Sew Head to Neck, sewing front side of Rnds 1-5 of Neck to Rnds 14-18 of Head. Face beak forward.
Attach Wings with the longest feathers toward the back, flat side of the wing facing up, largest side of the wing touching Body. Sew the flat edge of Wing to Body between Rnds 8 and 17. The bottom of Wings are 8 sts apart and the top of Wings are 4 sts apart. Leave the feather sides of Wings unattached.
Thank you for the free pattern. She was a little tricky to put together, by I finally got it. She’s adorable.
I wish there was a clear picture of how the neck is attached to the body.
I love her. She’s just what I was looking for my granddaughter. thanks again
I made this pattern and the color changes are in the pattern under the body part.The head starts with the beak (black) , then change to white in round 9 and Papaya in round 12. It is all written out below remaining body parts what color to use.
I’m having trouble with the stitch count in the neck. Row 19 doesn’t seem to work out for 15 stitches. I keep getting 16. So far it’s coming out great.
Hello! I’ve reached out to the designer for advice and she or I will reply as soon as possible. Thanks! – Nicola, Editor
Hi Sherry! You’re right. There is a counting error on that round. It should be “sc in the next 3 sts” at the end. So it should read:
Rnd 19: Sc in next st, 2 inc, sc in next 5 sts, 2 dec, sc in next 3 sts. (15 sts)
The pattern above has now been updated is well. Thanks for bringing this to our attention! – Nicola, Editor
In response to Rachel’s color question Papaya (C1, 1 ball), Black (C2, 1 ball), White (C3, 1 ball). The ‘C’ and what number is indicated in pattern. Took me a while to figure that out
I believe the real problem with row 8, is the last 6 sc were left off. I counted number of stitches and no matter what explanation was used it only came to 9 and the last 6 sc were not part of it. If you look at the math you start with a total of 15, added 3 and subtracted 3 which would look like this 15 + 3 = 18 – 3 = 15 but the way row 8 is written there are only 9 sts left. example of how written 1+1+1+2+2+2+1+1+1-1-1-1 = 9 Where are the last 6 sts.
Hello! I’ve reached out to the designer for advice and she or I will reply as soon as possible. Thanks! – Nicola, Editor
In the Flamingo pattern, there appears to be an error. On Row 8, it says “Sc in next 3 sts, 3 inc, sc next 3, dec 3 (15)”
If you add 3 inc to first 3 sts, you get 9, add next 3 sts, you get 12, if you dec 3, you get 9, not 15. Same mistake is in Row 9.
I am trying to make this but beak s not coming out way it should according to your instructions. HELP!
Thank you, Teresa Drake
Hi Teresa! We’ve reached out to the designer for clarification and she or I will reply as soon as possible. Thanks! – Nicola
Hello! Update:
The stitch count for that round is correct.
The round reads: “Sc in next 3 sts, 3 inc, sc next 3, dec 3 (15)”
The round is worked as follows:
Sc, sc, sc, inc, inc, inc, sc, sc, sc, dec, dec, dec. This totals 15 stitches.
Or, to make it a little clearer still, the previous round has 15 sts, so here is the breakdown for how those stitches are worked in this round:
Sc in 1st, sc in 2nd, sc in 3rd, inc in 4th, inc in 5th, inc in 6th, sc in 7th, sc in 8th, sc in 9th, dec over 10th and 11th, dec over 12th and 13th, dec over 14th and 15th.
Since it increases 3 and decreases 3, the stitch count does not change from the previous round.
Hope that helps! – Nicola
Was reading to see if I thought I could make this and realized that the instructions don’t say when to change to which colors. Has anyone made this? Looks like maybe 8rows black, then 2 white, then the papaya for the rest?
Hello Rachel! We’ve reached out to the designer for clarification and she or I will reply as soon as possible. Thanks! – Nicola
Hello! The changes are in the pattern, but to sum it up, the piece starts with Black, changes to white at the beginning Round 9 and changes to Papaya at the beginning of Round 11. Hope that helps! – Nicola