


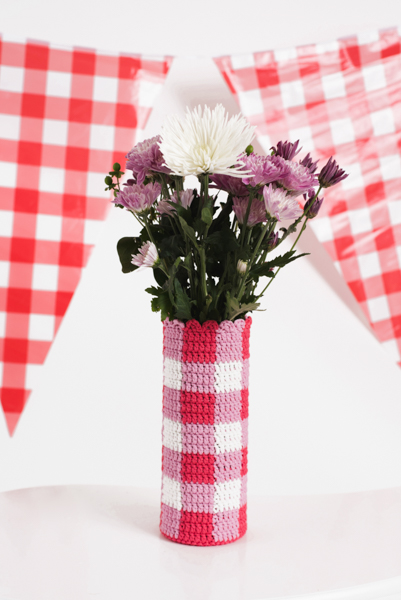
This vase cozy disguises a simple cylinder vase to make a bouquet of flowers extra special on Mother’s Day. The base is crocheted first to fit the bottom width of any size cylinder vase. The gingham pattern is then worked in the round in double crochet with two alternating colors for each round. A simple scallop edging completes the sweet look.
Skill Level: Easy
Size: Approx. 10” tall and fits snug around a 3.45 x 9.5” cylinder vase; top edge extends approx. 0.5” above glass vase’s top edge.
Gauge: 4 sts = 1” (approximately)
Exact gauge is not critical since final crocheted base width determines fit of cozy.
Let’s celebrate ILC’s 10th birthday! Enter to win the yarn needed to make the Charming Gingham Vase Cover right here.

Materials
 Yarn: Scheepjes Bloom (100% Cotton; 87 yards [80 meters]/50 grams): 408 Geranium (A, 1 skein), 409 Rose (B, 1 skein), 423 Daisy (C, 1 skein).
Hook: US size G/6 (4.0 mm)
Notions: Tapestry needle, 3.45 x 9.5” cylinder glass vase (available at Target)
Pattern Notes
Pattern is written with a 12-stitch repeat (6 sts each for 2 colors).
The base width of the cozy (before starting the vertical gingham pattern) should measure the same width as the base of the cylinder vase. If making a cozy for a larger vase, add 12 sts evenly for every extra round. When final round of base is completed (which should be the same diameter as the vase), follow gingham pattern as written.
After completing base, work is turned to work the vertical part of the vase. In the finished cozy, the RS of the base will face up and the WS will face down. This change in direction helps to define the bottom edge of the cozy.
Changing colors in rnds: When working last dc of a 6-dc group, on last yo of the dc, yo with new color and draw through last 2 lps on hook.
Always crochet over yarn not being used in each color section.
Each color change needs to be slightly adjusted before continuing with the next color. Before completing the second yo with the addition of the new color, pull on the unused yarn carried in back to tighten the 6-st wide color section just worked, yo with the new color and pull through two loops remaining on hook, then pull on old color to tighten loop on hook. When working the first dc in the new color, it helps to pull on the unused yarn being carried behind and worked over one more time. These adjustments seem fussy but you will develop a rhythm. The tightness of the unused yarn being carried and worked over determines the snug fit and structured look of the cozy.
Cozy should fit snug but not so tight that it’s hard to insert or remove the vase.
Pattern
Base
Note: Rework at a tighter tension for the first 4 rnds if base turns out slightly too wide.
With A and beg at bottom, make magic ring.
Rnd 1 (WS): Ch 3 (counts as first dc throughout), work 11 dc in ring, sl st in top of beg ch-3 to join, pull magic ring tight. (12 dc)
Rnd 2: Ch 3, dc in same st as join, work 2 dc in each dc around, sl st in top of beg ch-3 to join. (24 dc)
Rnd 3: Ch 3, dc in same st as join, *dc in next st, work 2 dc in next st; rep from * around, ending with dc in last st, sl st in top of beg ch-3 to join. (36 dc)
Rnd 4: Ch 3, dc in same st as join, *dc in next 2 sts, work 2 dc in next st; rep from * around, ending with dc in next 2 sts, sl st in top of beg ch-3 to join. (48 dc)
Note: Place glass vase on top of Base. Base should be approx. same size as vase base (or at most, 0.25” beyond glass vase edge). If it extends too far, the vase cozy won’t fit snug and will eventually sag.
If making a cozy for a vase with a diameter wider than 3.5”, cont increasing 12 sts evenly for every rnd until Base is same size as glass vase base (i.e. Rnd 5 would have 3 dc sts between the increases, Rnd 6 would have 4 dc sts between the increases, Rnd 7 would have 5 dc sts between the increases, etc.).
Body
Note: The very first round of the gingham pattern sets the width and tension for the upright part of the cozy. It is worked at what feels like a tighter tension because the unused yarn being carried behind the working stitches is pulled tight before the next color change. This is the only round that should feel too tight when crocheting. Be aware, however, that you might start crocheting tighter as more rounds are completed. Try to maintain the same tension throughout after Rnd 5. Each square should be approx. the same width from bottom to top.
Rnd 5 (RS): Ch 3, turn (WS of base will now face up), dc in next 5 sts, change to B with second yo of last st completed, dc in next 6 sts (working over unused yarn per color section throughout), change to A with second yo of last st completed. Cont in patt of 6 dc in A and 6 dc in B, ending with changing to A with the second yo of last dc completed, sl st in top of beg ch-3 to join.
Rnds 6-7: With A, ch 3, dc in next 5 sts, change to B with second yo of last dc completed, dc in next 6 sts, change to A with second yo of last dc completed. Cont in patt of 6 dc in A and 6 dc in B, changing to A with the second yo of last dc completed, sl st in top of beg ch-3 to join for Rnd 6. For Rnd 7, do not change colors at end of rnd. Sl st with B in top of beg ch-3 to join. Fasten off A.
Note: After working the first 2-3 upright rnds, place vase in cozy to make sure it fits and does not gap. When the vase is lifted, the cozy should stay on.
Rnds 8-10: With B, ch 3, dc in next 5 sts, change to C with second yo of last dc completed, dc in next 6 sts, change to B with second yo of last dc completed. Cont in patt of 6 dc in B and 6 dc in C, changing to B with the second yo of last dc completed, sl st in top of beg ch-3 to join for Rnds 8 and 9. For Rnd 10, do not change colors at end of rnd. Sl st with C in top of beg ch-3 to join. Fasten off C.
Rnds 11-13: With A, ch 3, dc in next 5 sts, change to B with second yo of last dc completed, dc in next 6 sts, change to A with second yo of last dc completed. Cont in patt of 6 dc in A and 6 dc in B, changing to A with the second yo of last dc completed, sl st in top of beg ch-3 to join for Rnds 11 and 12. For Rnd 13, do not change colors at end of rnd. Sl st with B in top of beg ch-3 to join. Fasten off A.
Rnds 14-16: Rep Rnds 8-10.
Rnds 17-19: Rep Rnds 11-13.
Rnds 20-22: Rep Rnds 8-10.
Rnds 23-25 (final 3 rnds before edging): Rep Rnds 11-13, changing to A with second yo of last dc completed for Rnd 25. Sl st in top of beg ch-3 of rnd to join.
Edging
Rnd 26: *Ch 3 (cont with A), dc in same st (at the same time working over unused B), ch 1, sk 1 st, sl st in next 2 sts, ch 3, dc in same st, ch 1, sk 1 st, sl st in next st, sl st with B in next st (at the same time working over unused A), ch 3, dc in same st, ch 1, sk 1 st, sl st in next 2 sts, ch 3, dc in same st, ch 1, sk 1 st, sl st with A in next st; rep from * around. ending with sl st with A in base of beg ch-3 of rnd to join. Fasten off A and B.
Finishing
Carefully turn inside out and weave in loose ends.
Turn right side out and insert glass vase.
Pull edging upwards gently approx.0.5” above glass vase to shape and hide glass edge.