


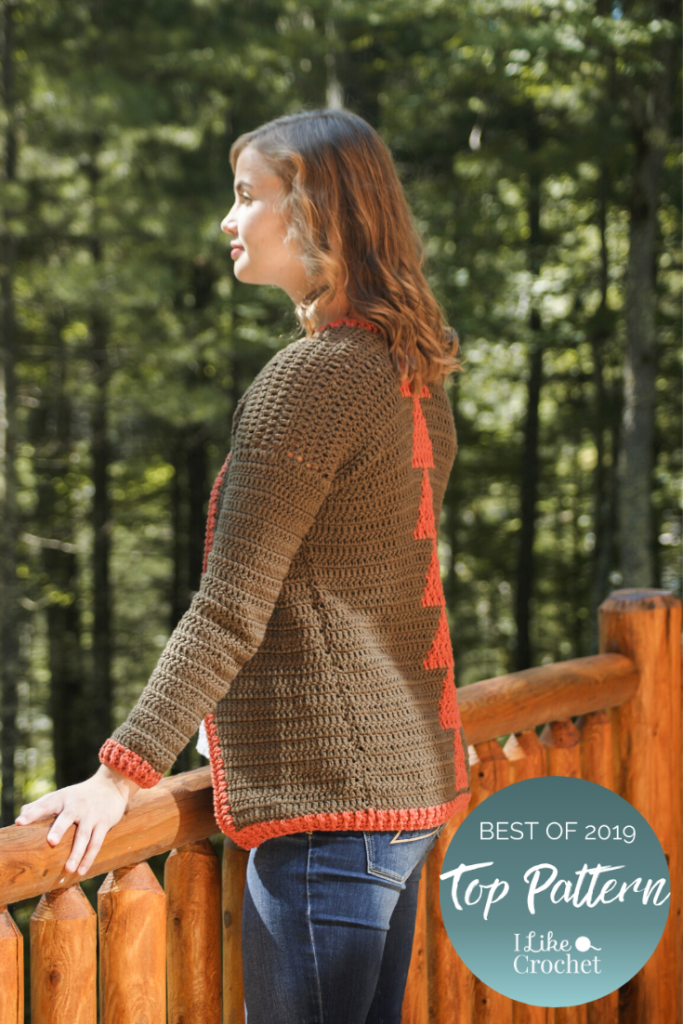
The Timberlane Cardigan is inspired by the great outdoors and everything wonderful about cabin living. Rust-colored triangles in post stitch pop against a mossy green background made of double crochet. Crochet this beauty for a statement piece you’ll wear all season long.
Skill Level: Intermediate
Size: Finished Bust Size 30 (34, 38, 42, 46, 50)” to fit bust 30 (34, 38, 42, 46, 50)”
0” positive ease recommended.
Shown in size 30”
Gauge: 14 sts and 7 rows = 4” [10 cm] in dc using larger hook
Materials
 Yarn: Sugar Bush Yarns Bold (100% Merino Wool; 190 yards [174 meters]/100 grams): 3205 Chestnut Tree (MC, 5 (6, 7, 7, 9, 9) balls), 3007 Rusty Road (CC, 1 (1, 1, 2, 2, 2 balls)
Hook: US size H/8 (5.0 mm), US size G (4.5 mm) or one size smaller than the size used to obtain gauge
Notions: Tapestry needle
Pattern Notes
The cardigan is worked in 3 separate panels that are sewn together at the sides and shoulders.
Sleeves are then joined at the armhole and worked in turned rounds.
Ch 3 at beginning of rows counts as a dc.
When changing colors, yo with the new color on the stitch before the color change. This allows for a seamless color change.
Carry both the MC and CC throughout back panel (like tapestry crochet, but with dc). Do not cut the yarn for the post-stitch color work, but carry the colors as follows:
Carry MC throughout entire piece (even through all CC sections).
Carry CC color only through the CC sections. Drop the CC when working MC sections, then pick it back up when you get back to CC section.
When dropping a color, always leave it at the back of the work. This way any strands that may look messy will not be seen.
Pattern
Back Panel
With MC and larger hook, fsc 57 (63, 71, 77, 85, 91).
Row 1: Ch 3, dc in next 21 (24, 28, 31, 35, 38) fsc, with CC dc in next 13 dc, with MC dc in last 22 (25, 29, 32, 36, 39) dc, turn.
Row 2: Ch 3, dc in next 22 (25, 29, 32, 36, 39) dc, with CC bpdc in next dc, (dc in next dc, bpdc in next dc) 5 times, with MC dc in last 23 (26, 30, 33, 37, 40) dc, turn.
Row 3: Ch 3, dc in next 23 (26, 30, 33, 37, 40) dc, with CC fpdc in next dc, (dc in next dc, fpdc in next dc) 4 times, with MC dc in last 24 (27, 31, 34, 38, 41) dc, turn.
Row 4: Ch 3, dc in next 24 (27, 31, 34, 38, 41) dc, with CC bpdc in next dc, (dc in next dc, bpdc in next dc) 3 times, with MC dc in last 25 (28, 32, 35, 39, 42) dc, turn.
Row 5: Ch 3, dc in next 25 (28, 32, 35, 39, 42) dc, with CC fpdc in next dc, (dc in next dc, fpdc in next dc) twice, with MC dc in last 26 (29, 33, 36, 40, 43) dc, turn.
Row 6: Ch 3, dc in next 26 (29, 33, 36, 40, 43) dc, with CC bpdc in next dc, dc in next dc, bpdc in next dc, with MC dc in last 27 (30, 34, 37, 41, 44) dc, turn.
Row 7: Ch 3, dc in next 21 (24, 28, 31, 35, 38) dc, with CC dc in next 13 dc, with MC dc in last 22 (25, 29, 32, 36, 39) dc, turn.
Rep Rows 2-7 until 43 (43, 49, 49, 55, 55) rows are complete or until Back Panel reaches your desired length (adjust length here).
Fasten off, leaving a long tail for sewing.
Front Panel (make 2)
With MC and larger hook, fsc 25 (28, 32, 35, 39, 42).
Row 1: Ch 3, dc in each st across, turn.
Row 2: Ch 3, dc in each st across, turn.
Rep Row 2 until reached the same number of rows as for Back Panel.
Fasten off, leaving a long tail for sewing.
Assembly
Lay out Back Panel and two Front Panels together with the RS facing.
Sew shoulder seams; there should be a gap of 7 sts in the middle of the Front Panels. Sew side seams, leaving a 6.5 (7, 7.5, 8, 8.5, 9)” armhole opening.
Sleeves
Rnd 1: With larger hook and MC, join with sl st at the base of armhole, ch 2 (does not count as dc, here and throughout Sleeves), dc 46 (50, 54, 56, 60, 64) evenly around armhole, join with sl st to first dc, turn.
Rnds 2-12: Ch 2, dc in each st around until 2 sts rem, dc2tog, join with sl st to first dc, turn. (35 (39, 43, 45, 49, 53) dc at end of Rnd 12)
Rnds 13-18: Ch 2, dc in each st around, join with sl st to first dc, turn.
Rnds 19-21: Rep Rnd 2. (32 (36, 40, 42, 46, 50) dc at end of Rnd 21)
Rnds 22-29: Ch 2, dc in each st around, join with sl st to first dc, turn.
Note: For longer or shorter sleeves, simply keep add or subtract rnds here. Keep in mind the ribbing will add about 1” more.
Sleeve Ribbing
Rnd 1: With smaller hook and CC, join with sl st at the end of previous rnd, ch 2, dc in each dc around, join with sl st to first dc, turn.
Rnd 2: Ch 2, *fpdc in next dc, bpdc in next dc; rep from * around, join with sl st to first fpdc, turn.
Rnd 3: Ch 2, *bpdc in next dc, fpdc in next dc; rep from * around, join with sl st to first bpdc, turn.
Fasten off and weave in ends.
Bottom Ribbing
Row 1: With RS facing, smaller hook, and CC, join with sl st at the bottom right corner of cardigan, ch 3, dc evenly across first Front Panel, Back Panel, and second Front Panel, turn.
Row 2: Ch 3, *fpdc in next dc, bpdc in next dc; rep from * across, turn.
Row 3: Ch 3, *bpdc in next dc, fpdc in next dc; rep from * across, turn.
Fasten off and weave in ends.
Edging
Row 1: With RS facing, larger hook, and CC, join with sl st at the bottom right corner of ribbing, ch 3, dc evenly around the entire outside edge of cardigan (approx. 2 dc per row, plus the 7 dc in between front panels), do not turn.
Row 2: Work the crab stitch (backward single crochet) across all dc.
Fasten off.
Finishing
Weave in all ends.
This is pretty.
These pictures are poor representations of this pattern. Neither the front or back are shown. This makes zero sense.
Additional photos have been added – Nicola, Editor
the pictures show at least one button, did i miss it in the pattern somewhere? can you say how many buttons and what size they are? thank you. dawn
To view photos, scroll down, photos on the right-hand side of the page.
Not a button, what looks like a button at the top right of the lower picture is the model’s finger tip/fingernail.
Great cardi will be good in cotton for Summer hope I can get it finished by Christmas
will be good for evenings here in Australia
Tanks Heaps
Bernadette