


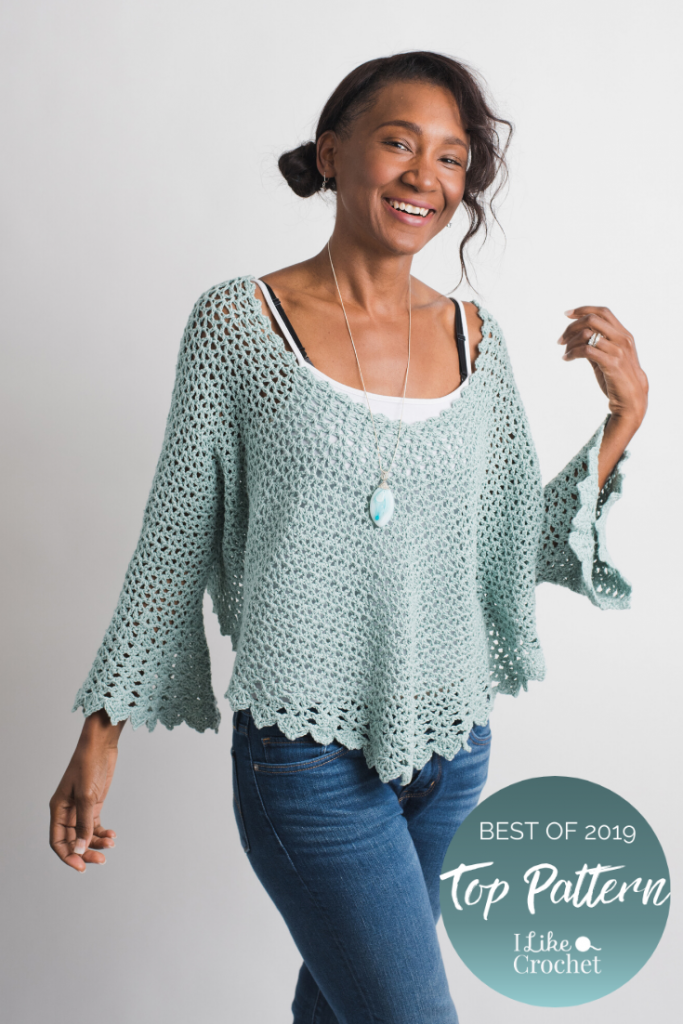
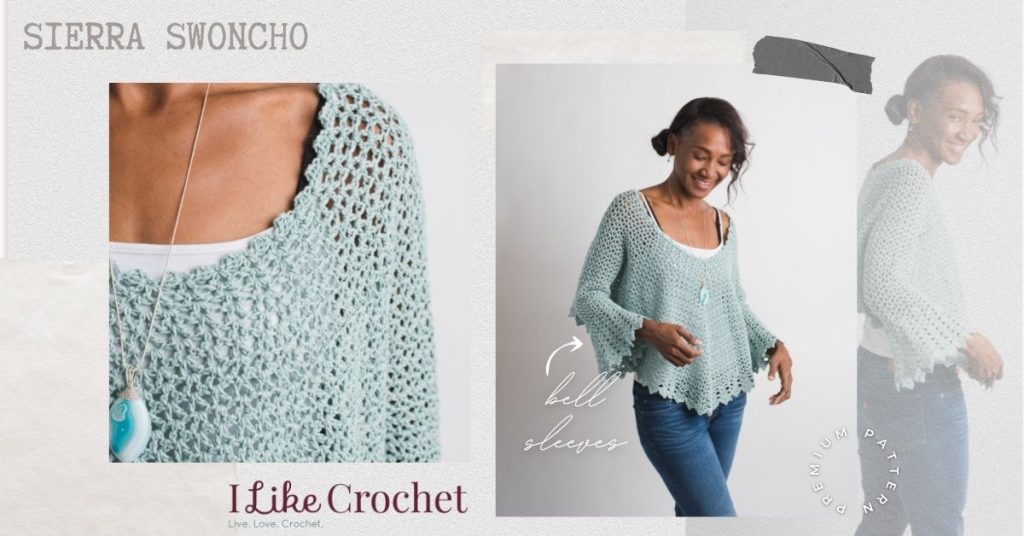
Part sweater and part poncho, this classic pattern pairs simple mesh with dramatic lace borders to create a sweet springtime layer. Belled cuffs and a swingy loose poncho style fit make this a garment you will delight in wearing as the season changes.
Skill Level: Advanced
Size: Small (Medium/Large, X Large/2X), 48 (52, 52)” wide from cuff to cuff, 17 (18, 20)” long from shoulder to hem.
About 8” positive ease recommended at the chest.
Sleeves fit about 1” positive ease recommended at the elbow
Shown in size Medium/Large
Gauge: 6 V-sts and 8 rows = 4” [10 cm] in V-st pattern after blocking
Materials
 Yarn: Berroco Corsica (90% Cotton,10% Cashmere; 150 yards [137 meters]/50 grams):
#3624 Venus (7 (8, 10) balls)
Note: This yarn is now discontinued. See YarnSub for suitable substitutions.
Hook: US size I/9 (5.5 mm)
Notions: Stitch markers (3 colors), tapestry needle, scrap contrasting color yarn
Abbreviations
CBN – Center Back Neck
PM – Place Stitch Marker
Special Stitches
V-Stitch (V-st): (dc, ch 1, dc) in indicated st or sp.
Increase Shell (IncShl): ([dc, ch 1] 2 times, dc) in indicated st or sp.
Shell Stitch (Shl): (2 dc, ch 1, 2 dc) in indicated st or sp.
Fan Stitch (Fan): ([dc, ch 1] 3 times, dc) in indicated st or sp.
3 V Stitch Shell (3V-Shl): (dc, ch 1, dc) 3 times in indicated st or sp.
Pattern Notes
*Pattern Update 2/25/20: Per popular request, we’ve included a video tutorial from designer Andee Graves for the Crochet Stacked Rows. We hope this helps!*
This pattern is worked in the round from the top down, then armholes are joined and sleeves are worked in the round from each armhole. Additional rounds are worked off the remaining body stitches to create border.
Stitch markers are very important for following this pattern. Six markers in one color for regular increase points, 2 or 4 in different color for bustline increase points, 4 in 3rd color for armhole markers.
Bustline increases are written for A-B cup in size Small, B-C cup in size Med/Large and C+ cup in size XL/2X. Number of increases can be adjusted for larger or smaller bustline as needed. If going to a A-B cup size in Med/Large or XL/2X use same st marker placement as instructed for size Med/Large but stop bust increases in Rnd 7.
Sample is worked in size Med/Large and had 38g of yarn left from 8 50g balls.
For a quick video tutorial on Crochet Stacked Rows, check out Andee’s video below
Pattern
Stacked Rows Foundation / Neckline
Row 1 (WS): Ch 2, sc in 2nd ch from hook.
Row 2 (RS): Ch 3, turn, 2 dc in sc.
Row 3: Ch 1, turn, sc in first dc.
Rows 4-60 [72, 72]: Rep Rows 2-3, ending with a Row 2, without twisting stacked rows sl st to bottom of Row 1 to form ring. (30 [36, 36] sc rows, 30 [36, 36] dc rows)
Body
Turn to work along straight edge of neckline with WS facing.
Size Small Only
PM for Increase points in 2nd, 7th, 12th, 17th, 22nd, and 27th sc rows from join. 27th sc row is also CBN.
Sizes Med/Large (XL/2X) Only
PM for increase points in 2nd, 8th, 14th, 20th, 26th, and 32nd sc rows from join. 32nd sc row is also CBN.
All Sizes
Tie a contrasting piece of yarn thru sc row at CBN.
Rnd 1: Ch 4, dc in same sc row as join (counts as first V-st of Rnd), sk next dc row, [*V-st in next sc row, sk next dc row*; rep from * to * until reach marked sc row, IncShl in marked sc row, move st marker to center dc of IncShl just made] 6 times; rep from * to * until work in last sc row of neckline, sk next dc row, sl st to 3rd ch of beginning ch-4. (24 [30, 30] V-sts, 6 IncShls)
Rnd 2 (RS): Turn, (sl st, ch 4, dc) in ch-1 sp of first V-st (counts as first V-st of Rnd), *V-st in each ch-1 sp around until reach marked IncShl, V-st in first ch-1 sp of IncShl, ch 1, sk marked dc, move st marker to ch-1 sp just made, V-st in 2nd ch-1 sp of same IncShl*; rep from * to * until work in last marked IncShl, V-st in each ch-1 sp until work in last V-st of previous rnd, sl st to 3rd ch of beginning ch-4. (36 [42, 42] V-sts, 6 marked ch-1 sp)
Rnd 3: Turn, (sl st, ch 4, dc) in ch-1 sp of first V-st (counts as first V-st of Rnd), V-st in each ch-1 sp around until work in last V-st of previous rnd, move up st markers to ch-1 sp of V-st worked in marked ch-1 sps, sl st to 3rd ch of beginning ch-4. (42 [48, 48] V-sts)
Add st markers for bustline increases in Front of Body 4 (4, 3 and 5) V-sts out from either side of center front marked V-st. Updated 7/13/2021
Rnd 4: Turn, (sl st, ch 4, dc) in ch-1 sp of first V-st (counts as first V-st of Rnd), *V-st in each ch-1 sp around until reach marked ch-1 sp, IncShl in marked ch-1 sp, move st marker to center dc of IncShl just made*; rep from * to * until work in last marked ch-1 sp, V-st in each ch-1 sp until work in last V-st of previous rnd, sl st to 3rd ch of beginning ch-4. (34 [40, 38] V-sts, 8 [8, 10] IncShls)
Rnd 5: Rep Rnd 2. (50 [56, 58] V-sts, 8 [8, 10] marked ch-1 sps)
Rnd 6: Rep Rnd 3. (58 [64, 68] V-sts)
Size Small Only
Remove bustline increase markers.
Rnds 7-12: Rep Rnds 4-6. (82 [96, 108] V-sts at end of Rnd 12)
All Sizes
Remove bustline increase markers.
Rnds 13-23 [23, 26]: Rep Rnds 4-6, ending with a Rnd 5. (124 [138, 162] V-sts, 6 marked ch-1 sps at end of Rnd 23 [23, 26])
Rnd 24 [24, 27] (Armhole joining Rnd): Using Armhole Stitch markers, count out from Center Back marked ch-1 sp in same direction as will be working Rnd 24 [24, 27], PM in 40th [41st, 47th] ch-1 sp. Then counting from Center Back marked ch-1 sp in opposite direction, PM in 23rd [25th, 24th] ch-1 sp.
Turn, (sl st, ch 4, dc) in ch-1 sp of first V-st (counts as first V-st of Rnd), *V-st in each ch-1 sp around until work in ch-1 sp with armhole marker, count back 16 [16, 24] V-sts beginning with V-st just completed, with WS of body together, slip st snugly between 16th and 17th [16th and 17th, 24th and 25th] V-st, (armhole made)*; rep from * to * once, V-st in each ch-1 sp around to beginning of Rnd, sl st to 3rd ch of beginning ch-4. (130 [144, 168] V-sts at end of Rnd 24 [24, 27])
Do Not Fasten Off.
Leave in Front Center and Back Center increase point st markers, remove the other stitch markers.
Opening Border
Rnd 1 (V-sts with 2 regular increase points, skipped V-sts at armhole for Small and Med/Large): Count down 3 (4, 0) V-sts from armhole join in both directions along Body opening and PM with different color from increase markers, turn, (sl st, ch 4, dc) in ch-1 sp of first V-st, *V-st in each ch-1 sp around until work in first marked armhole V-st, skip next 4 (6, 0) V-sts, V-st in ch-1 sp of next marked V-st, V-st in each ch-1 sp until reach increase marker, IncShl in marked ch-1 sp, move st marker to center dc of IncShl just made*; rep from * to * once, V-st in each ch-1 sp until work in last V-st of previous rnd, sl st to 3rd ch of beginning ch-4. (88[104, 118] V-sts, 2 IncShls) Updated 4/13/2022
Rnd 2: Turn, (sl st, ch 4, dc) in ch-1 sp of first V-st, *V-st in each ch-1 sp around, until reach marked IncShls, V-st in first ch-1 sp of IncShl, ch 1, skip marked dc, remove st marker, V-st in 2nd ch-1 sp of same IncShl*; rep from * to * until work in last V-st of previous rnd, sl st to 3rd ch of beginning ch-4. (92 [108, 122 V-sts, 2 extra ch-1 sps) Updated 4/13/2022
Rnd 3: Turn, (sl st, ch 4, dc) in ch-1 sp of first V-st, V-st in each ch-1 sp around until work in last V-st of previous Rnd, sl st to 3rd ch of beginning ch-4. (94 [108, 124] V-sts) Updated 4/13/2022
Rnd 4 (Fans worked every other V-st): Turn, (sl st, ch 4, V-st) in center ch-1 sp of first V-st, *ch 1, skip next V-st, Fan in ch-1 sp of next V-st*; rep from * to * until only 1 V-st remains unworked, ch 1, skip last V-st, (dc, ch 1) in ch-1 sp where Rnd started, sl st to 3rd ch of beginning ch-4, completes first Fan of rnd. (47 [55, 62] Fans, 50 [52, 62] ch-1 sps) Updated 4/13/2022
Rnd 5 (Alt Fan & 3V-Shl): (Sl st, ch 4, turn, V-st) in center ch-1 sp of first Fan, working only in center ch-1 sps of Fans: *3V-Shl in next indicated ch-1 sp, Fan in next indicated ch-1 sp*; rep from * to * 23 (26, 30) times, Fan in next indicated ch-1 sp, (XL/2X only: 3V-Shl in next indicated ch-1 sp), (dc, ch 1) in ch-1 sp where rnd started, sl st to 3rd ch of beginning ch-4, completes first Fan of rnd. (24 [27, 31] Fans, 23 [26, 31] 3V-Shls) Updated 4/13/2022
Rnd 6 (All 3V-Shl): (Sl st, ch 4, turn, dc, V-st) in center ch-1 sp of first Fan, working only in center ch-1 sps of 3V-Shls and center ch-1 sps of Fans, 3V-Shl in each indicated ch-1 sp around, V-st in ch-1 sp where rnd started, sl st to 3rd ch of beginning ch-4, completes first 3V-Shl of rnd. (47 [55, 62] 3V-Shl) Updated 4/13/2022
Rnd 7: Do Not Turn, (sl st, ch 1, sc, ch 3, sc) in center ch-1 sp of first 3V-Shl, ch 3, sk 2 dc, sc in next ch-1 sp, sk next dc, sl st before next dc, *sk dc, sc in next ch-1 sp, ch 3**, sk 2 dc, (sc, ch 3, sc) in next ch-1 sp, ch 3, sk 2 dc, sc in next ch-1 sp, sk 1 dc, sl st before next dc*; rep from * to * 46 (54, 61) times, then rep from * to ** once, sl st to first sc of rnd. Fasten off. (188 [220, 248] sc, 141 [165, 186] ch-3 sps, 47 [55, 62] sl st) Updated 4/13/2022
Sleeves
Working around V-sts in armhole opening.
Rnd 1: With WS of last Body rnd of armhole facing, attach yarn in ch-1 sp of V-st at bottom of armhole opening toward back of Body, (sl st, ch 4, dc) in ch-1 sp of first V-st, counts as first V-st in rnd, V-st in ch-1 sp of each V-st around, sl st to 3rd ch of beginning ch-4. (16 [16, 24] V-sts)
Rnd 2: (Sl st, ch 4, turn, dc) in ch-1 sp of first V-st, counts as first V-st in rnd, V-st in ch-1 sp of each V-st around, sl st to 3rd ch of beginning ch-4. (16 [16, 24] V-sts)
Rnds 3-4 [6, 4]: Rep Rnd 2. (16 [16, 24] V-sts)
Rnd 5 [7, 5]: (Sl st, ch 4, turn, 2 dc) in ch-1 sp of first V-st,(*V-st in ch-1 sp of next 7 V-sts*, Shl in ch-1 sp of next V-st) 1 (1, 2) times; rep from * to * once, dc in ch-1 where rnd started, sl st to 3rd ch of beginning ch-4, completes first Shl st of rnd. (14 [14, 21] V-sts, 2 [2, 3] Shls)
Rnd 6 [8, 6]: (Sl st, ch 4, turn, 2 dc) in ch-1 sp of first Shl, (*V-st in next ch-1 sp, Shl in next ch-1 sp, V-st in next 3 ch-1 sps, Shl in next ch-1 sp, V-st in next ch-1 sp*, Shl in next ch-1 sp) 1 (1, 2) times; rep from * to * once, dc in ch-1 where rnd started, sl st to 3rd ch of beginning ch-4, completes first Shl st of rnd. (10 [10, 15] V-sts, 6 [6, 9] Shls)
Rnd 7 [9, 7]: (Sl st, ch 4, turn, 2 dc) in ch-1 sp of first Shl, *V-st in next ch-1 sp, Shl in next ch-1 sp*; rep from * to * 6 (6, 10) times, V-st in next ch-1 sp, dc in ch-1 where rnd started, sl st to 3rd ch of beginning ch-4, completes first Shl st of rnd. (8 [8, 12] V-sts, 8 [8, 12] Shls)
Rnd 8 [10, 8]: (Sl st, ch 4, turn, 2 dc) in ch-1 sp of first Shl, (*Shl in next 2 ch-1 sps, [V-st in next ch-1 sp, Shl in next ch-1 sp] 2 times*, Shl in next 2 ch-1 sps) 1 (1, 2) times; rep from * to * once, Shl in next ch-1 sp, dc in ch-1 where rnd started, sl st to 3rd ch of beginning ch-4, completes first Shl st of rnd. (4 [4, 6] V-sts, 12 [12, 18] Shls)
Rnd 9 [11, 9]: (Sl st, ch 4, turn, 2 dc) in ch-1 sp of first Shl, Shl in each ch-1 sp around, dc in ch-1 where Rnd started, sl st to 3rd ch of beginning ch-4, completes first Shl st of Rnd. (16 [16, 24] Shls)
Rnd 10 [12, 10]: (Sl st, ch 4, turn, V-st) in ch-1 sp of first Shl, *Shl in next 3 ch-1 sps, Fan in next ch-1 sp*; rep from * to * 2 (2, 4) times, Shl in next 3 ch-1 sps, (dc, ch 1) in ch-1 where rnd started, sl st to 3rd ch of beginning ch-4, completes first Fan of rnd. (12 [12, 18] Shls, 4 [4, 6] Fans)
Rnd 11 [13, 11]: (Sl st, ch 4, turn, V-st) in center ch-1 sp of first Fan, *working only in ch-1 sps of Shls and center ch-1 sps of Fans, Shl in next indicated ch-1 sp, Fan in next indicated ch-1 sp*; rep from * to * 6 (6, 10) times, Shl in next indicated ch-1 sp, (dc, ch 1) in ch-1 where rnd started, sl st to 3rd ch of beginning ch-4, completes first Fan of rnd. (8 [8, 12] Shls, 8 [8, 12] Fans)
Rnd 12 [14, 12]: (Sl st, ch 4, turn, V-st) in center ch-1 sp of first Fan, working only in ch-1 sps of Shls and center ch-1 sps of Fans, Fan in each indicated ch-1 sp around, (dc, ch 1) in ch-1 where rnd started, sl st to 3rd ch of beginning ch-4, completes first Fan of rnd. (16 [16, 24] Fans)
Rnd 13 [15, 13]: (Sl st, ch 4, turn, dc, V-st) in center ch-1 sp of first Fan, *working in center ch-1 sps of Fans, Fan in next indicated ch-1 sp, 3V-Shl in next indicated ch-1 sp*; rep from * to * 6 (6, 10) times, Fan in next indicated ch-1 sp, V-st in ch-1 where rnd started, sl st to 3rd ch of beginning ch-4, completes first 3V-Shl of rnd. (8 [8, 12] Fans, 8 [8, 12] 3V-Shls)
Rnd 14 [16, 14]: (Sl st, ch 4, turn, dc, V-st) in center ch-1 sp of first 3V-Shl, working in center ch-1 sps of 3V-Shls and center ch-1 sps of Fans, 3V-Shl in each indicated ch-1 sp around, V-st in ch-1 sp where rnd started, sl st to 3rd ch of beginning ch-4, completes first 3V-Shl of rnd. (16 [16, 24] 3V-Shl)
Rnd 15 [17, 15]: Do Not Turn, (sl st, ch 1, sc, ch 3, sc) in center ch-1 sp of first 3V-Shl, ch 3, sk 2 dc, sc in next ch-1 sp, sk next dc, sl st before next dc, *sk dc, sc in next ch-1 sp, ch 3**, sk 2 dc, (sc, ch 3, sc) in next ch-1 sp, ch 3, sk 2 dc, sc in next ch-1 sp, sk 1 dc, sl st before next dc*; rep from * to* 14 (14, 22) times; rep from * to ** once, sl st to first sc of Rnd. Fasten off. (64 [64, 96] sc, 48 [48, 72] ch-3 sps,16 [16, 24] sl st)
Repeat for 2nd sleeve.
Finishing
Gently block to define points at cuffs and border. Weave in all ends.
Sizes Small and Medium/Large Only
Sew tops of skipped V-sts under armhole to each other using a whip stitch.
Like so many others, I really love this pattern, and was excited to start, but find the instructions beyond confusing. I have restarted and reworked it so many times, but I wonder if I will ever finish. I’ve read through all the comments and they helped me to figure out some of my confusion, but now I’m stuck on when to turn, and when not to turn, which rows are RS, and which rows are wrong, Because the instructions refer you to previous Rose worked, but do not follow the initial pattern of every even row being RS. Beautiful, but most confusing and therefore, time-consuming, so probably will not repeat, assuming I ever finish.
Hi Lisa,
Thank you for your comment and feedback. I’m passing this along to our tech editor for clarification. Please stay tuned.
Explains increase shell.
What is the explanation for ([dc, ch 1]2times, dc)
Is all this in one stitch
This is my first finished pattern from this magazine and I’m afraid that this pattern was very confusing to get started. I finally figured out the pattern stitch, only have to have more confusing directions for under the arms. I ended up just counting out the stitches myself and just continuing on with the body. The body was VERY short, so I just ended up continuing the pattern stitch without additional increases until it was a length that I liked. I also kept the sleeves short since it’s almost summer. I didn’t see a place to share finished photos in the comments, so I posted a photo on the Ravelry page. My fingers are crossed that not all of the patterns are this confusing.
bonjour, est-il possible d’avoir les explications en Français merci
Hi there, unfortunately we do not offer our patterns in French at this time. Please let me know if I can be of further assistance. – Nicola, Editor
Hi, I am waiting for a reply from you on this pattern. I am so anxious to make it…. I just can’t get past the first row of shells around the neckline. I am using a 9 or I hook. It calls for 72 total stitches. 36 doubles & 36 singles. It comes out WAY to long …. What am I doing wrong.. My gauge is correct…. Oh I hope you can help me , I am so anxious to make this. I am making the 2 XL… I have the feeling I am going to need you every now & then but it is lovely & the yarn was costly…. I hope I hear from you & you can tell me why this is happening…. Thank you sooooo much….????
Hello! I’ve reached out to the designer for advice and she or I will reply as soon as possible. Thanks! – Nicola, Editor
Hi , I am having trouble with this payers. I am making the 2xl . I have the right yarn 90% cotton, 10% silk. A substitute… This pattern is calling for repeating rows 2&3 72 times. 36 doubles, 36 singles. The pattern calls for an I or 9 hook. 72 repeats with the neck shell round is sooooooo long. It would fall right off me when I join it to make the first round… What am I doing wrong ?
Hello! I’ve reached out to the designer for advice and she or I will reply as soon as possible. Thanks! – Nicola, Editor
Is it possible to lengthen the body of this top? I have not done anything other than clance through the pattern to see if there was any obvious section about lengthening or shortening, so I apologise if I missed that anywhere.
For the people who are confused about the foundation row… I haved tried that a few times just to see how to do it… not had much luck, but there are Many, Many videos, and tutorials all over the internet that I am sure would help. You just need to find the one that works for You. Its become such a popular things, perhaps us oldies need to step into modern times… 😉
I’m doing the small size. End 1 opening border I’m getting 88 V sts after skipping 4 V sts twice. I can’t figure out how to get 94 total V sts for that round like the pattern calls for
Thank you for the pattern. I have started this and it seems to be going quite well. Sometimes the instructions are a tad confusing but then it all makes sense. Just keep watching and moving the markers. Very happy with it so far but I need more yarn than what was told.
It shows 2 different yarns on this pattern… Which one do I need ?. I have looked for one of the yarns on an the same pattern that I saved awhile ago & it said that yarn was not made anymore…. Could you give me a sight where I could find the yarn in this pattern…?
Hello! Yes, this yarn is now discontinued. I recommend YarnSub for substitutions:
https://yarnsub.com/yarns/berroco/corsica
-Nicola, Editor
I made this to round 6 in M/L but the neckline looked much smaller than pictured when I slipped it over my head. Tried the XL but still doesn’t drape down as far as the picture. If I start over and do more of rows 2-3 what multiple should I use, and how does that change the placing of the markers??? I’d appreciate any suggestions.
Hello Tracey! I’ve reached out to the designer for advice and she or I will reply as soon as possible. Thanks! – Nicola, Editor
It’s really important with garments to match the gauge of the pattern. For making the correct size to fit your body you need to have your measurements.
The sample in the photos was a bit too large for the model, so the neckline may look a little smaller for you.
There is also a lot of growth to the fabric from the weight of the finished fabric when the garment is completed.
Hope this helps! – Nicola, Editor
The scfs is a different stitch, the stacked rows foundation alternates short rows of single crochet and double crochet to create a scalloped edging at the neckline. The long strip of stitches are joined in a loop and the first round of the garment is worked into the flat side of that strip.
Stacked Rows Foundation / Neckline
i have seen this foundation stitch written as single crochet foundation (scfs) in patterns it has a softer, slit give to the stitch with a better look than simple chain stitch as a foundation stitch
After Rnd 3 of the body directions say “Add st markers for bustline increases in Front of Body 4 (4, 3, and 5) V-sts out from either side of center front marked V-st.” Please explain the #’s in parenthesis. I know I need 4 more stitch markers for my size but can’t figure out where to place them.
Hello! I’ve reached out to the designer for advice and she or I will reply as soon as possible. Thanks! – Nicola, Editor
Hello again! In the beginning of pattern it indicates what number in the parentheses refers to instructions for what size. Hope that helps! – Nicola, Editor
There are only 3 numbers in parenthesis at the beginning of pattern. There are 4 numbers for the bustline increases. That’s why I was confused. So I’m going to assume that the numbers for bustline are 4, 3 & 5 and ignore the extra 4?
Hello again! We removed a comma in this portion of the pattern. 3 and 5 are the instructions for the XL size, there will be 4 bust increase points for that size. The other 2 sizes have only 2 bust increase points. XL is written for larger busted individuals so the front of swoncho won’t ride up. If not that large busted # of increase markers should be adjusted for smaller bust. It is detailed in the pattern notes to help with making adjustments. Hope this helps! – Nicola, Editor
How would I lengthen the sweater? I would like it to hit the low hip on the sides.
Hola Por favor podrian hacer un tutotial de todo el sweter… realmente todo es muy confuso..y me encanta!!! espero tener respuestas mi mal.. claupastorino@yahoo.com.ar
Hello! At this time we do not have a full sweater tutorial, but there is a helpful video included and lots of advice in the comments section. Hope that helps! – Nicola, Editor
En español por favor!!!!!
Hello! I apologize, but at this time we do not offer patterns in other languages. However, this article may help you! https://oombawkadesigncrochet.com/2014/04/u-s-and-spanish-crochet-terms.html
– Nicola, Editor
I like this pattern, hoping I can keep into it and not get mixed up.or distracted. Glad I joined bbq the Gold Club. Wondering how I can keep this in my own MY LIBRARY…
Hi Denise! We are so glad you are here! This is currently a function we are working on implementing in the near future. In the meantime, we recommend using your web browser’s book mark tool or Pinterest for saving your favorite patterns. Hope this helps for now! – Nicola
I love this top. I made it through the first 2 rounds (I was confused after reading the pattern for the starting but when I actually crocheted it it made sense). My confusion is on row 3, the stitch counts for size XL says there should be 48 V-Stitches. There’s only 42 after round 2, and nowhere does the pattern state to increase in round 3; so how do I get more V-St than round 2? Am I supposed to do an IncShl in marked stitches?
Hi Coleen! We’ve reached out to the designer for clarification and she or I will reply as soon as possible. Thanks! – Nicola
Hello Colleen! Update:
If following the directions exactly as written, you will gain 6 V-sts that are worked in the marked ch-1 spcs from Rnd 2. I’ve bolded the relevant sections of text in the pattern below. Hope this helps! – Nicola
Rnd 1: Ch 4, dc in same sc row as join (counts as first V-st of Rnd), sk next dc row, [*V-st in next sc row, sk next dc row*; rep from * to * until reach marked sc row, IncShl in marked sc row, move st marker to center dc of IncShl just made] 6 times; rep from * to * until work in last sc row of neckline, sk next dc row, sl st to 3rd ch of beginning ch-4. (24 [30, 30] V-sts, 6 IncShls)
Rnd 2 (RS): Turn, (sl st, ch 4, dc) in ch-1 sp of first V-st (counts as first V-st of Rnd), *V-st in each ch-1 sp around until reach marked IncShl, V-st in first ch-1 sp of IncShl, ch 1, sk marked dc, move st marker to ch-1 sp just made, V-st in 2nd ch-1 sp of same IncShl*; rep from * to * until work in last marked IncShl, V-st in each ch-1 sp until work in last V-st of previous rnd, sl st to 3rd ch of beginning ch-4. (36 [42, 42] V-sts, 6 marked ch-1 sp)
Rnd 3: Turn, (sl st, ch 4, dc) in ch-1 sp of first V-st (counts as first V-st of Rnd), V-st in each ch-1 sp around until work in last V-st of previous rnd, move up st markers to ch-1 sp of V-st worked in marked ch-1 sps, sl st to 3rd ch of beginning ch-4. (42 [48, 48] V-sts)
Hi. I am also having trouble with this round. I’m making the M/L size and have 42 v-stitches in both round 2 and 3 although I have done a v-stitch each in chain 1 space like the pattern states but there is no increase in number of v-stitches. Not sure how moving the stitch markers creates 6 extra v-stitches? Thanks in advance
Hi Ruth! From the designer: You might want to check your increase points for Round 2. Did you make the extra ch-1 space between the 2 V-sts worked at each increase point?
Hope this helps! – Nicola, Editor
Ruth, I did the same thing 3 times thinking (hoping) it would change, finally decided to read the comments because I couldn’t be the only one this happened to. Just say Nichole’s reply and I totally missed the extra V-stitch that goes into that extra chain. Whew! Thank you for asking the question!
Hi!! I am having trouble with row 24. I just can’t seem to get both sides even no matter how many times I try placing these markers. Do I count the center back marker as the first chain space or do I start with the next one out? I think it might be easier to just start from the center back and count out all around the edge to place the markers instead of going forward and then backing up. Is it possible for you to that for us? Thanks! 🙂
Hello Wendy! We’ve reached out to the designer for clarification and she or I will reply as soon as possible. Thanks! – Nicola
Hello Wendy! We might need more information on where you are having trouble, but one thing to note is that the front and back are not even; there are more stitches in front than back because of bust increases. Also note, that the marked chain spaces at the start are not even distances from the center back. Hope that helps for now! – Nicola
After reading the comments, I grabbed some yarn and a hook to see what all the fuss was about. I did exactly what the stacked rows said. I chained 2, put a sc in the first chain, chained 3, turned work, put 2dc in the sc, chained 1, turned work, put a sc in the first dc. I continued alternating rows 2 and 3, no problem, no confusion. Did any of you even try it? The directions clearly state to alternate these two rows until you have 60 or 72 rows. Each repeat makes a little triangle shape, so it’s easy to count.
To the designer: I’ve never done stacked rows before but found your directions to be very clear and easy to follow. Beautiful top, I look forward to making this.
Great tips, thanks!
Hello Heather! Thanks for your message and we apologize for any confusion! We’ve added a video to this pattern from the designer that demonstrates how to do crochet stacked rows, which is how this pattern is started. I hope this helps!
I’m LMAO. This company wants you to buy their product in subscription form, but yet they can’t even write a free pattern that makes any sense. I’ll save my money.
Has anyone figured out how to start this project? I’m clueless. Too bad cuz if I liked the pattern I might consider subscribing.
I’m struggling with determining sc/dc rows?
I would like to make this beautiful swoncho, but would want it to be much longer. Does the pattern allow for this? Is there an increasing repetition that would let this swoncho get longer and wider? I am an experienced crocheter. .
I don’t want to purchase yarn, start to crochet it and find out it can’t be done. Many thanks
Hi Sandra,
So sorry but there really isn’t a repeat that can easily make this swoncho longer. That would be a completely different design. I hope to create a longer swoncho design in the future, but there is a lot of math that needs to happen first.
Oh good I don’t feel so actually stupid because I kept reading the pattern volume and crocheting for under age but I couldn’t figure this out for nothing if anyone knows if they did do a YouTube video on us please let me know I would appreciate it or send me the link I’ll put my email in it’s so beautiful not to do it but I do not understand how to start it it’s too confusing I don’t get it
Please show us how this is done in a video tutorial on YouTube. Pattern is not very explanatory. Such a lovely pattern and color of the yarn is amazing. Please consider my request.
What a beautiful too and an awesome color. I agree with everyone. Would you please consider doing a video tutorial for this awesome pattern please. Many thanks for sharing with everyone. Love it!!!!
Same here. Ive crochet for years! Have no clue how many stitches to start with.Im completely lost.
Hello. The stacked sts builds up the foundation row instead of a long chain. I hope this helps.
Where did I find this type yarn? TIA
This pattern makes no sense !!!! I’ve never read a pattern that was so confusing. Do you have pictures somewhere ??? How do you get a, say 32” inch circumference w/ only a few stitches. Am I missing a critical part of this pattern ???
Hello there.
Are you repeating rows 2-3 as indicated?
You are creating a “chain” of stitches that becomes the neck trim, then connecting it into a circle and building outward from the trim to create the body of the poncho. The video helps.
This is stunning. I wish you could do a video as I would love to make this beautiful top you have made. Thank you