


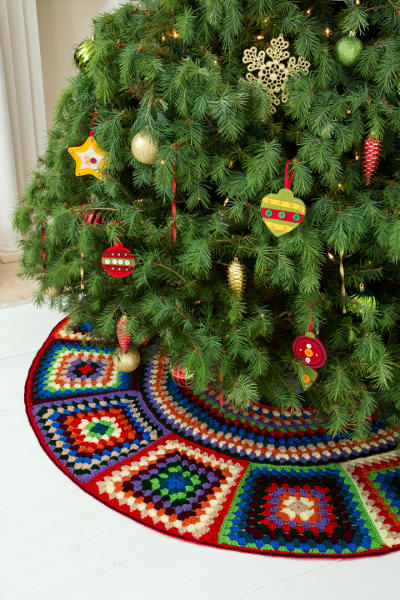
Create a perfect tree skirt that reflects your passion for crochet and the beloved granny square motif! This scrappy skirt is worked up in ten different colors of yarn. Each of the grannies is made with more stitches on the outer edge so it will lie flat once assembled. Designed by Ann Regis.
Skill Level: Intermediate
Size: 58″ diameter, to fit around standard tree holder
Gauge: 12 sts = 4″; 6 rows = 4″ in double crochet
Materials
Yarn:
![]() Red Heart Super Saver (100% acrylic; 364 yards [333 meters]/198 grams): #334 Buff (A, 1 skein), #322 Pale Yellow (B, 1 skein), #256 Carrot (C, 1 skein), #319 Cherry Red (D, 1 skein), #378 Claret (E, 1 skein), #358 Lavender (F, 1 skein), #886 Blue (G, 1 skein), #656 Real Teal (H, 1 skein), #672 Spring Green (I, 1 skein), #389 Hunter Green (J, 1 skein)
Red Heart Super Saver (100% acrylic; 364 yards [333 meters]/198 grams): #334 Buff (A, 1 skein), #322 Pale Yellow (B, 1 skein), #256 Carrot (C, 1 skein), #319 Cherry Red (D, 1 skein), #378 Claret (E, 1 skein), #358 Lavender (F, 1 skein), #886 Blue (G, 1 skein), #656 Real Teal (H, 1 skein), #672 Spring Green (I, 1 skein), #389 Hunter Green (J, 1 skein)
Hook: US size K/10.5 (6.5 mm) hook
Notions: Yarn needle, stitch marker
Pattern Notes
Skirt is made from thirteen pieces: an inner ring and twelve granny squares arranged around the outer edge of the inner ring.
The granny squares are not perfectly square; one edge is shorter than the other three edges. The shorter edge is sewn to the outer edge of the inner ring.
Pattern
Inner Ring
With B, ch 140.
Row 1 (Right Side): 3 dc in 4th ch from hook (beginning ch counts as first dc), *skip next 2 ch, 3 dc in next ch; repeat from * across to last ch, dc in last ch. (46 3-dc groups, and one dc on each end)
Fasten off B.
Row 2: With Wrong Side facing, draw up a loop of G in the space between the first 2 dc, ch 4 (counts as dc, ch 1 here and throughout), *3 dc in next space between 3-dc groups, ch 1; repeat from * across, dc in space between last dc and beginning ch. (45 3-dc groups, 46 ch-1 spaces, and one dc on each end)
Fasten off G.
Row 3: With Right Side facing, draw up a loop of C in first dc, ch 3, 3 dc in first ch-1 space, [ch 1, 3 dc in next ch-1 space] 4 times, ch 1, (3 dc, ch 1, 3 dc) in next ch-1 space (increase made), *[ch 1, 3 dc in next ch-1 space] 6 times, ch 1, (3 dc, ch 1, 3 dc) in next ch-1 space; repeat from * 4 more times, [ch 1, 3 dc in ch-1 space] 4 times, 3 dc in turning ch-space, dc in 3rd ch of beginning ch. (52 3-dc groups and 51 ch-1 spaces)
Fasten off C.
Row 4: With Wrong Side facing, draw up a loop of A in the space between the first 2 dc, ch 4, 3 dc in next ch-1 space, [ch 1, 3 dc in next ch-1 space] 8 times, ch 1, (3 dc, ch 1, 3 dc) in next ch-1 space, *[ch 1, 3 dc in next ch-1 space] 15 times, (3 dc, ch 1, 3 dc) in next ch-1 space; repeat from * once more, [ch 1, 3 dc in next ch-1 space] 9 times, dc in space between last dc and beginning ch. (54 3-dc groups and 55 ch-1 spaces)
Fasten off A.
Row 5: With Right Side facing, draw up a loop of F in first dc, ch 3, 3 dc in first ch-1 space, [ch 1, 3 dc in next ch-1 space] 4 times, ch 1, (3 dc, ch 1, 3 dc) in next ch-1 space (increase made), [ch 1, 3 dc in next ch-1 space] 8 times, ch 1, (3 dc, ch 1, 3 dc) in next ch-1 space, *[ch 1, 3 dc in next ch-1 space] 7 times, ch 1, (3 dc, ch 1, 3 dc) in next ch-1 space, [ch 1, 3 dc in next ch-1 space] 8 times, ch 1, (3 dc, ch 1, 3 dc) in next ch-1 space; repeat from * once more, [ch 1, 3 dc in ch-1 space] 5 times, 3 dc in turning ch-space, dc in 3rd ch of beginning ch. (61 3-dc groups and 60 ch-1 spaces)
Fasten off F.
Row 6: With Wrong Side facing, draw up a loop of I in the space between the first 2 dc, ch 4, 3 dc in next ch-1 space, [ch 1, 3 dc in next ch-1 space] 9 times, ch 1, (3 dc, ch 1, 3 dc) in next ch-1 space, *[ch 1, 3 dc in next ch-1 space] 18 times, (3 dc, ch 1, 3 dc) in next ch-1 space; repeat from * once more, [ch 1, 3 dc in next ch-1 space] 11 times, dc in space between last dc and beginning ch. (63 3-dc groups and 64 ch-1 spaces)
Fasten off I.
Row 7: With Right Side facing, draw up a loop of D in first dc, ch 3, 3 dc in first ch-1 space, [ch 1, 3 dc in next ch-1 space] 5 times, ch 1, (3 dc, ch 1, 3 dc) in next ch-1 space (increase made), [ch 1, 3 dc in next ch-1 space] 10 times, ch 1, (3 dc, ch 1, 3 dc) in next ch-1 space, *[ch 1, 3 dc in next ch-1 space] 8 times, ch 1, (3 dc, ch 1, 3 dc) in next ch-1 space, [ch 1, 3 dc in next ch-1 space] 10 times, ch 1, (3 dc, ch 1, 3 dc) in next ch-1 space; repeat from * once more, [ch 1, 3 dc in ch-1 space] 5 times, 3 dc in turning ch-space, dc in 3rd ch of beginning ch. (70 3-dc groups and 69 ch-1 spaces)
Fasten off D.
Row 8: With Wrong Side facing, draw up a loop of E in the space between the first 2 dc, ch 4, 3 dc in next ch-1 space, [ch 1, 3 dc in next ch-1 space] 11 times, ch 1, (3 dc, ch 1, 3 dc) in next ch-1 space, *[ch 1, 3 dc in next ch-1 space] 21 times, (3 dc, ch 1, 3 dc) in next ch-1 space; repeat from * once more, [ch 1, 3 dc in next ch-1 space] 12 times, dc in space between last dc and beginning ch. (72 3-dc groups and 73 ch-1 spaces)
Fasten off E.
Row 9: With Right Side facing, draw up a loop of G in first dc, ch 3, 3 dc in first ch-1 space, [ch 1, 3 dc in next ch-1 space] 3 times, ch 1, (3 dc, ch 1, 3 dc) in next ch-1 space (increase made), *[ch 1, 3 dc in next ch-1 space] 7 times, ch 1, (3 dc, ch 1, 3 dc) in next ch-1 space; repeat from * 7 more times, [ch 1, 3 dc in ch-1 space] 3 times, 3 dc in turning ch-space, dc in 3rd ch of beginning ch. (82 3-dc groups and 81 ch-1 spaces)
Fasten off G.
Row 10: With Wrong Side facing, draw up a loop of H in the space between the first 2 dc, ch 4, *3 dc in next ch-1 space, ch 1; repeat from * across, dc in space between last dc and beginning ch. (81 3-dc groups and 82 ch-1 spaces)
Fasten off H.
Row 11: With Right Side facing, draw up a loop of A in first dc, ch 3, 3 dc in first ch-1 space, [ch 1, 3 dc in next ch-1 space] twice, ch 1, (3 dc, ch 1, 3 dc) in next ch-1 space (increase made), [ch 1, 3 dc in next ch-1 space] 5 times, *ch 1, (3 dc, ch 1, 3 dc) in next ch-1 space, [ch 1, 3 dc in next ch-1 space] 8 times; repeat from * 7 more times, ch 1, 3 dc in turning ch-space, dc in 3rd ch of beginning ch. (91 3-dc groups and 90 ch-1 spaces)
Fasten off A.
Row 12: With Wrong Side facing, draw up a loop of C in the space between the first 2 dc, ch 4, *3 dc in next ch-1 space, ch 1; repeat from * across, dc in space between last dc and beginning ch. (90 3-dc groups and 91 ch-1 spaces)
Fasten off C.
Row 13: With Right Side facing, draw up a loop of B in first dc, ch 3, 3 dc in first ch-1 space, [ch 1, 3 dc in next ch-1 space] 13 times, ch 1, (3 dc, ch 1, 3 dc) in next ch-1 space (increase made), *[ch 1, 3 dc in next ch-1 space] 14 times, ch 1, (3 dc, ch 1, 3 dc) in next ch-1 space; repeat from * 3 more times, [ch 1, 3 dc in ch-1 space] 15 times, 3 dc in turning ch-space, dc in 3rd ch of beginning ch. (96 3-dc groups and 95 ch-1 spaces)
Fasten off B.
Row 14: With Wrong Side facing, draw up a loop of F in the space between the first 2 dc, ch 4, *3 dc in next ch-1 space, ch 1; repeat from * across, dc in space between last dc and beginning ch. (95 3-dc groups and 96 ch-1 spaces)
Fasten off F.
Row 15: With Right Side facing, draw up a loop of J in first dc, ch 3, 3 dc in first ch-1 space, *ch 1, 3 dc in next ch-1 space; repeat from * across to last ch-1 space, ch 1, 3 dc in turning ch-space, dc in 3rd ch of beginning ch. (96 3-dc groups and 95 ch-1 spaces)
Fasten off J.
Granny Square (Make 12)
Make one granny square in each of the color sequences listed.
Squares are worked in joined rounds with Right Side facing at all times.
Ch-1 spaces are worked between the 3-dc groups across 3 edges of each square. No ch-1 spaces are worked between the 3-dc groups across one edge of each square (the top of the square). This shapes each square so that it is slightly narrower at the top than at the bottom.
Each round is worked with a different color. Fasten off old color at the end of each round.
To reduce the number of tails to weave in later, crochet over the ends as you go.
Color Sequences
Square #1: C, D, B, A, E, F, G, I, J, H.
Square #2: J, G, A, I, B, F, D, H, E, C.
Square #3: I, D, F, H, C, G, B, E, A, J.
Square #4: F, E, J, H, G, I, C, D, A, B.
Square #5: A, B, C, F, D, J, E, H, G, I.
Square #6: G, H, I, J, F, E, C, B, A, D.
Square #7: H, I, B, D, C, E, G, A, J, F.
Square #8: D, J, F, A, C, B, I, G, H, E.
Square #9: F, D, I, J, G, H, E, A, B, C.
Square #10: B, C, F, I, G, D, A, H, E, J.
Square #11: A, I, H, D, E, B, F, C, J, G.
Square #12: E, G, J, I, H, F, D, B, C, A.
With first color, ch 5; join with slip st in first ch to form a ring.
Rnd 1 (RS): Ch 3 (counts as first dc here and throughout), 2 dc in ring, [ch 1, 3 dc in ring] 3 times, ch 1; join with slip st in top of beginning ch. (12 dc and 4 ch-1 spaces)
Fasten off first color.
Rnd 2: With Right Side facing, draw up a loop of 2nd color in any ch-1 space, ch 3, 2 dc in same ch-1 space, (3 dc, ch 1, 3 dc) in each of next 3 ch-1 spaces, 3 dc in same ch-1 space as joining, ch 1; join with slip st in top of beginning ch—24 dc and 4 ch-1 spaces. Fasten off 2nd color.
Rnd 3: With Right Side facing, draw up a loop of 3rd color in any ch-1 space, ch 3, 2 dc in same ch-1 space, 3 dc in next space between 3-dc groups, (3 dc, ch 1, 3 dc) in next ch-1 space (corner made), place a marker in the 3-dc group before the corner for top edge of square, *ch 1, 3 dc in next space between 3-dc groups, ch 1, (3 dc, ch 2, 3 dc) in next ch-1 space (corner made); repeat from * once more, ch 1, 3 dc in next space between 3-dc groups, ch 1, 3 dc in same ch-1 space as joining, ch 1; join with slip st in top of beginning ch. (4 corners and one 3-dc group on each side)
Fasten off 3rd color.
Rnd 4: With Right Side facing, draw up a loop of 4th color in first corner ch-1 space, ch 3, 2 dc in same ch-1 space, 3 dc in each space between 3-dc groups across to next corner ch-1 space, (3 dc, ch 1, 3 dc) in corner ch-1 space, [*ch 1, 3 dc in next ch-1 space; repeat from * across to next corner ch-2 space, ch 1, (3 dc, ch 2, 3 dc) in corner ch-2 space] twice, **ch 1, 3 dc in next ch-1 space; repeat from ** across to first corner ch-1 space, ch 1, 3 dc in same ch-1 space as joining, ch 1; join with slip st in top of beginning ch. (4 corners and two 3-dc groups on each side)
Fasten off 4th color.
Rnds 5-10: Repeat Round 4 six times and continue to change color every round as in color sequence. (4 corners and eight 3-dc groups on each side at the end of Round 10)
Note: If desired, join in a different corner ch-space for each round and work as for Round 4, taking care not to work ch-1 spaces between the 3-dc groups across the top edge of the square, and working ch-1 spaces between the 3-dc groups across the other 3 edges. Work (3 dc, ch 1, 3 dc) for each top corner, and (3 dc, ch 2, 3 dc) for each lower corner.
Finishing
Arrange granny squares around outer edge of inner ring, as shown in Assembly Diagram. Take care to place shorter (marked) edge of each granny square next to edge of inner ring. Match the ten 3-dc groups across the top edge of each granny square with eight 3-dc groups (and the ch-1 spaces between the 3-dc groups) of outer edge of inner ring. Sew the granny squares together and to the inner ring. The designer recommends sewing the squares together in groups of three and then sewing the group of three to the inner ring.
Outer Border
Row 1 (Right Side): With Right Side facing, join D in outer corner of ring of granny squares, to work across outer edge, ch 2, work 1 hdc in each dc, 1 hdc in each ch-1 space, and 2 hdc in each corner ch-2 space (where squares are joined) all the way across outer edge. Fasten off.
Row 2 (Right Side): With Right Side facing, join E in top of beginning ch-2 of Row 1, ch 1, working in back loops only slip st in each hdc across. Note: Work with relaxed tension so as not to pull in the outer edge. Fasten off.
Inner Border
Row 1 (Right Side): With Right Side facing, join D in inner corner of inner ring, to work across inner edge, ch 2, 2 hdc in each space between 3-dc groups all the way across inner edge, DO NOT TURN.
Row 2: Working in the opposite direction (without turning piece, to work reverse hdc sts), ch 2, work hdc in each space between 2-dc groups across, slip st in beginning ch-2 of Row 1.
Fasten off.
Side Borders
Row 1 (Right Side): With Right Side facing, join D in corner, to work across side edge, hdc evenly spaced across side edge, DO NOT TURN.
Row 2: Ch 1, reverse sc in each st across.
Fasten off. Repeat across other side edge.
Weave in any remaining ends. Lay skirt flat on floor around tree holder, and pat into position. Note any areas that may need blocking. Block piece very, very lightly, if needed. 
Save