


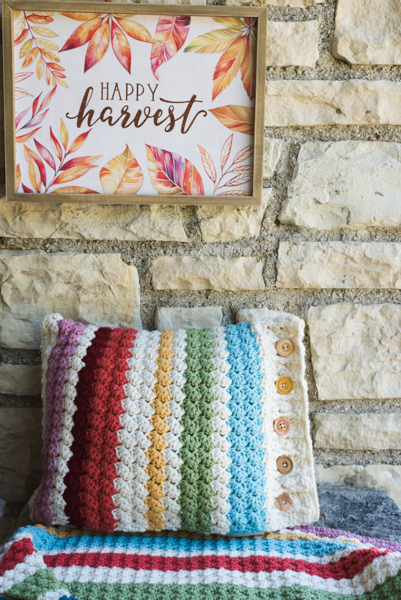
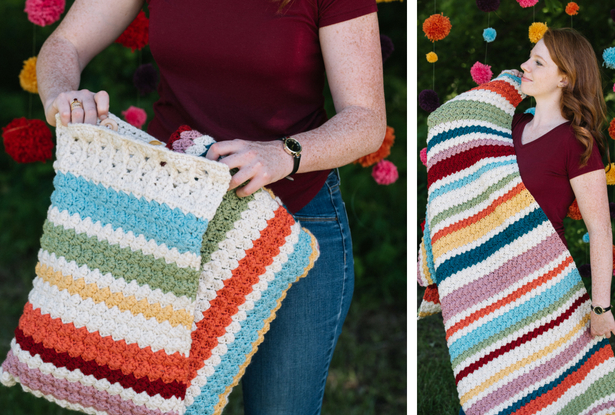
Two is always better than one – which is why we love this pillow-blanket combination! Fold this colorful striped lapghan up and tuck it into its pocket to create a stylish couch pillow. Or, unfold the blanket, throw a pillow form into the pocket and enjoy it as a cozy pillow and built-in blanket set.
Skill Level: Easy
Size: Lapghan – 32” wide x 51” long; Pocket – 28” wide x 18” long
Gauge: 5 clusters and 10 rows = 4” [10 cm] using one strand with smaller hook; 4 clusters and 8 rows = 4” [10 cm] using 2 strands held together on larger hook
Materials
Yarn: Red Heart With Love (100% Acrylic; 370 yards [338 meters]/198 grams): Berry Red (C1, 1 skein), Mallard (C2, 1 skein), Coral (C3, 1 skein), Cornsilk (C4, 1 skein), Cameo (C5, 1 skein), Iced Aqua (C6, 1 skein)
Red Heart Super Saver (100% Acrylic; 364 yards [333 meters]/198 grams): Iced Aqua (C7, 1 skein), Aran (C8, 1 skein), Light Sage (C9, 1 skein)
Hook: US size I/9 (5.5mm), US size J/10 (6.0mm)
Notions: Tapestry needle, five 1.5-2” buttons, sewing needle, thread, pins
Abbreviations
BPhdc = Back post half double crochet
FPhdc = Front post half double crochet
Pattern Notes
The lapghan and pocket are made separately and then seamed together.
The lapghan is created with one strand. The pocket is created with two strands held together.
The first st of each row is worked into the same st as the turning chain. The chain is not counted as a stitch.
Stitch count remains the same unless noted at end of row.
Pattern
Lapghan
With smaller hook and C8, ch 121.
Row 1: Sc in 2nd ch from hook, sc in each ch. (120 sts)
Rows 2-4: Ch 2, turn, hdc in same st, *(sc, 2dc) in next st, sk next 2 sts; rep from * until 2 sts rem, hdc in last 2 sts.
Rep Row 2 until Lapghan meas 51” long or desired length, changing colors following Stripe Sequence below.
Stripe Sequence
With C7, work 2 rows.
With C4, work 4 rows.
With C8, work 2 rows.
With C5, work 2 rows.
With C8, work 2 rows.
With C9, work 6 rows.
With C8, work 4 rows.
With C3, work 4 rows.
With C2, work 2 rows.
With C8, work 2 rows.
With C5, work 4 rows.
With C8, work 2 rows.
With C4, work 2 rows.
With C8, work 4 rows.
With C1, work 2 rows.
With C8, work 2 rows.
With C9, work 2 rows.
With C7, work 4 rows.
With C8, work 2 rows.
With C3, work 2 rows.
With C8, work 2 rows.
With C5, work 6 rows.
With C8, work 4 rows.
With C2, work 4 rows.
With C8, work 2 rows.
With C4, work 4 rows.
With C3, work 2 rows.
With C8, work 2 rows.
With C9, work 2 rows.
With C8, work 4 rows.
With C7, work 2 rows.
With C8, work 2 rows.
With C1, work 4 rows.
With C5, work 2 rows.
With C8, work 2 rows.
With C2, work 2 rows.
With C8, work 2 rows.
With C9, work 6 rows.
With C8, work 4 rows.
With C3, work 4 rows.
With C8, work 2 rows.
With C7, work 4 rows.
With C4, work 2 rows.
With C8, work 2 rows.
With C5, work 2 rows.
Last Row: Ch 1, turn, sc in each st to end of row.
Fasten off. Weave in ends.
With larger hook and 2 strands of C8 held together, ch 91.
Row 1: Sc in 2nd ch from hook, sc in each ch. (90 sts)
Row 2: Ch 2, turn, hdc in each st to end of row.
Row 3: Ch 2, turn, hdc in same st, *(sc, hdc, dc) in next st, sk 2, FPhdc around next post; rep from * until 1 st rem, hdc in last st. Tip: there should be 23 ridges.
Row 4: Ch 2, turn, hdc in same st, *(sc, hdc, dc) in next st, sk 2, BPhdc around next post; rep from * until 1 st rem, hdc in last st.
Rows 5-6: Rep Row 4.
Row 7: Ch 2, turn, hdc in each st to end of row. (90 sts)
Rows 8-12: Ch 2, turn, hdc in same st, *(sc, 2 dc) in next st, sk 2; rep from * until 2 sts rem, hdc in next 2 sts.
Rep Row 12, changing colors following Stripe Sequence below.
Stripe Sequence
With C8, work 2 rows.
With C9, work 4 rows.
With C8, work 2 rows.
With C4, work2 rows.
With C8, work 4 rows.
With C3, work 4 rows.
With C1, work 2 rows.
With C8, work 2 rows.
With C5, work 4 rows.
With C8, work 1 row.
Last Row: Ch 1, turn, sc in each st to end of row.
Fasten off, leaving a long yarn tail for sewing one edge together.
Finishing
Fold Pocket in half, lining up the edges of the last row. Use yarn tail to sew the 2 layers together.
Weave in all ends.
The buttons will be sewn to the inside, bottom layer of Pocket. Check placement first to make sure the buttons will easily slide through openings created by the clusters. With a sewing needle and matching thread, sew the five buttons in place.
Lay Lapghan and Pocket on a flat surface. Pin the bottom layer of the longer, open edge of Pocket to the middle third of Lapghan. With a tapestry needle and matching yarn, sew the two layers together.
Folding
Fold Lapghan edges towards the middle. Start at the opposite end from the pocket and fold Lapghan towards Pocket.
Fold Lapghan into Pocket. Slip buttons through the top layer of Pocket.
is there a tutorial on this pattern?
There is not a tutorial at this time. Please let me know if you have a specific question and I can reach out to the designer for advice.
I am having problems with the pocket. I can not come out with 23 ridges. Rows 1 and 2 have 90 stitches. I always have 22 ridges. Please help.
Thanks
I’ve tried many times to crochet this pattern. I can not seem to get the Pocket to come out with 23 ridges. Nothing I do seems to work out. Please help
I’m not sure if you are the same person as “marsha k” in the previous messages so I am replying to your messages as well.
Hi Marsha. I am the designer and was just made aware of the comments you had posted on this publisher’s site. I am sorry you have been waiting for a response.
I know it says 23 ridges, but the most important factor is that you keep 90 sts throughout the pocket piece. When working regular sts and post sts in a sequence it is easy to increase the st count so make sure you are skipping the sts and not working around the wrong post. I could work up a sample to show you this step if you would like. If so, please send me an email so I could send you that picture. Plus, I don’t receive notifications for comments on this site and it is much quicker to email me directly. heidi@snappy-tots.com
I am having problems with making the pocket. On row 3, I have 22 ridges but on row 7, I have 90 sts. Working rows 8 and 9, my pattern is growing. My count of sts isn’t the same. It’s becoming wider. Please help.
Thanks
Marsha Kraft
Hello Marsha! We’ve reached out to the designer for clarification and she or I will reply as soon as possible. Thanks! – Nicola
Hi Marsha. I am the designer and was just made aware of the comments you had posted on this publisher’s site. I am sorry you have been waiting for a response.
I know it says 23 ridges, but the most important factor is that you keep 90 sts throughout the pocket piece. When working regular sts and post sts in a sequence it is easy to increase the st count so make sure you are skipping the sts and not working around the wrong post. I could work up a sample to show you this step if you would like. If so, please send me an email so I could send you that picture. Plus, I don’t receive notifications for comments on this site and it is much quicker to email me directly. heidi@snappy-tots.com