


For this summer shawl, choose a lace weight yarn for a light shawl that can fit easily in a purse. Be sure to keep an eye out for the fall-friendly shawl, next up in our October 2014 issue!
Skill Level: Easy
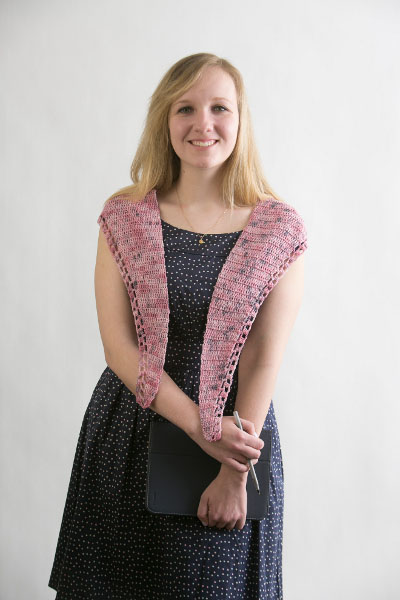
Size: Finished Wingspan 66”; Finished Spine Depth 10.5”
Gauge: 20 sts x 11 rows = 4” [10 cm] in shawl pattern before blocking
Materials
Yarn: Miss Babs Yet (65% merino wool, 35% tussah silk; 400 yards [365 meters]/65 grams): Moulin Rose (1 ball)
Hook: US size E/4 (3.5 mm) hook
Notions: Tapestry needle, 3 stitch markers or waste yarn
Special Stitches
3 Stitch Cluster (3-st cl): Yo, insert hook in next ch-3 sp, *yo and draw up a loop, yo and draw through 2 loops,** yo, insert hook in same ch-3 sp.* Repeat from * to * once, then from * to ** once, yo and draw through all 4 loops.
Double Crochet 2 Together (dc2tog): *Yo, insert hook in next st, yo and draw up a loop, yo and draw through 2 loops. Repeat from * once more. Yo and draw through all 3 loops.
Double Crochet 4 Together (dc4tog): *Yo, insert hook in next st, yo and draw up a loop, yo and draw through 2 loops.* Repeat from * to * 3 more times. Yo and draw through all 5 loops.
Pattern Notes
Shawl is crocheted side to side in increasing rows to midpoint, and then decreasing rows to opposite edge.
Adjust the size by changing the length to the midpoint.
Edging is crocheted in rows.
Ch 2 at beginning of rows does not count as stitch. Move up markers for each row of edging.
Pattern
Shawl
Increase to midpoint
Ch 3.
Row 1: Turn, skip 2 ch, 3 dc in next ch, pm in same ch to mark edge. (3 sts)
Row 2: Turn, ch 2, dc in same st and in next st, 2 dc in last st. (4 dc)
Row 3: Turn, ch 2, dc in same st and in each st across.
Row 4: Turn, ch 2, dc in same st and in each st across to last st, 2 dc in last st. (Increases by 1 st per row)
Rows 5-82: Repeat Rows 3 & 4 39 times, or until shawl measures approximately 30” (76.25 cm).
Row 83: Turn, ch 2, pm around turning ch to mark center row, dc in same st and in each st across.
Decrease to end
Row 84: Turn, ch 2, dc in same st and in each st across to last 2 sts, dc3tog. (Decreases by 1 st per row)
Row 85: Repeat Row 3.
Repeat Rows 84 & 85 until 4 sts remain.
Repeat Row 3.
Final Row: Turn, Ch 2, dc4tog, do not fasten off, pm in dc4tog to mark edge.
Edging along Angled Edge
Row 1: Turn, ch 6 (counts as dc plus ch-3 sp), *skip next row, dc in side of next row, ch 3* to center marked row, (dc, ch 3, dc) in side of center row, ch 3, repeat from * to * to last st, dc.
Row 2 (RS): Turn, ch 1, sc in first st, *ch 3,** 3-st cl in next ch-3 sp* across to center, ending last repeat before center at **, (3-st cl, ch 3, 3-st cl) in center ch-3 sp, repeat from * to * across, ending last repeat at **, sc in third ch of ch 6, fasten off.
Finishing
With tapestry needle, weave in ends. Wet or spray block.
how to wash and block a blanket or afghan
Hi there! We have an article here on blocking which should help! https://www.ilikecrochet.com/daily/crochet-techniques/finishing-techniques/how-to-block-your-crochet-projects/ From personal experience, it depends on the project. I usually don’t bother blocking acrylic blankets, but if say you have corners curling, you can use a steamer to help smooth those out. For natural fibers steam or wet blocking works great. I know of designers who simply throw their blankets in the washer and dryer and call it blocked if the yarn can be machine washed and dried. For smaller blankets like baby blankets, you can pin them on blocking boards (Amazon has many that come with rust-proof T-pins) and steam them, then remove when dry. For larger blankets, you can lay the project out on towels on a bed and shape it into the design you like without pinning. I hope those ideas help! The article is very helpful, and YouTube is also a great resource. Let me know if there are any other specific questions about blocking I can help with. -Dana, Editor
how to block a blanket
It would have been nice to see how the shawl drapes from the model’s back, this would give me an idea of what it looks like on her.
Hello! I do apologize, but it looks like we didn’t take a photo of the shawl draped across her back. However, hopefully this close-up of the shape of the shawl will help you visualize! https://www.ilikecrochet.com/wp-content/uploads/SummerShawl-2resize1.jpg
-Nicola, Editor