


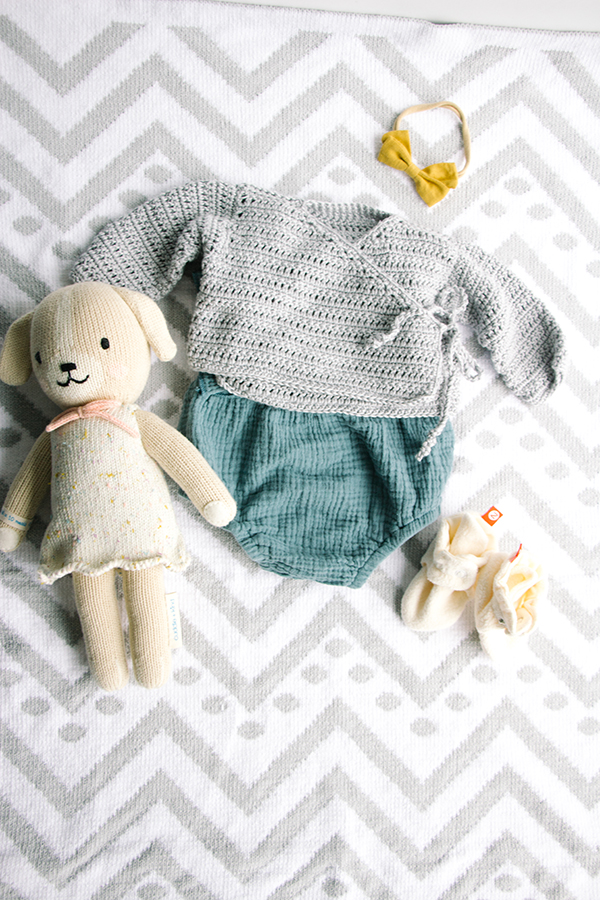
The Wrap + Tie Baby Sweater in soft gray is so easy to change in and out of with minimal fuss. The sweater ties on both sides for optimal fit without having to wiggle over the baby’s head.
Time: Weekend Project
Skill Level: Easy
Size: Finished Chest Size 16 (17, 18, 19)” to fit sizes 3 (6, 12, 18) months but very forgiving on sizing.
Shown in size 3 months
Gauge: 16 sts and 13 rows (6 rows dc + 7 rows sc) = 4” [10 cm] in patt st
Materials
 Yarn: Universal Yarn Little Bird (100% Acrylic; 344 yards [315 meters]/100 grams): Color #112 Ghostie Gray 1 (1, 2, 2,) ball(s)
Hook: US size F/5 (3.75 mm) or size needed to obtain gauge
Notions: Tapestry needle
Pattern Notes
Ch-3 counts as 1 dc.
For Left Front decreases only, ch-2 + first dc = 1 dec. On next row, work into dc and leave ch-2 unworked.
Pattern
Back
Ch 37 (39, 41, 43).
Row 1 (RS): Sc in 2nd ch from hook and in each ch across, ch 3, turn. (36 (38, 40, 42) sc)
Row 2: Dc in each sc across, ch 1, turn.
Row 3: Sc in each sc across, ch 3, turn.
Rep Rows 2-3 until piece meas 3.5 (4.25, 4.75, 5.25)”, ending with a RS row, ch 1, turn.
Decrease for Armholes
Row 1 (WS): Sl st in each of first 5 sc (all sizes), ch 3, dc in each sc across until 4 sts (all sizes) rem. Leave those sts unworked, ch 3, turn. (28 (30, 32, 34) dc)
Upper Back
Rep Rows 2-3 of Back until piece meas 3.5 (4.25, 4.75, 5.25)” from decrease row, ending with a RS row.
Shoulders
Left Shoulder
Row 1: Dc in each of next 7 (7, 9, 9) sc, hdc in next sc, sc in next sc. Fasten off. Do not turn.
Right Shoulder
Sk 8 (10, 8, 10) sc, join yarn in next sc, ch 1, sc in same sc, hdc in next sc, dc in each sc across. Fasten off.
Fronts
Right Front
Rep instructions for Back until piece meas 2.5 (3.25, 3.75, 4.25)”, ending with a WS row. Make note of how many rows you’ve worked.
Begin Decreases
Row 1 (RS): Sc2tog twice, sc in each dc to end, ch 3, turn. (34 (36, 38, 40) sc)
Row 2: Dc across until 4 sc rem, dc2tog twice, ch 1, turn. (32 (34, 36, 38) dc)
Rows 3-5: Rep Rows 1-2 once, then Row 1 once more, ch 1, turn. (26 (28, 30, 32) sc)
Armhole
Set-up Row: Sl st in each of first 5 sc (all sizes), ch 3, sc across until 4 sc rem, dc2tog twice, ch 1, turn. (20 (22, 24, 26) dc)
Rep Rows 1-2 of Begin Decreases until 8 (8, 10, 10) sts rem.
Work even as necessary until piece meas 3.5 (4.25, 4.75, 5.25)” from armhole decrease, ending with a RS row. Fasten off.
Left Front
See Pattern Notes about decreases.
Rep instructions for Right Front, working the same number of rows up to Begin Decreases.
Begin Decreases
Row 1 (RS): Sc in each dc across until 4 sts rem, sc2tog twice, ch 2, turn. (34 (36, 38, 40) sc)
Row 2: Dc in next sc (dec made), dc2tog, dc in each sc across, ch 1, turn. (32 (34, 36, 38) dc)
Rows 3-5: Rep Rows 1-2 once, then Row 1 once more, ch 1, turn. (26 (28, 30, 32) sc)
Armhole
Dc in next sc (dec made), dc2tog, dc in each sc across until 4 sc rem. Leave those sts unworked, ch 1, turn. (20 (22, 24, 26) dc)
Rep Rows 1-2 of Begin Decreases until 8 (8, 10, 10) sts rem.
Work even as necessary until piece meas 3.5 (4.25, 4.75, 5.25)” from armhole decrease, ending with a RS row. Fasten off.
Sleeves (Make 2)
Ch 25 (27, 31, 33).
Row 1 (RS): Sc in 2nd ch from hook and in each ch across, ch 3, turn. (24 (26, 30, 32) sc)
Row 2: Dc in each sc across, ch 1, turn.
Row 3: Sc in each sc across, ch 3, turn.
Row 4: Rep Row 2.
Row 5: Work 2 sc in first dc, sc in each dc across until 1 dc rem, 2 sc in last dc, ch 3, turn. (26 (28, 32, 34) sc)
Row 6: Rep Row 2.
Rows 7-10: Rep Rows 5-6. (30 (32, 36, 38) sc)
Rows 11-14: Rep Rows 3-6. (32 (34, 38, 40) sc)
Rep Rows 2-3 until Sleeve meas 7 (7.5, 8.25, 9.75)”, ending with a RS row. Fasten off.
Finishing
Using tapestry needle and whip stitch, with WS facing, sewing Fronts to Back at shoulder seams.
Sew sleeves into place at armhole.
Sew side seams and sleeve seams.
Beginning at center back hem, with RS facing, sc evenly spaced all the way around back, sides and tops of Fronts, and neck edge. Join rnd with sl st in first sc. Fasten off.
Sc around each sleeve hem, working in opposite side of foundation ch. Join rnd with sl st in first sc. Fasten off.
Ties (Make 4)
With 2 strands of yarn held tog, make a 12” ch.
Sew a tie to each outer corner of Fronts.
Sew a tie at the matching height on the side seam, one on the outside and one on the inside or the garment.
Weave in all ends.
I am having trouble lining the left & right front sides to the back, The decrease is not lining up. I had to frog the back because the back seemed like it was too long. I’m not quite sure how to line everything up to put sleeves & sides together. Is there some way to talk to the author of the pattern ???? I am making it for my first grandbaby due in a few weeks. Thank You.
Hello Carla! I’ve reached out to the designer for advice and she or I will reply as soon as possible. Thanks! – Nicola, Editor
“Check to make sure you have the same number of rows on the back before the armhole decreases as you do for the fronts, noting that the outside edge decreases start BEFORE the armhole decreases, so you don’t want to count there. If you need to adjust to make the rows match you certainly can – it’s possible in that case that your row gauge is not exactly the same as the pattern is written in.”