


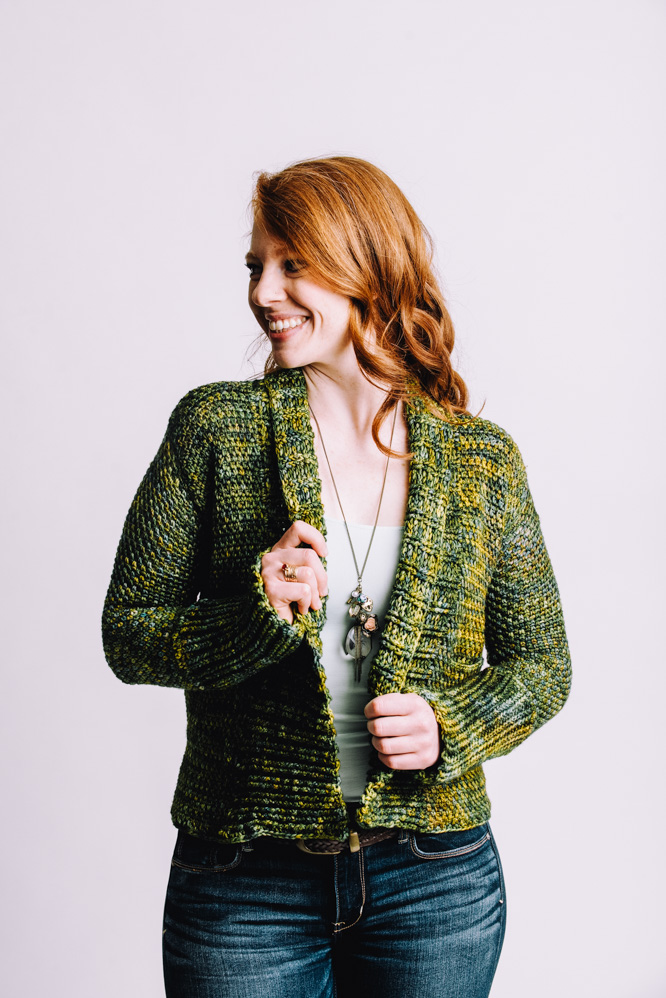
Brilliant green and yellow hues bring this cardigan to life. With a chunky collar and cozy pockets, this cardigan is bursting with vintage charm.
Skill Level: Intermediate
Size: X Small (Small, Medium, Large, 1x, 2x, 3x) Finished Bust Size 28-30 (30-32, 32-34, 34-36, 36-38, 38-40, 40-42)”, 21 (22, 23, 24, 25, 26, 27)” length.
1” positive ease recommended.
Gauge: 12 st and 23 rows = 5” [12.75 cm] in moss st
Materials
 Yarn: Malabrigo Yarn Rios (100% Wool; 210 yards [192 meters]/100 grams): Hojas, 8 (8, 9, 9, 10, 11, 12) skeins.
Hook: US size G/6 (4mm)
Notions: Tapestry needle, scissors
Pattern Note
Beginning chain counts as a stitch unless otherwise indicated.
Pattern
Pockets (make 2)
Ch 23.
Row 1: Sc in 3rd ch from hook, *ch 1, sk 1, sc in next st; rep from * across, sc in last ch, turn. (12 sc)
Row 2: Ch 2, *sc in next ch-1 sp, ch 1; rep from * across, sc in last st, turn.
Rows 3-23: Rep Row 2.
Fasten off, leaving a long tail for sewing.
Front Panel (make 2)
Row 1: Ch 35 (37, 39, 41, 43, 45, 47) sc in 3rd ch from hook, *ch 1, sk 1, sc; rep from * across, turn. (18 (19, 20, 21, 22, 23, 24) sc)
Rows 2-38: Ch 2, sc in next ch-sp, *ch 1, sc in next ch-sp; rep from * across, turn.
Holding pocket against sts of next row of Front Panel, work the first few sts on the Panel, the middle sts across the top of the Pocket, and the remaining sts across the last sts of the Panel, integrating the Pocket into the Panel itself.
Row 39: Ch 2, sc in next ch-sp, [ch 1, sc in next ch-sp] 3 (3, 4, 4, 5, 5, 6) times, [ch 1, sc in next ch-sp on Pocket] 11 times, working back on Front Panel, [ch 1, sc in next space] 3 (4, 4, 5, 5, 6, 6) times, turn.
Rep Row 2 until Panel meas 15 (15.5, 16, 16.5, 17, 17.5, 18)” from bottom.
Armhole Shaping
Row 1: Ch 1, sc in next ch-sp, *ch 1, sc in next ch-sp; rep from * across, turn.
Row 2: Ch 2, sc in next ch-sp, *ch 1, sc in next ch-sp; rep from * across to last ch-sp and sc, sc2tog across last ch-sp and sc, turn. (17 (18, 19, 20, 21, 22, 23) sc)
Rep Rows 1-2 until 12 sc rem.
Next Row: Ch 2, sc in next ch- sp, *ch 1, sc in next ch-sp; rep from * across, turn. (12 sc)
Rep last row until piece meas 21 (22, 23, 24, 25, 26, 26)” from beginning.
Fasten off. Weave in ends.
Back Panel
Row 1: Ch 71 (75, 79, 83, 87, 91, 95), sc in 3rd ch from hook, *ch 1, sk 1, sc; rep from * across, turn. (36 (38, 40, 42, 44, 46, 48) sc)
Row 2: Ch 2, sc in next ch-sp, *ch 1, sc in next ch-sp; rep from * across, turn.
Rep Row 2 until piece meas 15 (15.5, 16, 16.5, 17, 17.5, 18)” from bottom.
Shape Armholes
Row 1: Ch 1, sc in next ch-sp, *ch 1, sc in next ch-sp; rep from * across, turn.
Row 2: Ch 2, sc in next ch-sp, *ch 1, sc in next ch-sp; rep from * across to last ch-sp and sc, sc2tog across last ch-sp and sc, turn. (35 (37, 39, 41, 43, 45, 47) sc)
Rep Rows 1-2 until 24 sc rem.
Next Row: Ch 2, sc in next ch-sp, *ch 1, sc in next ch-sp; rep from * across, turn.
Rep last row until piece meas 21 (22, 23, 24, 25, 26, 26)” from beginning.
Fasten off. Weave in ends.
Assembly
Sew shoulder seams at top of each Front Panel to Back Panel. Sew from Bottom of each side seam up to armpit, stopping where decreases for armholes are made.
Sleeves (make 2)
Attach to underarm.
Rnd 1: Ch 1, sc evenly around in a multiple of 2 sts, join with sl st.
Rnd 2: Ch 1 (does not count as a st), sc in same st, ch 1, *sk 1, sc in next, ch 1; rep from * around, join with sl st.
Rnd 3: Ch 2, *sc in next ch-sp, ch 1; rep from * around, join with sl st.
Rep Rnd 3 until Sleeve meas approx. 14”.
Next Rnd: Ch 1, *fphdc in next 2 sts, bphdc in next 2 sts; rep from * in each st and ch-sp around, join with sl st.
Rep last rnd until ribbing measures approx. 8”.
Fasten off. Weave in ends.
Collar
With RS of Cardigan facing, join yarn to bottom left hand corner of Front Panel.
Row 1: Ch 1, hdc evenly across row ends of Front Panel, Back Panel, and Front Panel in a multiple of 4 sts, turn.
Row 2: Ch 1, *fphdc in next 2 sts, bphdc in next 2 sts; rep from * across, turn.
Row 3: Ch 1, *bphdc in next 2 sts, fphdc in next 2 sts; rep from * across, turn.
Rep Rows 2-3 until Collar meas approx. 8” wide.
Fasten off. Weave in ends.
Finishing
Push pockets to inside of Front Panels. With WS facing (inside), sew the 3 edges of pocket to Front Panels, leaving top of pocket open.
Weave in ends.
https://www.instagram.com/p/BrI70omBtpP/?utm_source=ig_web_button_share_sheet
I think you need to republish the whole thing and make the corrections within the pattern so that there is no more confusion. I really liked the sweater but I’m not going to try it with all of this confusion.
Hi Lila! I’ve reached out to the designer to see if there are changes that should be made within the pattern. I will indicate any updates within the pattern if needed. Thanks! – Nicola, Editor
Has the pattern issues ever been addressed. It appears from as far back as two years ago the same answer is being given about contacting the designer . Are there any updates ?
How about a diagram as many I like crochet sweaters have
We’ve reached out to the designer for clarification and she or I will reply as soon as possible. Thanks! – Nicola
Do you have a corrected pattern for the back panel armholes?
Hello Jodi! We’ve reached out to the designer for clarification and she or I will reply as soon as possible. Thanks! – Nicola
Hello! Update: I think the confusion is coming from the 1st skipped at at the start of the Armhole shaping rows, it’s chain 2 and sc in the next space which decreases on one side, and then a sc2tog on the other side.
It ends up decreasing on both sides to taper to the neckline.
Hope that helps! – Nicola
This pattern doesn’t make sense anyway. I tried figuring out how do decrease on both sides to do the armhole shaping. Then I went to sew the shoulder seams and this pattern made no room for your neck – the front panels width put together equals the exact width of the back panel. I spent hours on this and 5 balls of yarn later, I don’t know if it’s fixable or I have to start over.
Hello Melanie! I think the confusion is coming from the 1st skipped at at the start of the Armhole shaping rows, it’s chain 2 and sc in the next space which decreases on one side, and then a sc2tog on the other side.
It ends up decreasing on both sides to taper to the neckline.
Hope that helps! – Nicola
Hello. Why does it seem the back panel only has one arm holes.
Hello Annette! I think the confusion is coming from the 1st skipped at at the start of the Armhole shaping rows, it’s chain 2 and sc in the next space which decreases on one side, and then a sc2tog on the other side.
It ends up decreasing on both sides to taper to the neckline.
Hope that helps! – Nicola