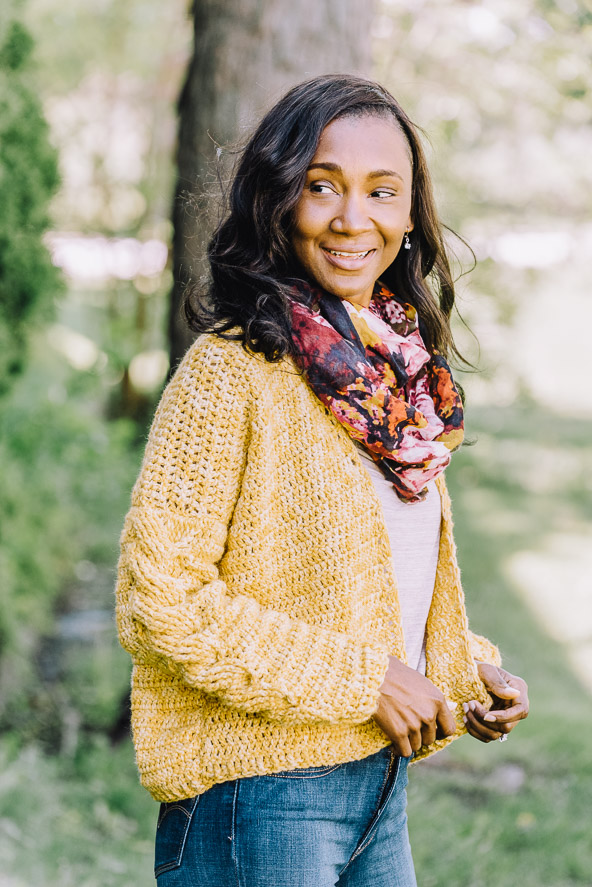
Looking to make a statement? Meet Carmella. She’s a modern, bulky cardigan with oversized sleeves and a ton of texture. Featuring cables that travel down the sides of each arm, this cardigan is the cozy addition to your fall-to-winter wardrobe that every crocheter needs.
Skill Level: Intermediate
Size: M/L
Gauge: 17 sts and 22 rows = 4” (10 cm)
Materials
 Yarn: we are knitters The Baby Alpaca (100% Baby Alpaca; 123 yards [112 meters]/50 grams): Chamomille (MC, 20 balls)
Hook: US size J/10 (6.0 mm)
Notions: Tapestry needle
Pattern Notes
This project is worked in several pieces which are then seamed together: front and back. After that the sleeves are added. Use double thread throughout.
Pattern
Back
With MC, ch 69, turn.
Rnd 1: Ch 3, dc across, turn. (70 sts)
Rnds 2-40: Rep Rnd 1.
Fasten off.
Front (make 2)
With MC, ch 31, turn.
Rnd 1: Ch 3, dc across, turn. (32 sts)
Rnds 2-40: Rep Rnd 1.
Fasten off.
Sleeves (make 2)
With MC, ch 47, turn.
Rnd 1: Ch 3, dc across, turn. (48 sts)
Rnd 2: Ch 3, dc in next 14 sts, sk 6 sts, FPtr around next 6 sts, FPtr around 6 skipped sts, FPdc around next 6 sts, dc in next 15 sts.
Rnd 3: Ch 2, hdc in next 14 sts, BPdc around next 18 sts, dc in next 15 sts.
Rnd 4: Ch 3, dc in next 14 sts, FPdc around next 6, sk 6 sts, FPtr around next 6, FPtr around 6 skipped sts, dc in next 15 sts.
Row 5: Rep Row 3.
Rows 6-33: Rep Rows 2-5, make 12 decreases total (6 sts for each side – 2 sts decreased each row) at the beg and end of the following rows: Rows 14, 16, 20, 22, 26, 30. (36 sts total at end of Row 33)
Row 34: Ch 3, dec, (dc in next st, dec) 3 times, dc in next st, (dec) 5 times, (dc in next st, dec) 4 times, dc in next st.
Row 35: Ch 3, (BPdc, FPdc) across, turn.
Row 36: Rep Row 35.
Fasten off.
Finishing
Sew two Front pieces to Back of Cardigan in the upper part (shoulders).
Sew Sleeves to Cardigan.
Sew seam of Sleeves and the remaining open sides of Cardigan.
Hemline Ribbing
Row 1: Join yarn to the last row of Front panel (if you are looking at the cardigan, not wearing it, this will be the corner on the right panel [or left panel if you’re left handed]), ch 2, dc in each st around the entire hemline of the cardigan (working over the first front panel, over the side seam, across the Back panel [you’re working into the original foundation chain here], over the second side seam, and across the other front panel), ch 2, turn.
Row 2: Dc, *Bpdc, Fpdc); rep from * in each st across, dc in last st, ch 2, turn.
Row 3: Dc, *Fpdc, Bpdc; rep from * in each st across, dc in last st, ch 2, turn.
Fasten off.
Neckline Ribbing
Row 1: Dc evenly in each st around entire neckline (working 1 dc into each of 3 skipped sts between front panels) until you reach other side of ribbing, ch 2, turn.
Row 2: Dc, *Bpdc, Fpdc; rep from * in each st across, dc in last st, ch 2, turn.
Fasten off.


Can you provide adjustment for larger sizes?
Is there directions available for xl size?
I Love the Look of this Sweater… Beautiful…
Excellent Design and Wonderful Idea… : )