


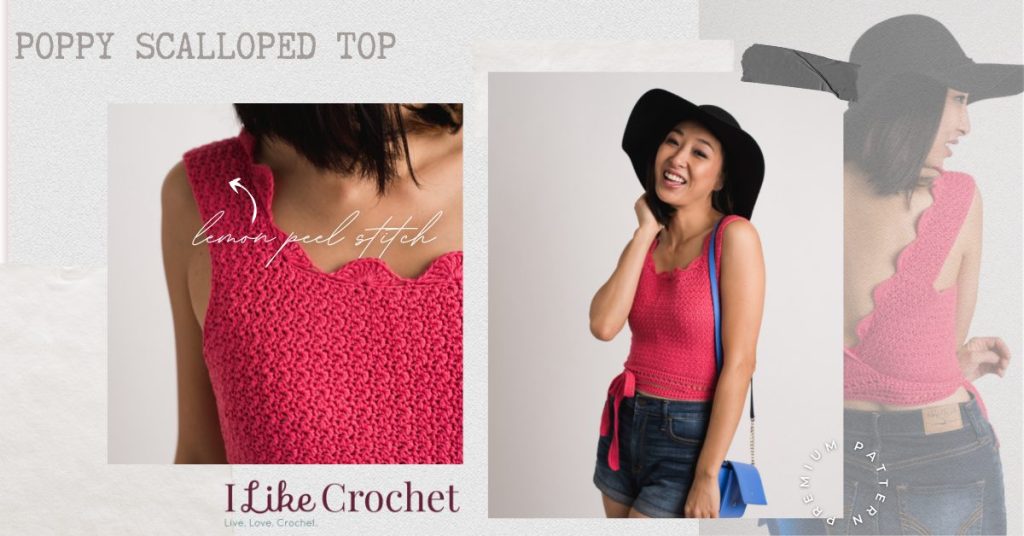
Poppy will become your staple top to welcome the warmer days of spring. It’s a comfortable cropped top with an open back and with a classy scallop edging and a belt that can be tied at the back or front.
Skill Level: Intermediate
Size: Finished Bust Size 29 (33, 37, 41, 45, 49, 53)” to fit bust 29 (33, 37, 41, 45, 49, 53)”
0” positive ease recommended.
Shown in size 37”
Gauge: 18 sts and 14 rows = 4” [10 cm] in lemon peel stitch after wet blocking
Materials
 Yarn: Garnstudio Drops Safran (100% Cotton; 174 yards [159 meters]/50 grams): 13 Raspberry (MC, 2 (2, 2, 3, 3, 3, 4) balls).
Hook: US size G/6 (4.0 mm)
Notions: Markers, tapestry needle
Special Stitches
Lemon Peel St: *Sc 1, dc 1; rep from * to the end of the row.
On following rows, alternate 1 sc and 1 dc st, always working 1 sc in a dc st and 1 dc in a sc st.
Pattern Notes
The pattern is worked bottom-up and flat, starting at the waist. After completing the body up to the armhole, work the front of armhole shaping, the chest, the neck, and finally the shoulder straps. When the shoulder straps are complete, they are attached to the back of the body.
A scallop edging is made around the bodice and a belt on the bottom edge.
Yarn amounts are approximate for a short crop top. Amounts may vary by adjusting desired length.
Pattern
Body
Ch 100 (108, 124, 150, 158, 178, 192).
Row 1: Starting in 2nd ch from hook, sc in each ch across. (99 (107, 123, 149, 157, 177, 191) sts)
Row 2 (Set-up Lemon Peel St): Ch 1, turn, sc in first st, *dc in next st, sc in next st; rep from * to end of row. (99 (107,123, 149, 157, 177, 191) sts)
Row 3: Ch 2, turn, dc in first st, *sc in next st, dc in next st; rep from * to end of row. (99 (107, 123, 149, 157, 177, 191) sts)
Rep Rows 2-3 until piece meas 8.5 (8, 8, 7.5, 7.5, 7, 6.6)” in length, or desired length for top to be from armhole to waist, minus 1.5” that you will add later with the belt.
Note: Make sure to finish with a row starting and finishing with 1 sc.
Fasten off and cut yarn.
Chest
Turn work, count 22 (24, 28, 38, 42, 50, 56) sts from the right corner, attach yarn to the next st (a sc st), maint Lemon Peel St patt throughout.
Row 1: Ch 1, sk first st where you attached yarn, *sc in next st, dc in next st; rep from * 26 (28, 32, 35, 35, 37, 38) times, sc2tog over next 2 sts. (53 (57, 65, 71, 71, 75, 77) sts)
Row 2: Ch 1, turn, sk first st, *sc in next st, dc in next st; rep from * to the last 2 sts, sc2tog over last 2 sts. (51 (55, 63, 69, 69, 73, 75) sts)
Rep Row 2, 3 (4, 4, 6, 6, 7, 8) more times (45, 47, 55, 57, 57, 59, 59 sts).
Next Row: Ch 2, turn, dc in first st, *sc in next st, dc in next st; rep from * to end of row. (45 (47, 55, 57, 57, 59, 59) sts)
Straps
Row 1: Ch 1, turn, sc in first st, *dc in next st, sc in next st; rep from * until 7 (8, 12, 13, 13, 9, 9) sts have been worked. (7 (8, 12, 13, 13, 9, 9) sts)
Cont working Lemon Peel St on the following rows until Strap meas 8 (8, 9, 9.5, 10.5, 11, 12)”. Note: Remember to ch 1 when the row starts with 1 sc and ch 2 when the row starts with 1 dc.
Fasten off, leaving a long tail to allow you to adjust the length of the strap later on and to attach it to Back.
Turn work and repeat Strap on the other corner of Chest.
Note: When both Straps are finished, check that the length is right for you, and adjust if necessary.
Use the tail to attach Strap to back corners of Body using a tapestry needle, making sure the Straps are not twisted and that the Right Strap is attached to the right corner and the Left Strap to the left corner.
Edging
You will now add an edging around the sides of the back, straps, and neck.
Attach yarn to the back-bottom corner of work to start working on the side of the back and straps. Sc along the edge, making 1 sc per row until 1 row before reaching the corner where the Strap meets the neck. Sc2tog the last st of the side and the first st of the neck. Sc to the last st of the neck, sc2tog the last neck st and the first row on the side of the neck. (31 (31, 31, 31, 31, 41, 41) sts on neck, including corner sts)
Cont to sc along the edge, making 1 sc per row, until reaching the bottom corner.
Fasten off and cut yarn.
This row of sc marks the RS of your work.
Count multiples of 8 sts + 4 on the side of the Left Strap and Back, from the neck corner st to the bottom corner. Place a marker on last st before you can’t complete any more multiples of 8 sts + 4. For example, if you have 78 sts on the side, counting the corner st, PM at st number 76 (8 x 9 = 72 + 4 = 76).
Attach yarn to the first sc from the previous row on the RS, sc to the st before marker and remove marker, (sk 3 sts, tr 11 in next st, sk 3 sts, sc in next st) until 3 sts before the corner st, sk 3 sts, tr 7 in corner st, sk 4 sts, sc in next st, (sk 4 sts, tr 11 in next st, sk 4 sts, sc in next st) 2 (2, 2, 2, 2, 3, 3) times, sk 4 sts, tr 7 in corner st, sk 3 sts, sc in next st, (sk 3 sts, tr 11 in next st, sk 3 sts, sc in next st) until there’s same amount of scallops as the opposite side, sc to the bottom corner.
Fasten off and cut yarn.
Belt
Row 1: Make a chain long enough to go around your waist. Attach it to the bottom right corner of work on the RS by working 1 sc on the unused loop of each of the the body starting chains. When you reach the end of Body, make a chain to match the one made on the other side, turn.
Row 2: Starting on 3rd ch from hook, dc in each st and ch until end of Belt.
Row 3: Ch 1, turn, sc until 6 sts before reaching Body, hdc in next 6 sts, *dc in next st, ch 1, sk 1 st; rep from * until reaching end of Body, hdc in next 6 sts, sc to end of row.
Row 4: Ch 2, turn, dc in each st and ch until end of row.
Fasten off and cut yarn.
Finishing
Weave in all ends.
Block your work.
Add lining if desired.
https://www.instagram.com/p/Bw5rexThA0j/?utm_source=ig_web_button_share_sheet