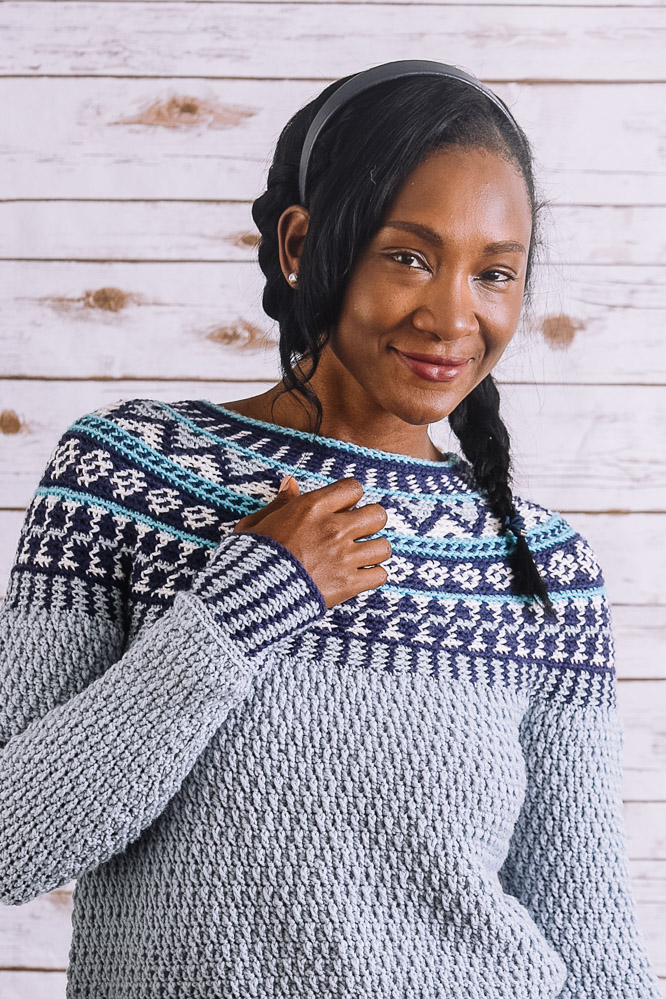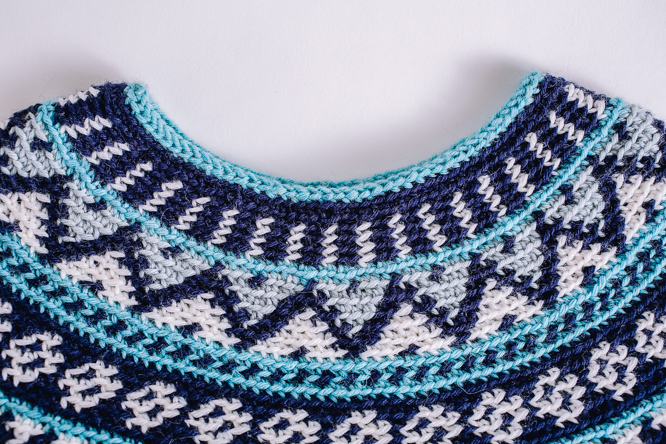
Fair Isle sweaters aren’t just for knitters! Crocheted seamlessly from the top down, this classic patterned sweater will become an instant winter wardrobe staple.
If you’re struggling with the concept of Fair Isle crocheting, our photo and video tutorial is sure to help.
Skill Level: Intermediate
Size: Finished Bust Size = 34 (37 3/4, 41 1/2, 45 1/4, 50, 53 3/4)”, to fit bust 30 (34, 38, 42, 46, 50)”; Shown in size 37 3/4”
Gauge: 17 sts x 18 rows = 4” [10 cm] in back loop only fair isle single crochet using larger hook after wet blocking; 17 sts x 14 rows = 4” [10 cm] in Alternating Posts patt using larger hook after wet blocking
Materials
Yarn:
 Universal Yarn Deluxe DK Superwash (100% superwash wool; 284 yards [259 meters]/100 grams): #817 Summer Sky (CC1, 1 ball, all sizes), #838 Twilight (CC2, 1 (2, 2, 2, 2, 2) balls), #828 Pulp (CC3, 1 ball, all sizes), #832 Icy Grey (MC, 5 (6, 6, 7, 8, 9) balls)
Hook: US size G/6 (4.0 mm) and US size 7 (4.5 mm) hooks
Notions: Tapestry needle
Special Stitches
Fsc: Foundation single crochet.
Bpsc: Back post single crochet.
Alternating Posts
(even number of sts)
Row 1 (RS): Ch 1, [dc in next sc, fpdc in sc from 2 rows below, sk sc behind fpdc just worked] to end, join with sl st to beg dc, turn.
Row 2 (WS): Ch 1, sc in each st across, join with sl st to beg sc, turn.
Row 3: Ch 1, [fpdc in dc from 2 rows below, sk sc behind fpdc just worked, dc in next sc] to end, join with sl st to beg fpdc, turn.
Row 4: Ch 1, sc in each st across, join with sl st to beg sc, turn.
Row 5: Ch 1, dc in next sc, fpdc in dc from 2 rows below, sk sc behind fpdc just worked] to end, join with sl st to beg dc, turn.
Row 6: Ch 1, sc in each st across, join with sl st to beg sc, turn.
Rep Rows 3-6 for patt.
Pattern Notes
This pullover is worked seamlessly from the top down. The fair isle yoke, hem, and sleeve cuffs are worked in the round. The textured body and sleeves are worked in joined rows. Work all fair-isle stitches in single crochet through the back loop only.

Pattern
Yoke
With CC1 and larger hook, fsc 84 (84, 90, 90, 96, 96). Using CC2, join with sl st to beg fsc.
Set-up Rnd 1: With CC2, ch 1, sc in blo of each st around, join with sl st to beg sc.
Set-up Rnd 2: With CC2, ch 1, sc in blo of each st around, inc’ing 24 (27, 30, 33, 36, 39) sc evenly around, join with sl st to beg sc. (108 (111, 120, 123, 132, 135) sc)
Rnds 1-4: Work Rows 1-4 of Yoke chart, joining the last rnd using CC1.
Rnd 5: With CC1, ch 1, sc in blo of each st around, inc’ing 28 (33, 32, 37, 36, 41) sts evenly around, join with sl st to beg sc using CC2. (136 (144, 152, 160, 168, 176) sc)
Rnds 6-11: Work Rows 6-11 of Yoke chart, joining the last rnd using CC2.
Rnd 12: With CC1, ch 1, sc in blo of each st around, inc’ing 28 (30, 32, 34, 41, 43) sts evenly around, join with sl st to beg sc using CC2. (164 (174, 184, 194, 209, 219) sc)
Rnds 13-14: Work Rows 13-14 of Yoke chart, inc’ing 1 st on last rnd, joining the last rnd using MC. (165 (175, 185, 195, 210, 220) sc)
Rnds 15-20: Work Rows 15-19 of Yoke chart, joining the last rnd using CC1.
Rnd 21: With CC1, ch 1, sc in blo of each st around, inc’ing 27 (33, 39, 37, 46, 52) sts evenly around, join with sl st to beg sc using CC3. (192 (208, 224, 232, 256, 272) sc)
Rnds 22-28: Work Rows 22-28 of Yoke chart, joining the last rnd using CC2.
Rnd 29: With CC2, ch 1, sc in blo of each st around, inc’ing 24 (26, 31, 32, 35, 40) sts evenly around, join with sl st to beg sc using MC. (216 (234, 255, 264, 291, 312) sc)
Rnds 30- 35: Work Rows 30-35 of Yoke chart, joining the last rnd using MC.
Break all colors except MC.
Next rnd: Ch 1, sc in blo of each st around, inc’ing 16 (26, 13, 28, 9, 20) sts evenly around, join with sl st to beg sc. (232 (260, 268, 292, 300, 332) sc)
Beg with Row 1, work – (2, 4, 6, 8, 10) rows of Alternating Posts patt. Piece meas about 81/4 (83/4, 91/2, 10, 101/2, 11)” from beg.
Divide for Body
Rnd 1: Work next row of Alternating Posts patt over 34 (38, 40, 44, 48, 52) Back sts, ch 4 (4, 8, 8, 12, 12) for underarm, sk next 48 (54, 54, 58, 58, 66) Right Sleeve sts, work in patt over 68 (76, 80, 88, 96, 104) Front sts, ch 4 (4, 8, 8, 12, 12) for underarm, sk next 48 (54, 54, 58, 58, 66) Left Sleeve sts, work in patt over rem 34 (38, 40, 44, 48, 52) Back sts, turn. (144 (160, 176, 192, 212, 228) Body sts)
Rnd 2: Ch 1, sc in each dc and ch, join with sl st to beg sc, turn.
Rnd 3: [Work in patt to underarm sts, dc in each chained st] 2 times, work in patt to end, turn. Cont in patt until piece meas 13” from separation of Body and Sleeves, ending with RS row.
Hem
Next rnd: Ch 1, sc in blo of each st around, inc’ing 0 (2, 1, 0, 1, 0) sts evenly around. (144 (162, 177, 192, 213, 228) sts)
Work Rnd 1 of Hem chart, 12 times.
Next rnd: With CC2, ch 1, sc in blo of each sc around, join with sl st to beg sc. Switch to smaller hook.
Next rnd: With CC2, ch 1, bpsc in each sc around, join with sl st to beg sc. Fasten off.
Sleeves
Attach MC to center of underarm.
Rnd 1 (RS): Ch 1, dc in first 2 (2, 4, 4, 6, 6) chained underarm sts, work in patt over Sleeve sts, dc in rem 2 (2, 4, 4, 6, 6) chained underarm sts, turn. (52 (58, 62, 66, 68, 76) sts)
Work in patt until Sleeve meas 3” from underarm, ending with RS row.
Dec rnd (WS): Ch 1, sc2tog, work in patt to last 2 sts, sc2tog – 2 sts dec’d. Maintaining sts in patt, rep Dec row every – (6, 6, -, 4, 4) rows, – (2, 4, -, 11, 7) more times, then rep Dec row every 6 (4, 4, 4, 2, 2) rows, 7 (8, 5, 11, 1, 9) time(s) – 36 (36, 42, 42, 42, 42) sts rem. Work even in patt until Sleeve meas 15” from underarm, ending with RS row. Do not turn.
Cuff
Next rnd: Ch 1, sc in blo of each st around, join with sl st to beg sc.
Work Rnd 1 of Hem chart, 12 times.
Next rnd: With CC2, ch 1, sc in blo of each sc around, join with sl st to beg sc. Switch to smaller hook.
Next rnd: With CC2, ch 1, bpsc in each sc around, join with sl st to beg sc. Fasten off.
Finishing
Weave in ends and block.


Are there written instructions for this pullover? I’m not good with charts.
Hi Deborah, at the moment I believe the charts are necessary to complete the pattern and that the charts are not written out in full. – Nicola, Editor
Where can I get the chart for the ski lodge sweater, I can’t find it anywhere
Hello! Charts are always on the far right side of the pattern page underneath the photos. Here is a direct link to the charts as well:
https://www.ilikecrochet.com/wp-content/uploads/Ski-Lodge-Pullover-Charts.pdf
https://www.ilikecrochet.com/wp-content/uploads/Ski-Lodge-Pullover-Schematic.pdf
Thanks! – Nicola, Editor
Hi I love your pattern where can I get the chart I’m not finding it. Thank you for your assistance appreciate it
Hello! Charts are available for logged-in Gold Members at the bottom of the pattern and appear as a blue button to click and download. – Dana, Editor
Are the charts written out somewhere? i’m totally blind and my screen reader will not read the document at the link above, but I’d love to make this.
Hello! Charts are always on the far right side of the pattern page underneath the photos. Here is a direct link to the charts as well:
https://www.ilikecrochet.com/wp-content/uploads/Ski-Lodge-Pullover-Charts.pdf
https://www.ilikecrochet.com/wp-content/uploads/Ski-Lodge-Pullover-Schematic.pdf
Thanks! – Nicola, Editor
So the answer is no? The only readable text with assistive tech is the key. I’m very disappointed, but thanks.
Pattern keeps talking about following yoke chart I see picture of yoke but not a chart to follow. Am I just missing it?
Hello! I’ve reached out to the designer for advice and she or I will reply as soon as possible. Thanks! – Nicola, Editor
Do you know where I can get the recommended yarn for this sweater?
And/or – could cotton yarn be used instead?
Hello! You can find this yarn here: https://universalyarn.com/products/ddk-swash
You probably could use cotton, but the sweater may be stiffer than you might like.
-Nicola, Editor
I’m a lefty. Will this work for me. I usually follow patterns, but, I run into problems when what I’m crocheting doesn’t work in reverse design. For example, the letter B, or animals facing one another, or a pattern that does not look good in reverse.
Hello! This article may help: https://www.ilikecrochet.com/magazine/crochet-articles-and-interviews/crochet-corner/left-handed/
I’m a lefty. Will this work for me. I usually follow patterns, but, I run into problems when what I’m crocheting doesn’t work in reverse.
Pueden publicar foto con el patrón dibujado para poderlo leer? Sino queda muy entreverado. Gracias!!
Hello! Perhaps you are looking for the charts? https://www.ilikecrochet.com/wp-content/uploads/Ski-Lodge-Pullover-Charts.pdf
Hope that helps! – Nicola, Editor
please show image of item before instructions to make item.