

Sometimes it’s because the pattern simply didn’t come written in the size we need, sometimes it’s because the pattern writer didn’t have the skill to grade an item properly into the plus sizes (and no, one can’t just make everything larger across the board and still expect it to fit a human being) and sometimes it’s because while we might be plus size and the pattern is plus size, we aren’t plus size in the same place! While it does take some effort to upsize an existing pattern to your own unique body, knowing how to resize crochet patterns is a wonderful skill for all crochet artists, and the end results will make the effort worthwhile. You don’t have to be intimidated by the prospect of doing your own pattern alterations, you just need a plan of attack.
Let’s talk about the first step – choosing a pattern that is a good candidate to be upsized.
Some patterns are simply easier to adjust than others. Take a close look at the pattern you are thinking of resizing before you make a yarn commitment. Patterns with large numbers of stitches or rows in the repeat are not good choices – you will wind up with a quarter of a repeat here and a half there, and unless you are gifted at reading your stitches, you may get very tangled up in the wording and have a hard time making an adjustment.
How do you quickly figure out what the stitch and row repeats are in the pattern you’re considering? For stitches in a repeat, look for an instruction in parentheses that is repeated several times.
For example:
(dc in each of next 5 dc, ch 3, sk 2 dc, sc in next dc, ch 3, sk 2 dc) 5 times.
My example has a 10-stitch repeat – the 5 dc that each have a dc in them, the two that were skipped, the one that got an sc, and the next two that were skipped. Now your stitch count may not be an exact multiple of the stitch count in a set of parentheses, but when skimming a pattern, that’s a good, quick clue that the stitch repeat is large, so this may not be a good pattern for your first time at upsizing. Look for a pattern with a smaller stitch repeat – maybe 4-6 stitches.
How about row repeats? Again, skim the pattern and look for an instruction that says something like “Rep Rows 5-8 for pattern 10 times.” If I am repeating Rows 5-8 times, it’s a good bet that there are four rows in the repeat. If I see something like “Rep Rows 10-21” that’s a twelve row repeat, which may make upsizing the pattern a little difficult.
One more thing to look at in the pattern writing is how lengths are written out. “Rep Row 5-8 for pattern until work measures 20” is going to be easier to work with than “Rep Rows 5-8 sixteen times, then Rows 5-6 once more”.
Lastly, glance at that pattern and make sure there is a schematic. That will give you a quick visual map from which to work when you are looking to see which measurements need to be extended. One of the tricks of plus-size crochet is that you can’t size up the whole pattern by the same ratio or number of inches for every single measurement – this is why you see boxy sweaters where the cross back would fit a linebacker and the armhole opening sags to the knees! Just because we need more room in the bust, waist or hip, doesn’t mean our arms are the length of King Kong’s. The schematic will help you see which measurements need to be extended to resize crochet patterns and which don’t.
Get this special collection of 3 FREE baby blanket patterns from I Like Crochet right now!
Now It’s Like a Puzzle!
How much coverage do you need and where do you need it?
The very first thing you need to do before you resize crochet patterns is make sure you have accurate measurements of yourself so you know what finished numbers you are aiming for. It’s almost impossible to measure yourself, so invite a like-minded friend over and make an afternoon out of getting measurements for each other. Before you start measuring, it’s a good idea to create a list of all the information you’ll need to record. Use this handy dandy printable checklist as your guide!
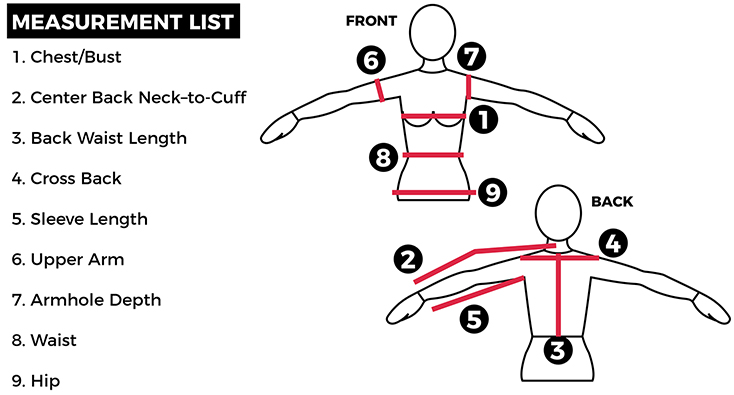
At the very least you’ll need bust, waist, high hip, cross shoulder (back), upper arm circumference and sleeve length. These will be your body measurements; you will still need to add some fabric (called “ease”) to get to your finished measurements.
If you need or want to fly solo, the best way to get a good set of finished measurements is to pick out a sweater you already own that fits you like a dream, and measure that to get the finished measurements for your various pieces.
Print out or scan and copy the schematic on the pattern you’ve chosen so you have a basis from which to work that you can scribble on. Write in your desired finished measurements on the copy so you can see which pieces need adjustment and where.
Get this special collection of 3 FREE baby blanket patterns from I Like Crochet right now!
Now that you know where you want to go and how to resize crochet patterns, you can make a specific plan on how to get there. You have done the planning, now it’s time to get out your hook and yarn and do some swatching! Be sure to check your gauge with your pattern and measurements, you don’t want all your hard work to be wasted because your stitches are the wrong size!
Want to learn more? Don’t miss part 2 of our sizing series to learn a few different ways to add fabric where it’s needed. The, try out these awesome (size-inclusive) patterns!

Roses are Red Vest | Making it Fit: Adapting Crochet Patterns for Plus Sizes – Part 2 | Garden Glow Sweater
I ALWAYS must adjust any sweater (knit or crochet) pattern for my Pear Shape. My bust (and shoulder width) is always smaller than my hips – no matter how much weight I loose. I wish there was someone who could come up with some cute “A-line” sweater patterns (knit and crochet) for us Pear Shapes! It is so frustrating to have to always practically “remake” a sweater pattern. I usually end up designing my own pattern in the end. Thank you for this posting article!
Wonderful article with great information!
PLEASE PLEASE do me a favor EDITOR or someone?
O have noticed many designers AND editors including in this article overuse commas!
This is a huge problem when designers do this because it makes patterns very hard to understand!
I was taught never to use a comma before the word AND which makes sense because commas are to notify us to pause but the word and is already a separation.
Schematics – I see many patterns without any of them (including patterns on this site) and it is hard to visualize to makers then obviously.
Thank you again for this article- I know many will find it helpful for them!
Linda
Hello! Thank you for your feedback. We are always looking for new ways to improve our user experience. If a pattern requires a schematic, they can be found on the right hand side of the page below the photos. – Nicola, Editor
This is super helpful for creating gloves that fit my sister’s extra long fingers. Now I can alter a pattern to fit her and me… I’m very petite in bone frame and very curvy in hips and bust while she is much taller, curvy, and has a larger frame. 32DD is hard to find a pattern for!
I appreciate you taking the time to write this up and giving voice to the reality of being plus size. Of course many people just need to adjust a pattern due to one area such as bust or hips. This is where your advice shines. I personally won’t buy a pattern that is not size inclusive, but will often adjust the shoulders and bust to fit better.
I am having to relearn this technique. I had a mastectomy on my right breast and a reduction of the left. Unfortunately I didn’t get a waist reduction. Nothing fits! Thanks for these tips.
Very useful. Starting to ‘dip my crochet feet’ into garments, bra cups ponchos and accessories, so this is very handy. Thank you
This is fantastic information and I THANK YOU! I made things (knit and crochet) from pattern books (McCalls Needleworks and Crafts, Leisure Arts, and others) during the 70’s when sizing was sooooo very different. – size 12 then is definitely not a size 12 now – and i’m now in the 18-20 or bust size 46. Would love to make some of the items again, but….. Would your instructions help me with this problem or shall I just forget them?
In the past 2 years I have made 7 crocheted sweaters. The reason? I am small in the shoulders and bust, but my hips are 7 inches bigger than my bust. Nothing I buy fits well. This article describes the beauty of crochet. My first sweater was very, very slow-going. I would work 10 rows, then try it on and take out the last 5 or 6 rows before working them again. Don’t be afraid to rip it out!! Just use a smooth yarn that doesn’t catch on itself to make it easier for you. After that one was finished, I just laid the others on top of the finished one as I work them to see which upcoming rows I need to add or subtract. First one was simple double crochet. Since then, I have even used a shell stitch with 6-stitch repeat in a couple of the sweaters. I love every one of them and get plenty of compliments!
Great additional tips and encouragement! Thank you for your comment ????
*!!! (not”???”, lol)
Do you have suggestions for us really large people who also want to wear crocheted clothing? We are called super sized, which means over a size 26 possibly up to a size 44 (see a Woman Within or Roaman’s catalog or website.
Check out Crochet Foundry. They are a magazine that not only includes plus size in the instructions, but also the models.
What a useful article! Thank you!
THANK YOU! It has indeed been frustrating so I greatly appreciate the tips!