


 Finishing is something that most crocheters don’t take much time to think about, but it can really make or break a project. One important aspect that every crochet project includes is loose ends. There is nothing worse than spending hours on a project only to rush through the finishing and have ends sticking out. I’ll never forget the first scarf I made in more than one color. It was a striped scarf in super bulky yarn and I simply tied the two colors together at every color change, tucked them in, and snipped them off. You can imagine how embarrassed I was later when I saw my friend wearing it and there were about twenty ends sticking out! After that I set out to find the best technique for weaving in ends and tried out several before finding the one that I regularly use.
After finding that you can’t just cut the ends off and hope they go away, the next thing I tried was crocheting over the ends. It sounds great! You just hold the yarn tails on top of the row you’re working and crochet over them. I did this for a while until I found that they slip out easily. So I tried whipstitching the ends into the stitches, but this bothers me because it adds too much bulk to the area and wasn’t good for many types of projects.
Get this special collection of 3 FREE baby blanket patterns from I Like Crochet right now!
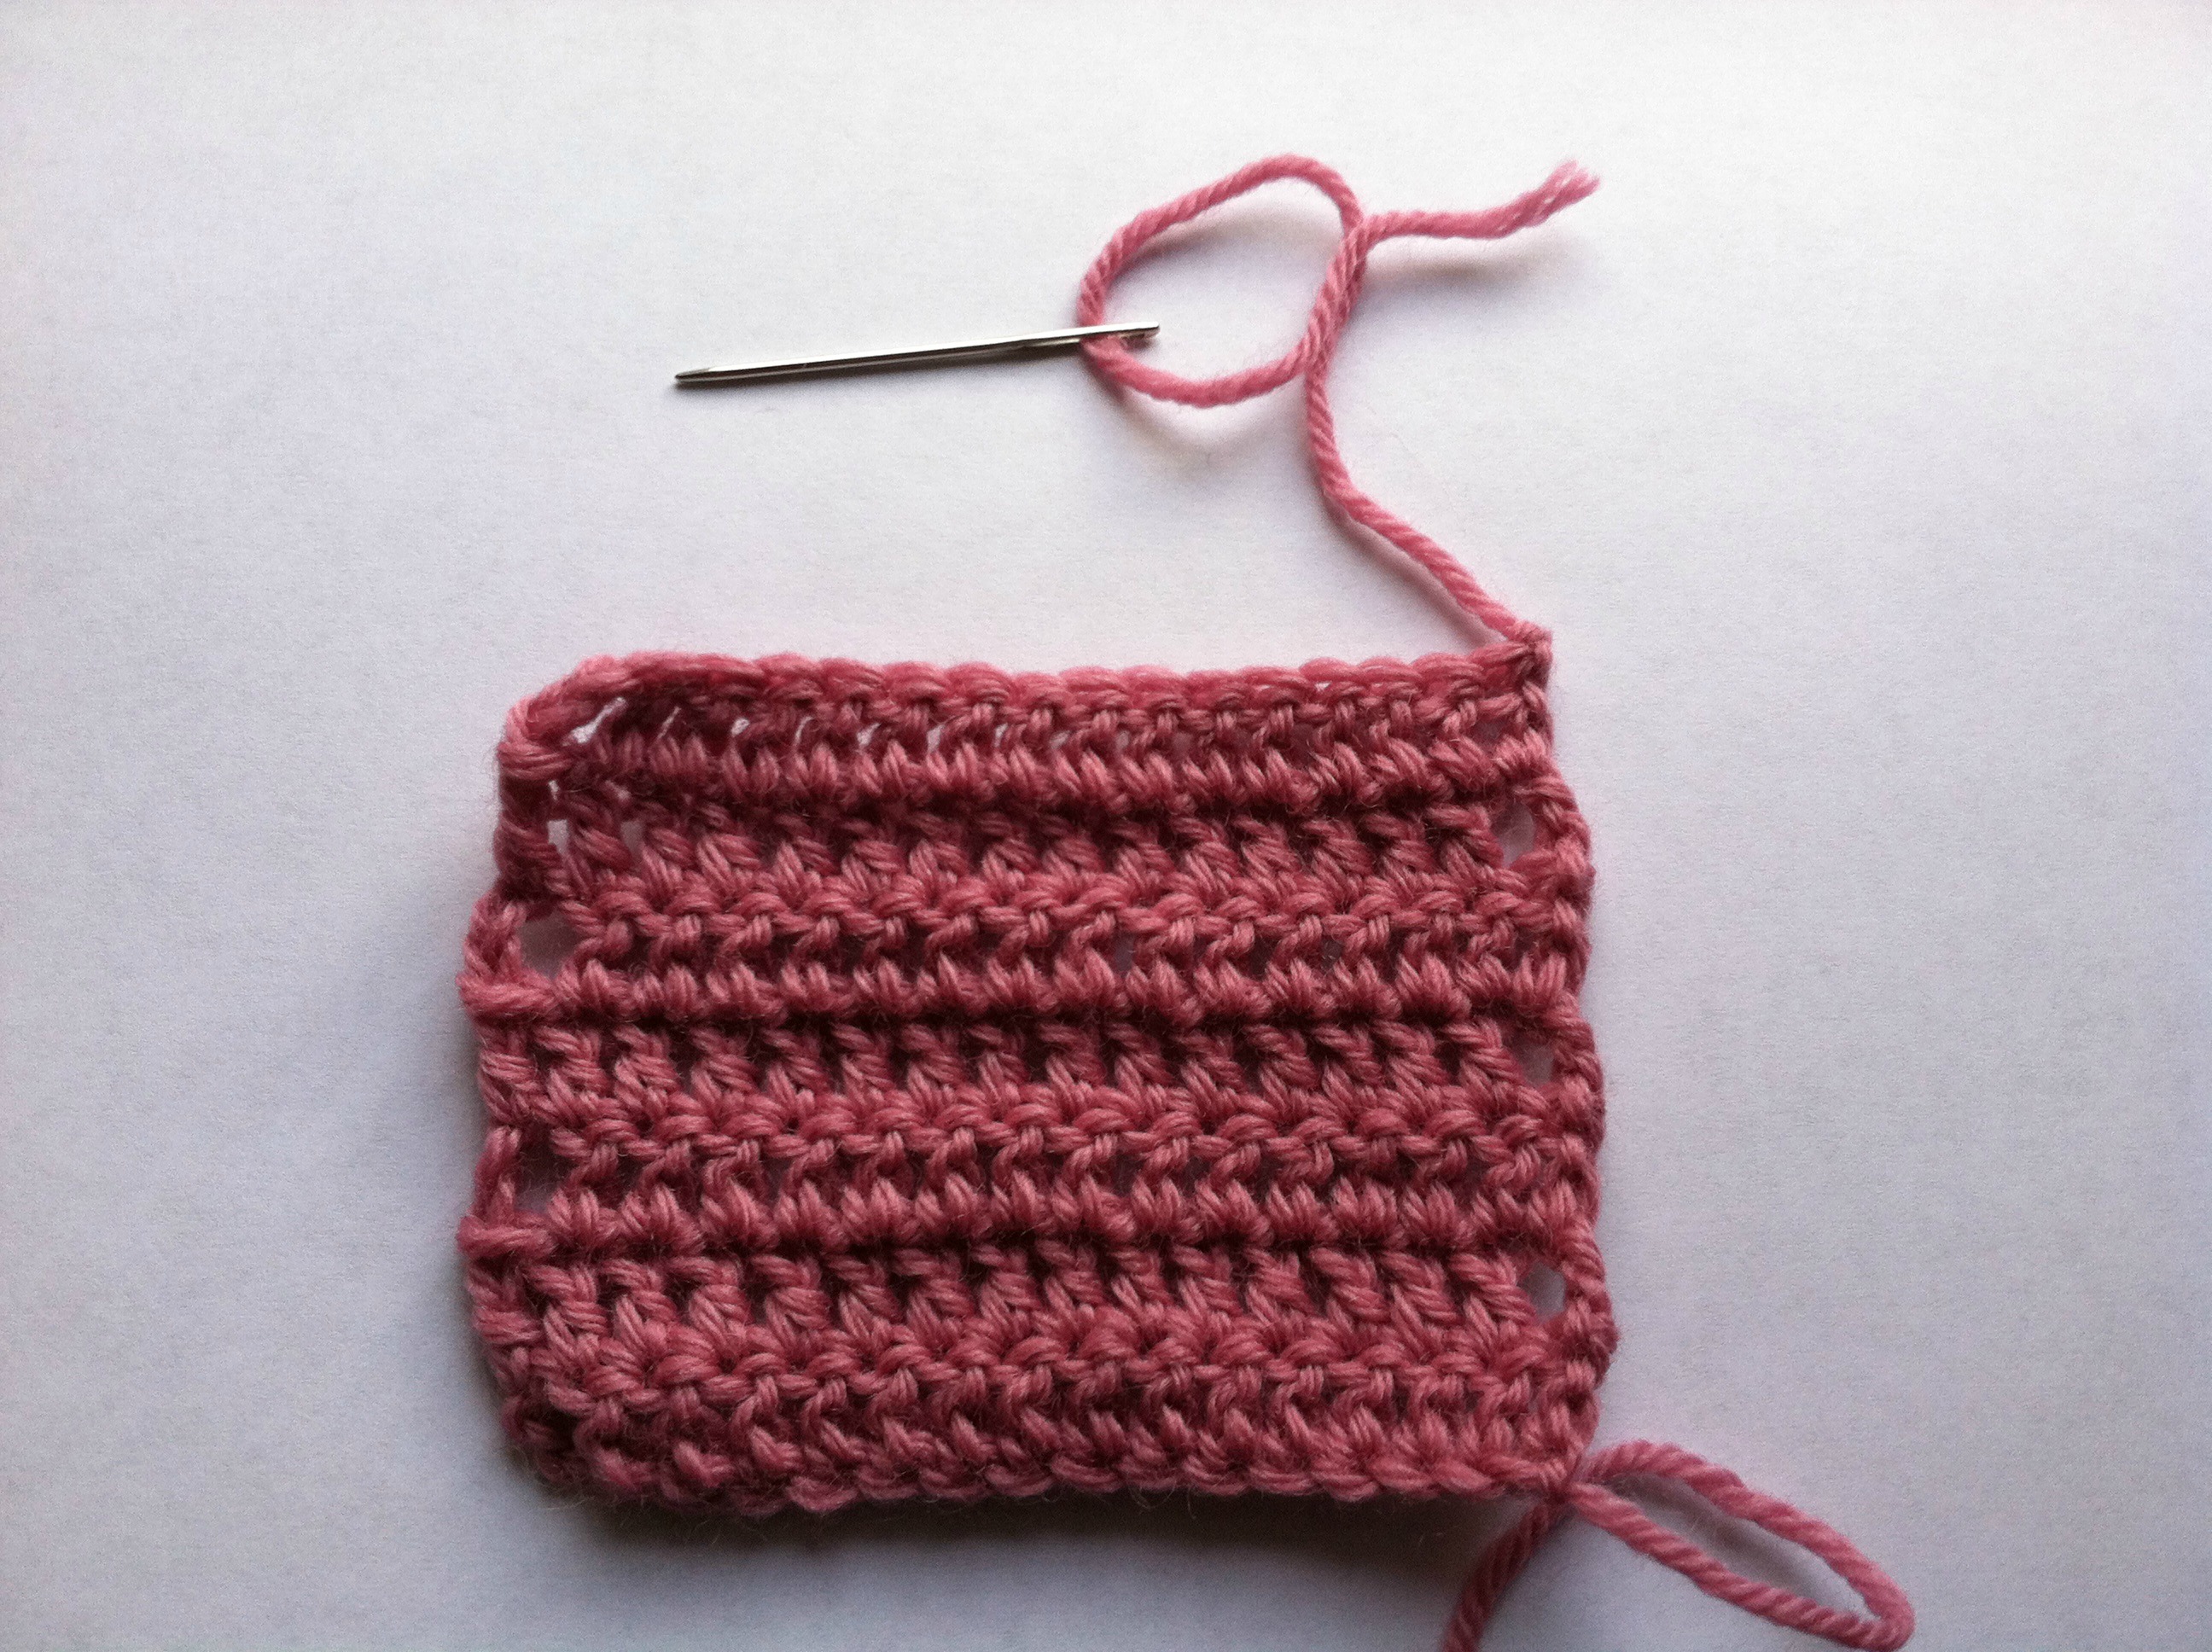
To properly weave in ends, you will need a yarn needle. I prefer to use a metal one as I find that it slides more smoothly through the stitches in most any type of yarn. The plastic ones work, too, but I don’t find them as easy to get through the stitches. Every project will require a little different approach, but the basics are the same. Typically I will try to always leave my yarn tails at the end of a row, but sometimes I am working with a very limited supply of yarn and must work to the middle of a row. The only thing this really affects is whether you weave in before or after blocking.
How to Weave in Yarn Ends
Tips
- If the yarn is left at the end of a row, block the pieces before weaving in the ends. If you are seaming any pieces it will be easier to weave the ends into the seam.
- If the yarn is left in the middle of a row, weave in the ends before you block. This really helps to set the ends if they happen to be in the middle of your work.
- Be very, very careful not to cut your work! This can happen to the best of us.
- Always weave in ends on the wrong side of the work. If there is no right or wrong side, just weave them in as invisibly as possible.
- Don’t pull too tightly. This will cause your work to look uneven. Try to keep the tension even with the rest of the crocheted piece.
My Go-To Technique
After nearly ten years of crocheting, this is the method I prefer for almost every end. Like I said before, if there is a seam I will wait to weave in the ends until the project has been seamed and weave the ends into the seam. This prevents any bulk from being added to the project and the ends are sure to hide there.
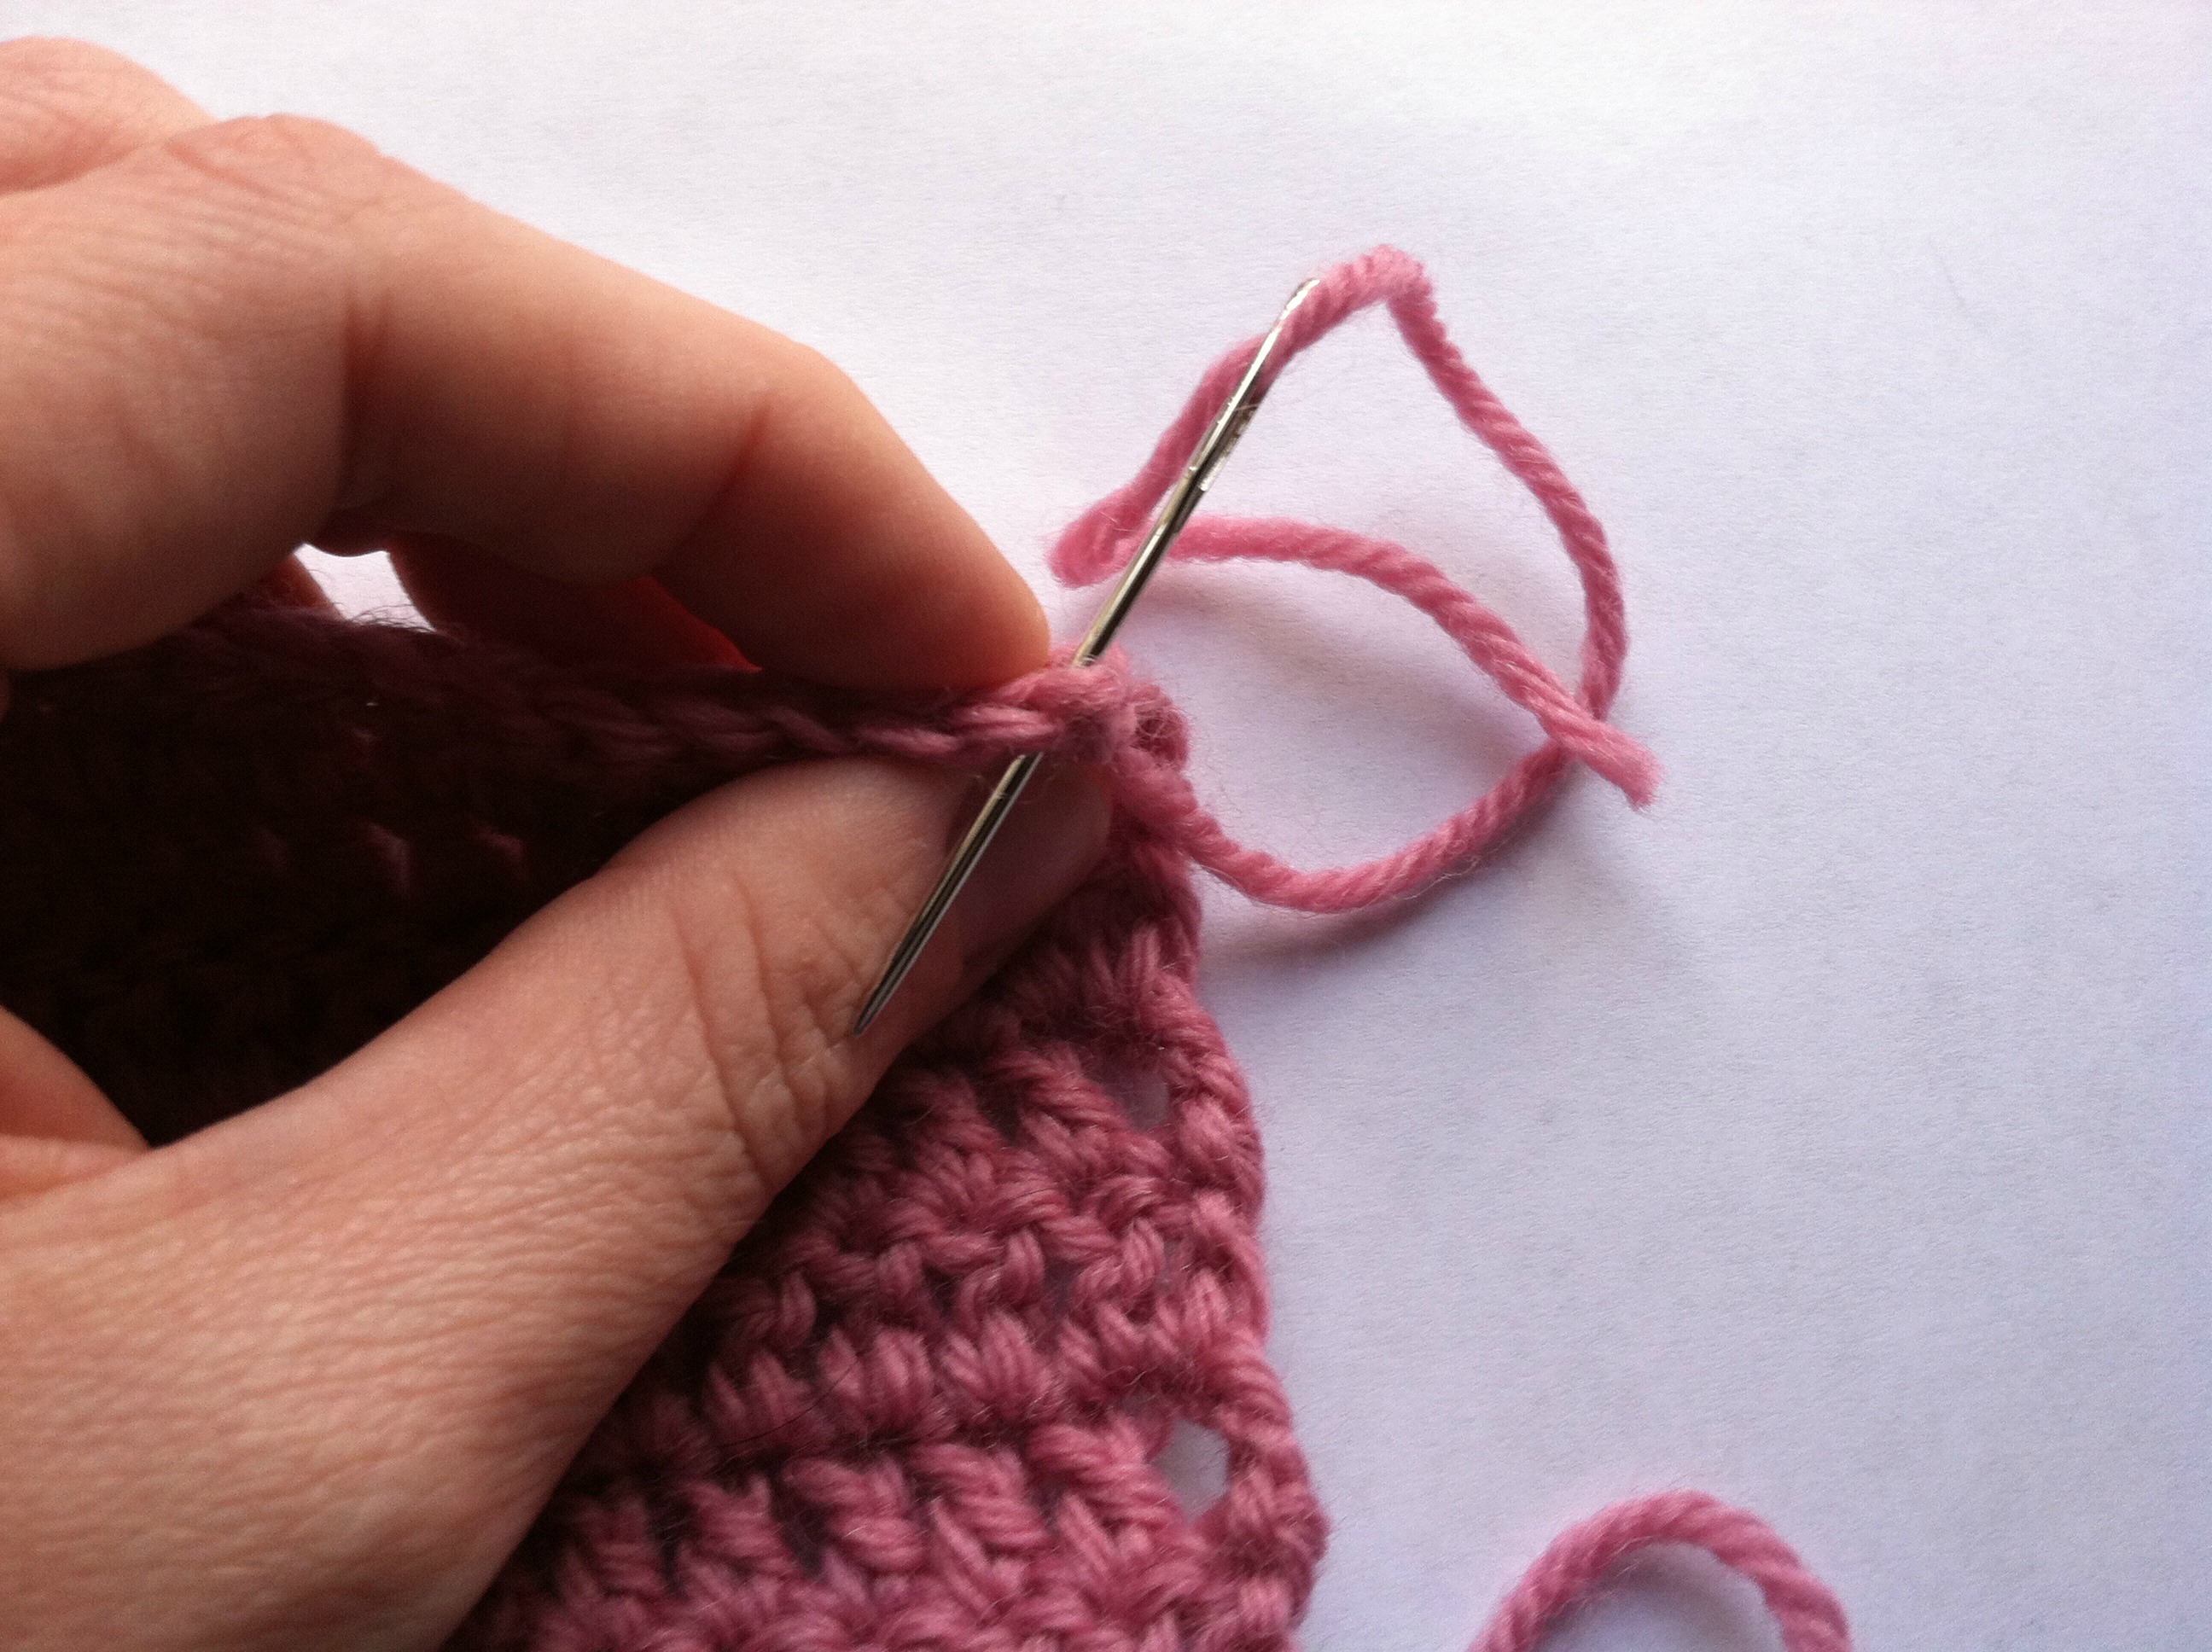
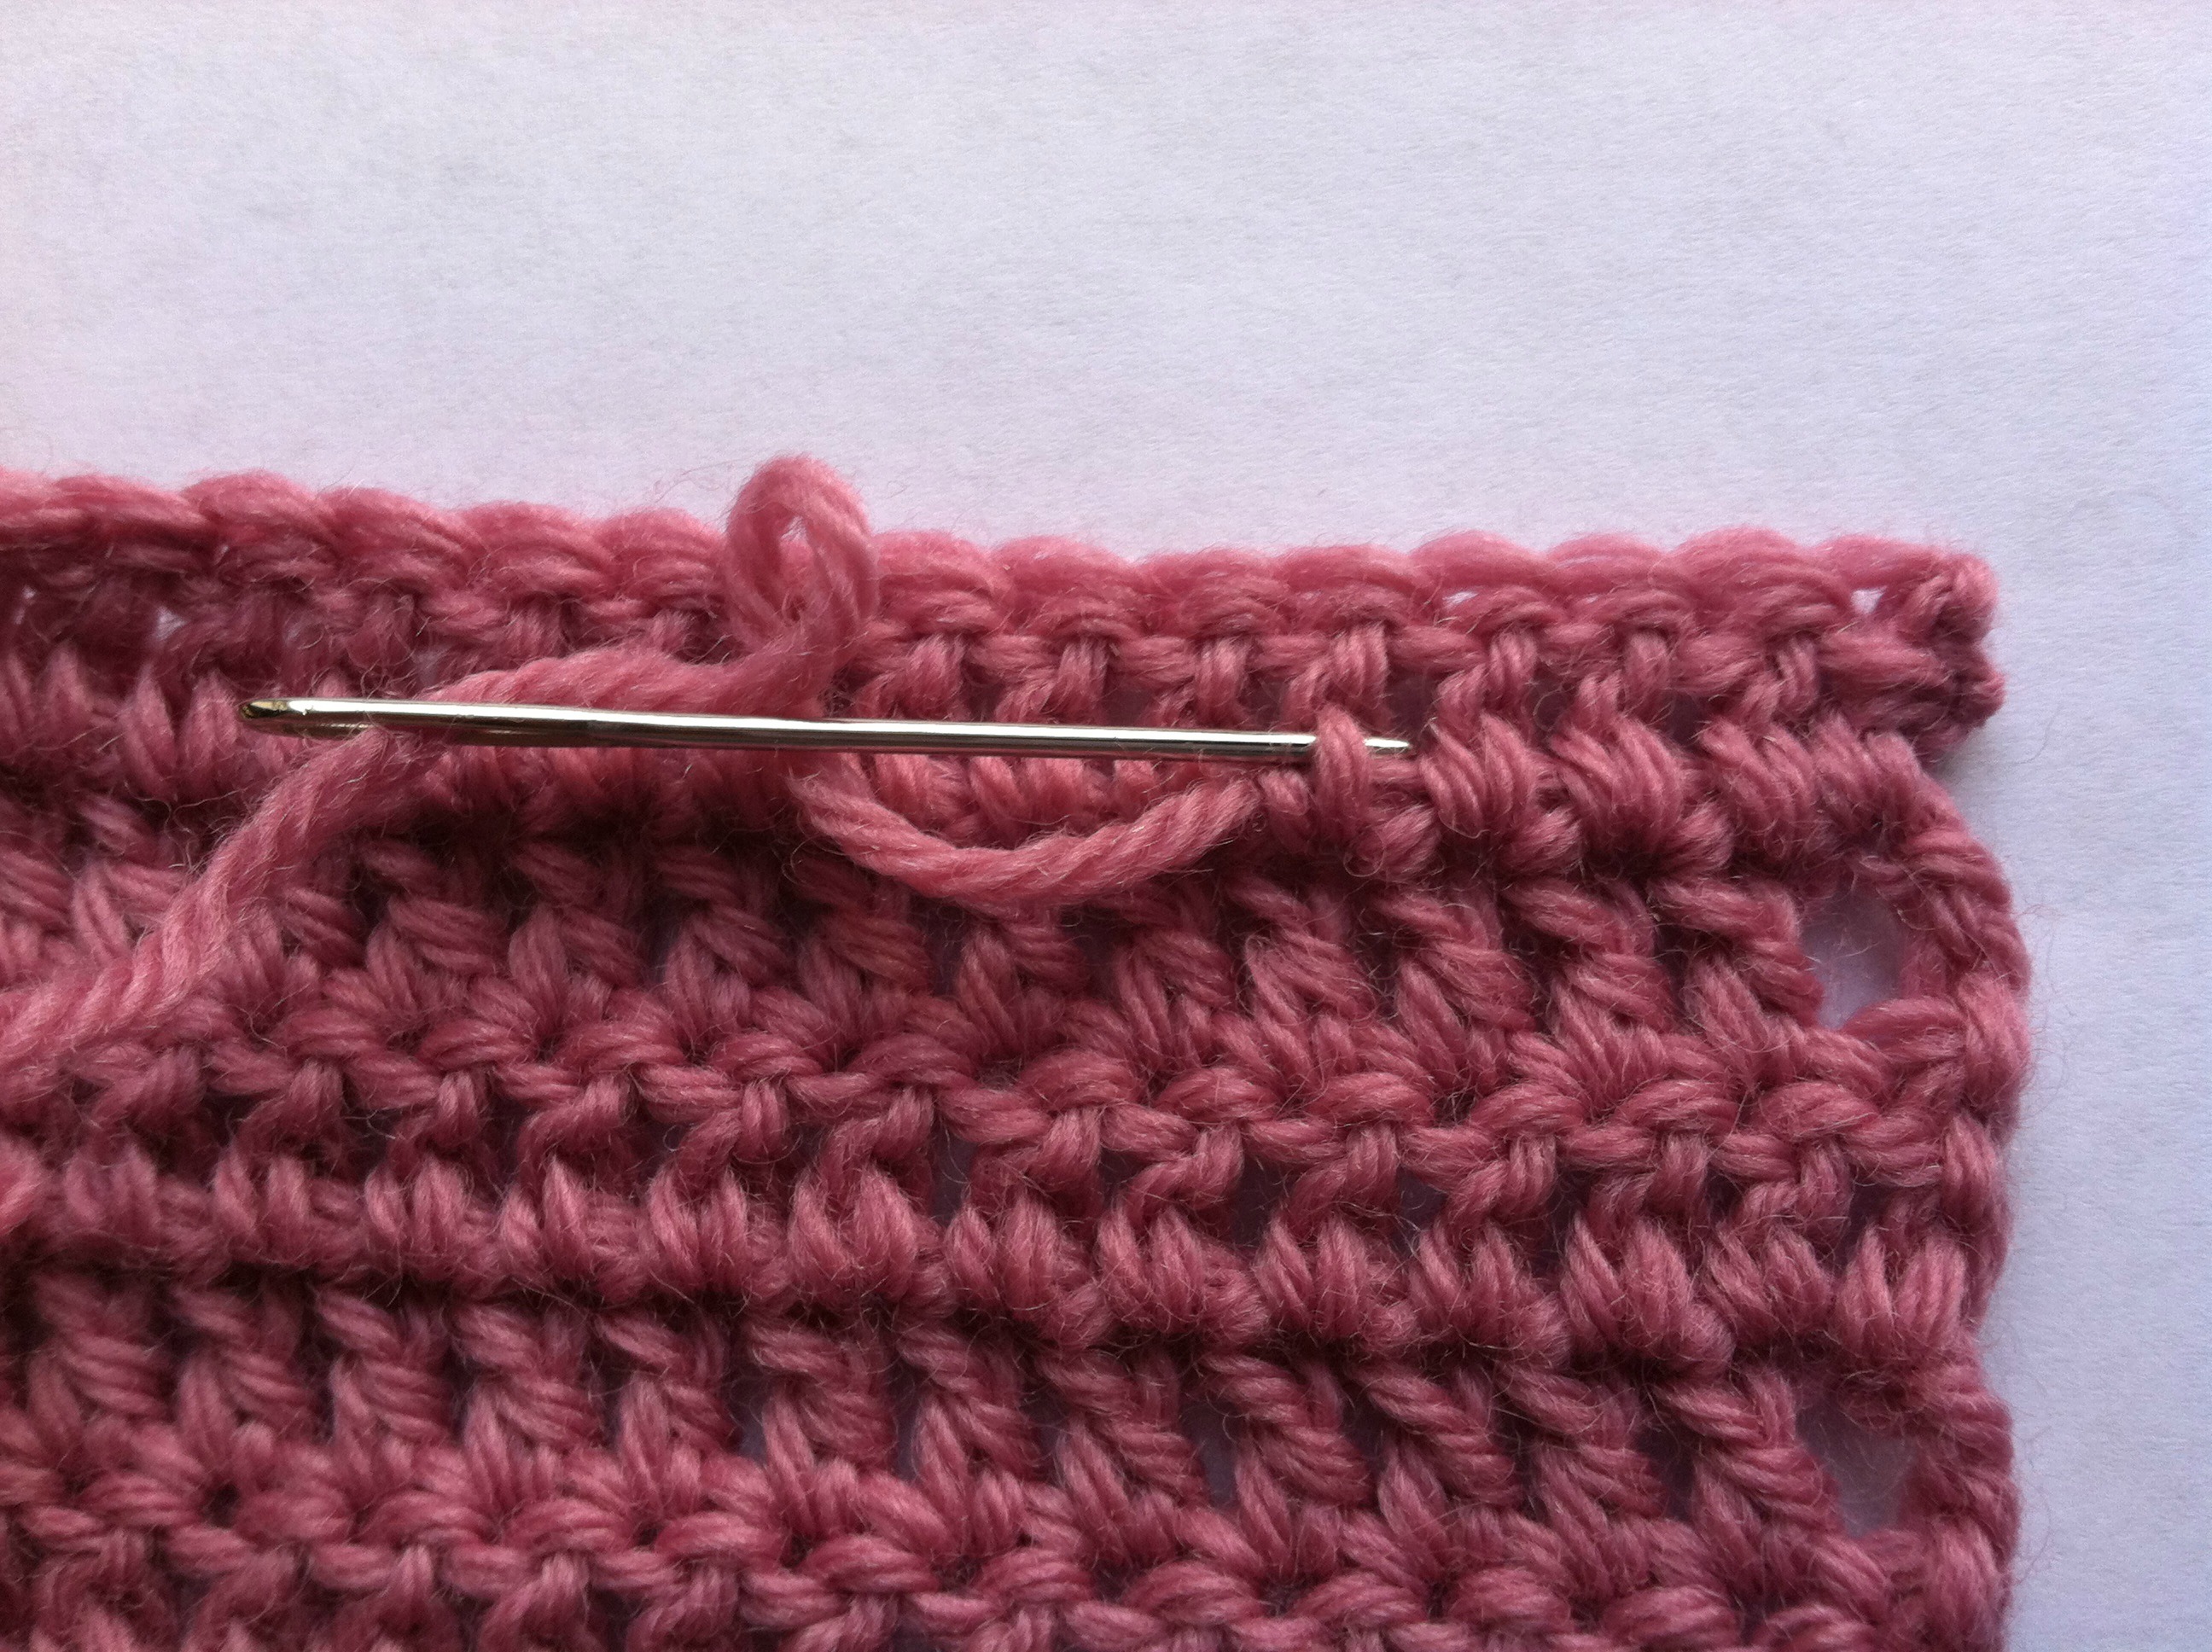
Step One:
Insert yarn needle through the vertical bar on the side of the last stitch and pull the yarn all the way through.
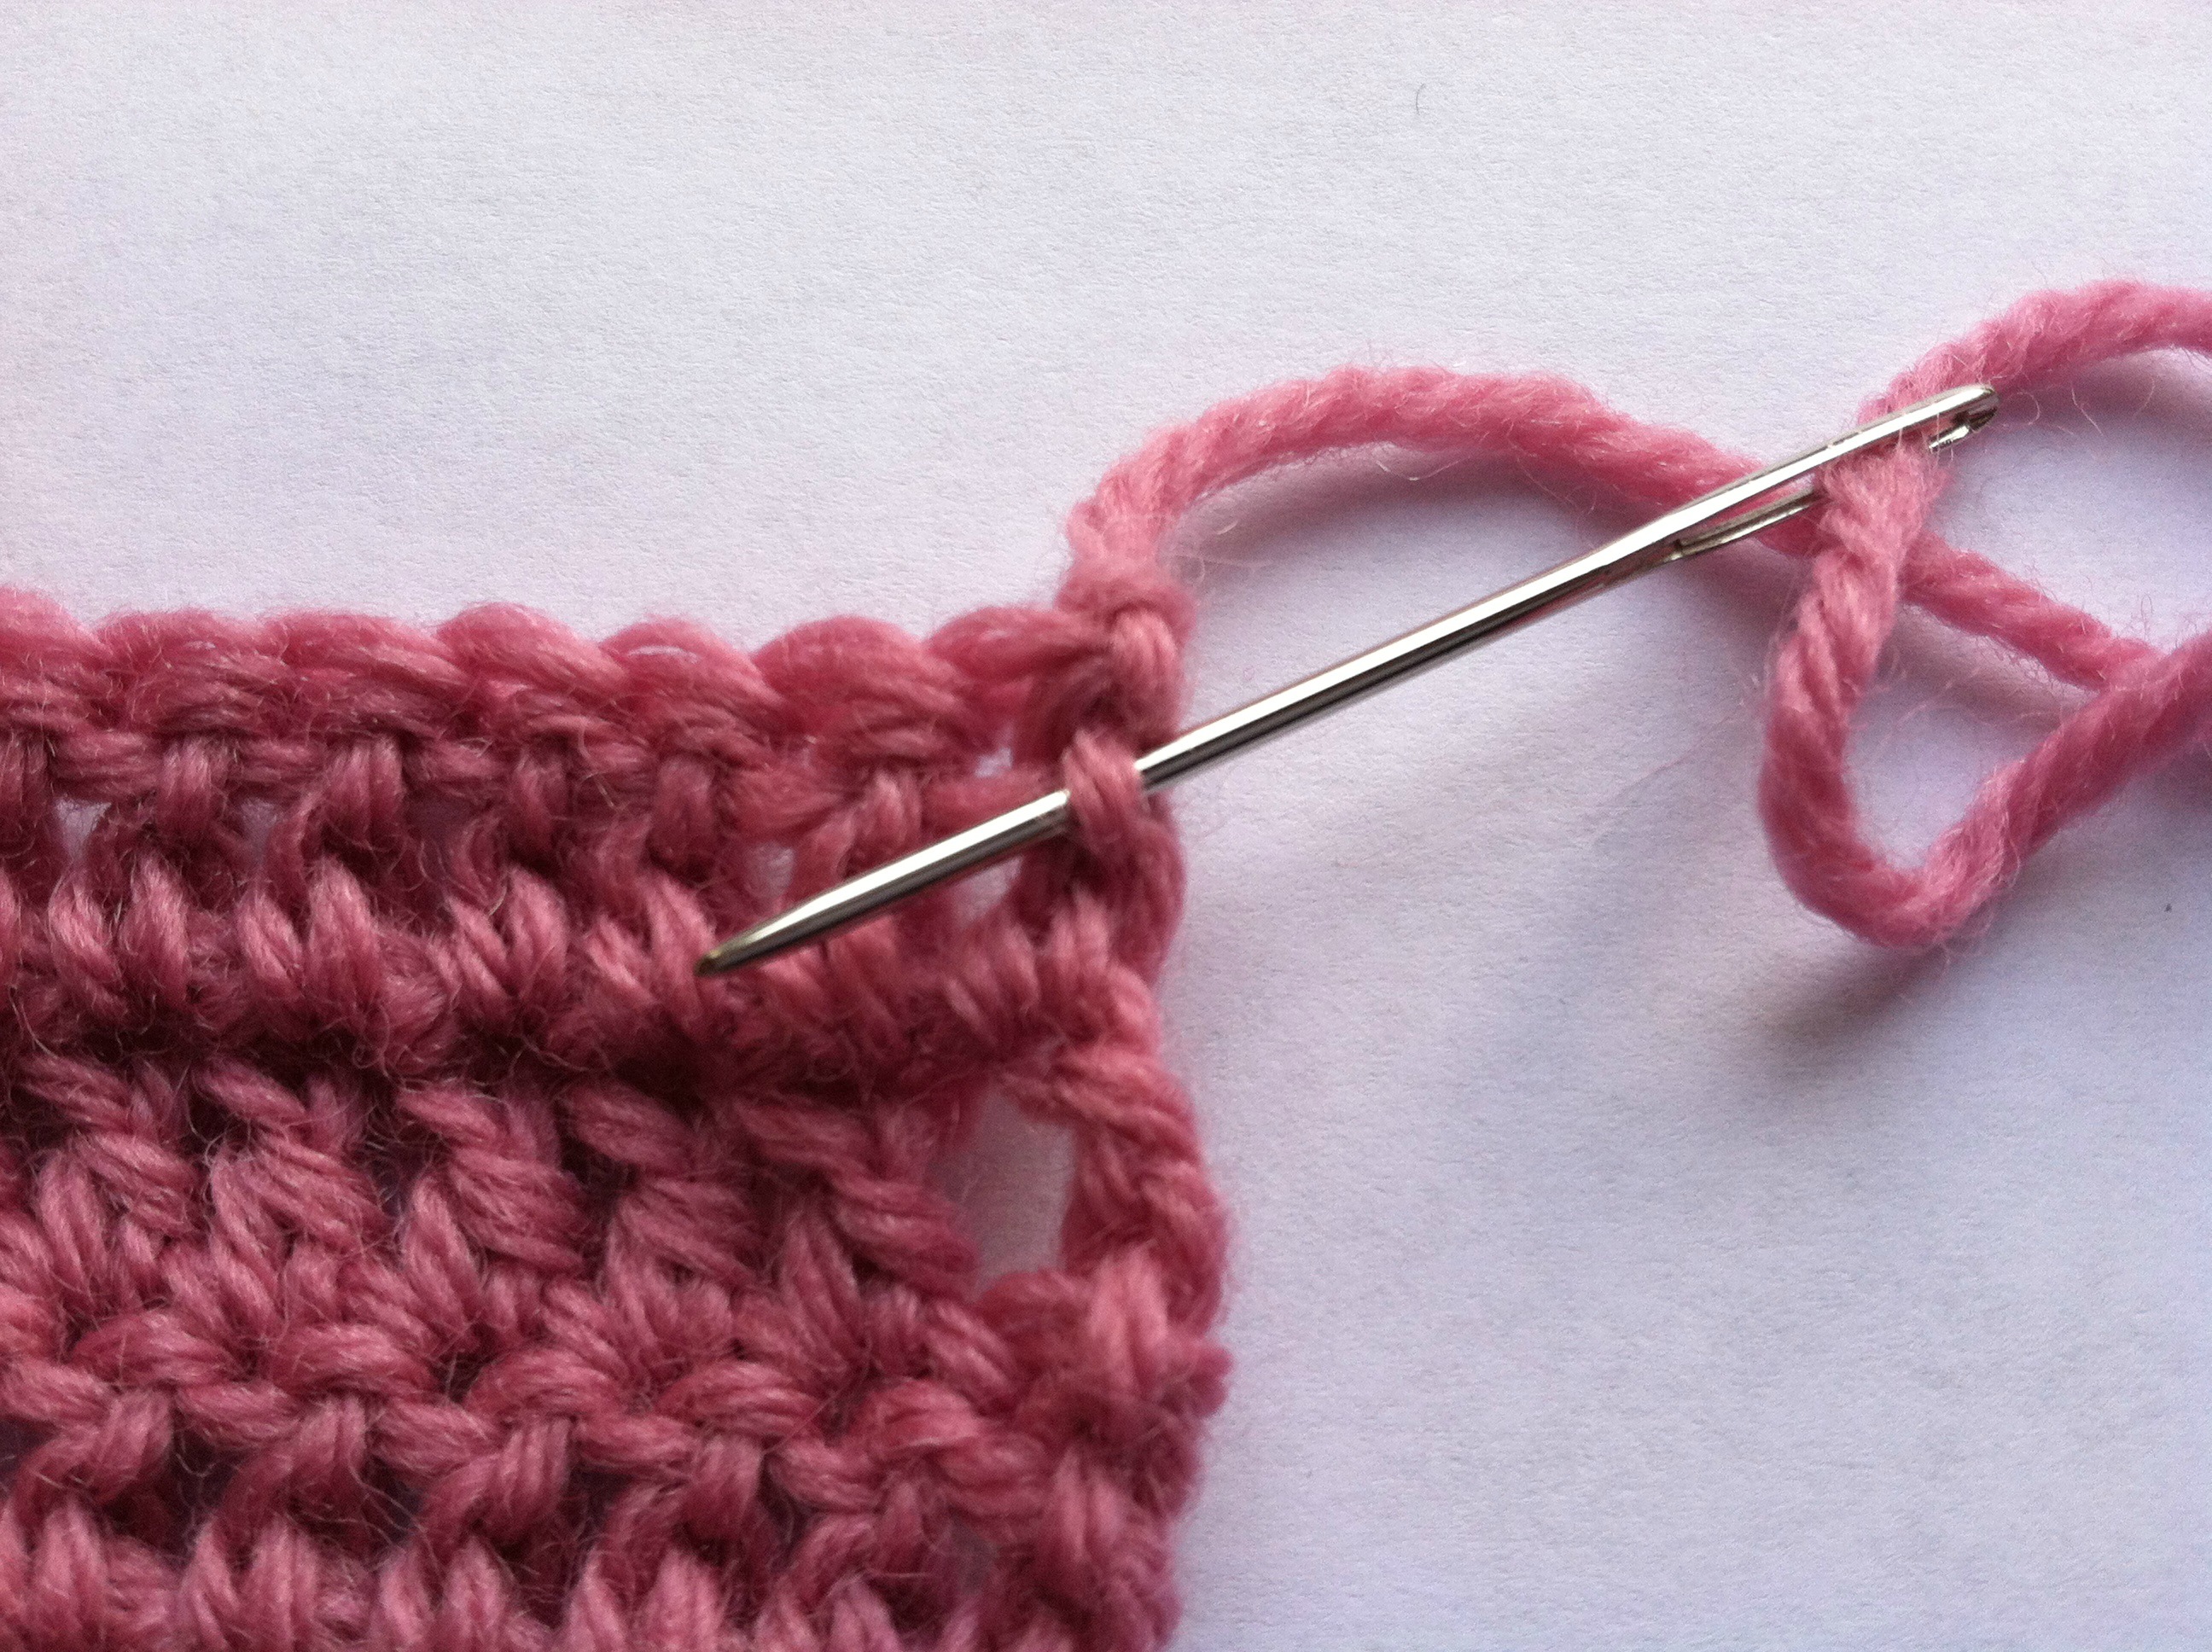
Step Two:
Go back into the top of the same stitch, make sure it is right from where the yarn end came from. Pull the yarn all the way through.
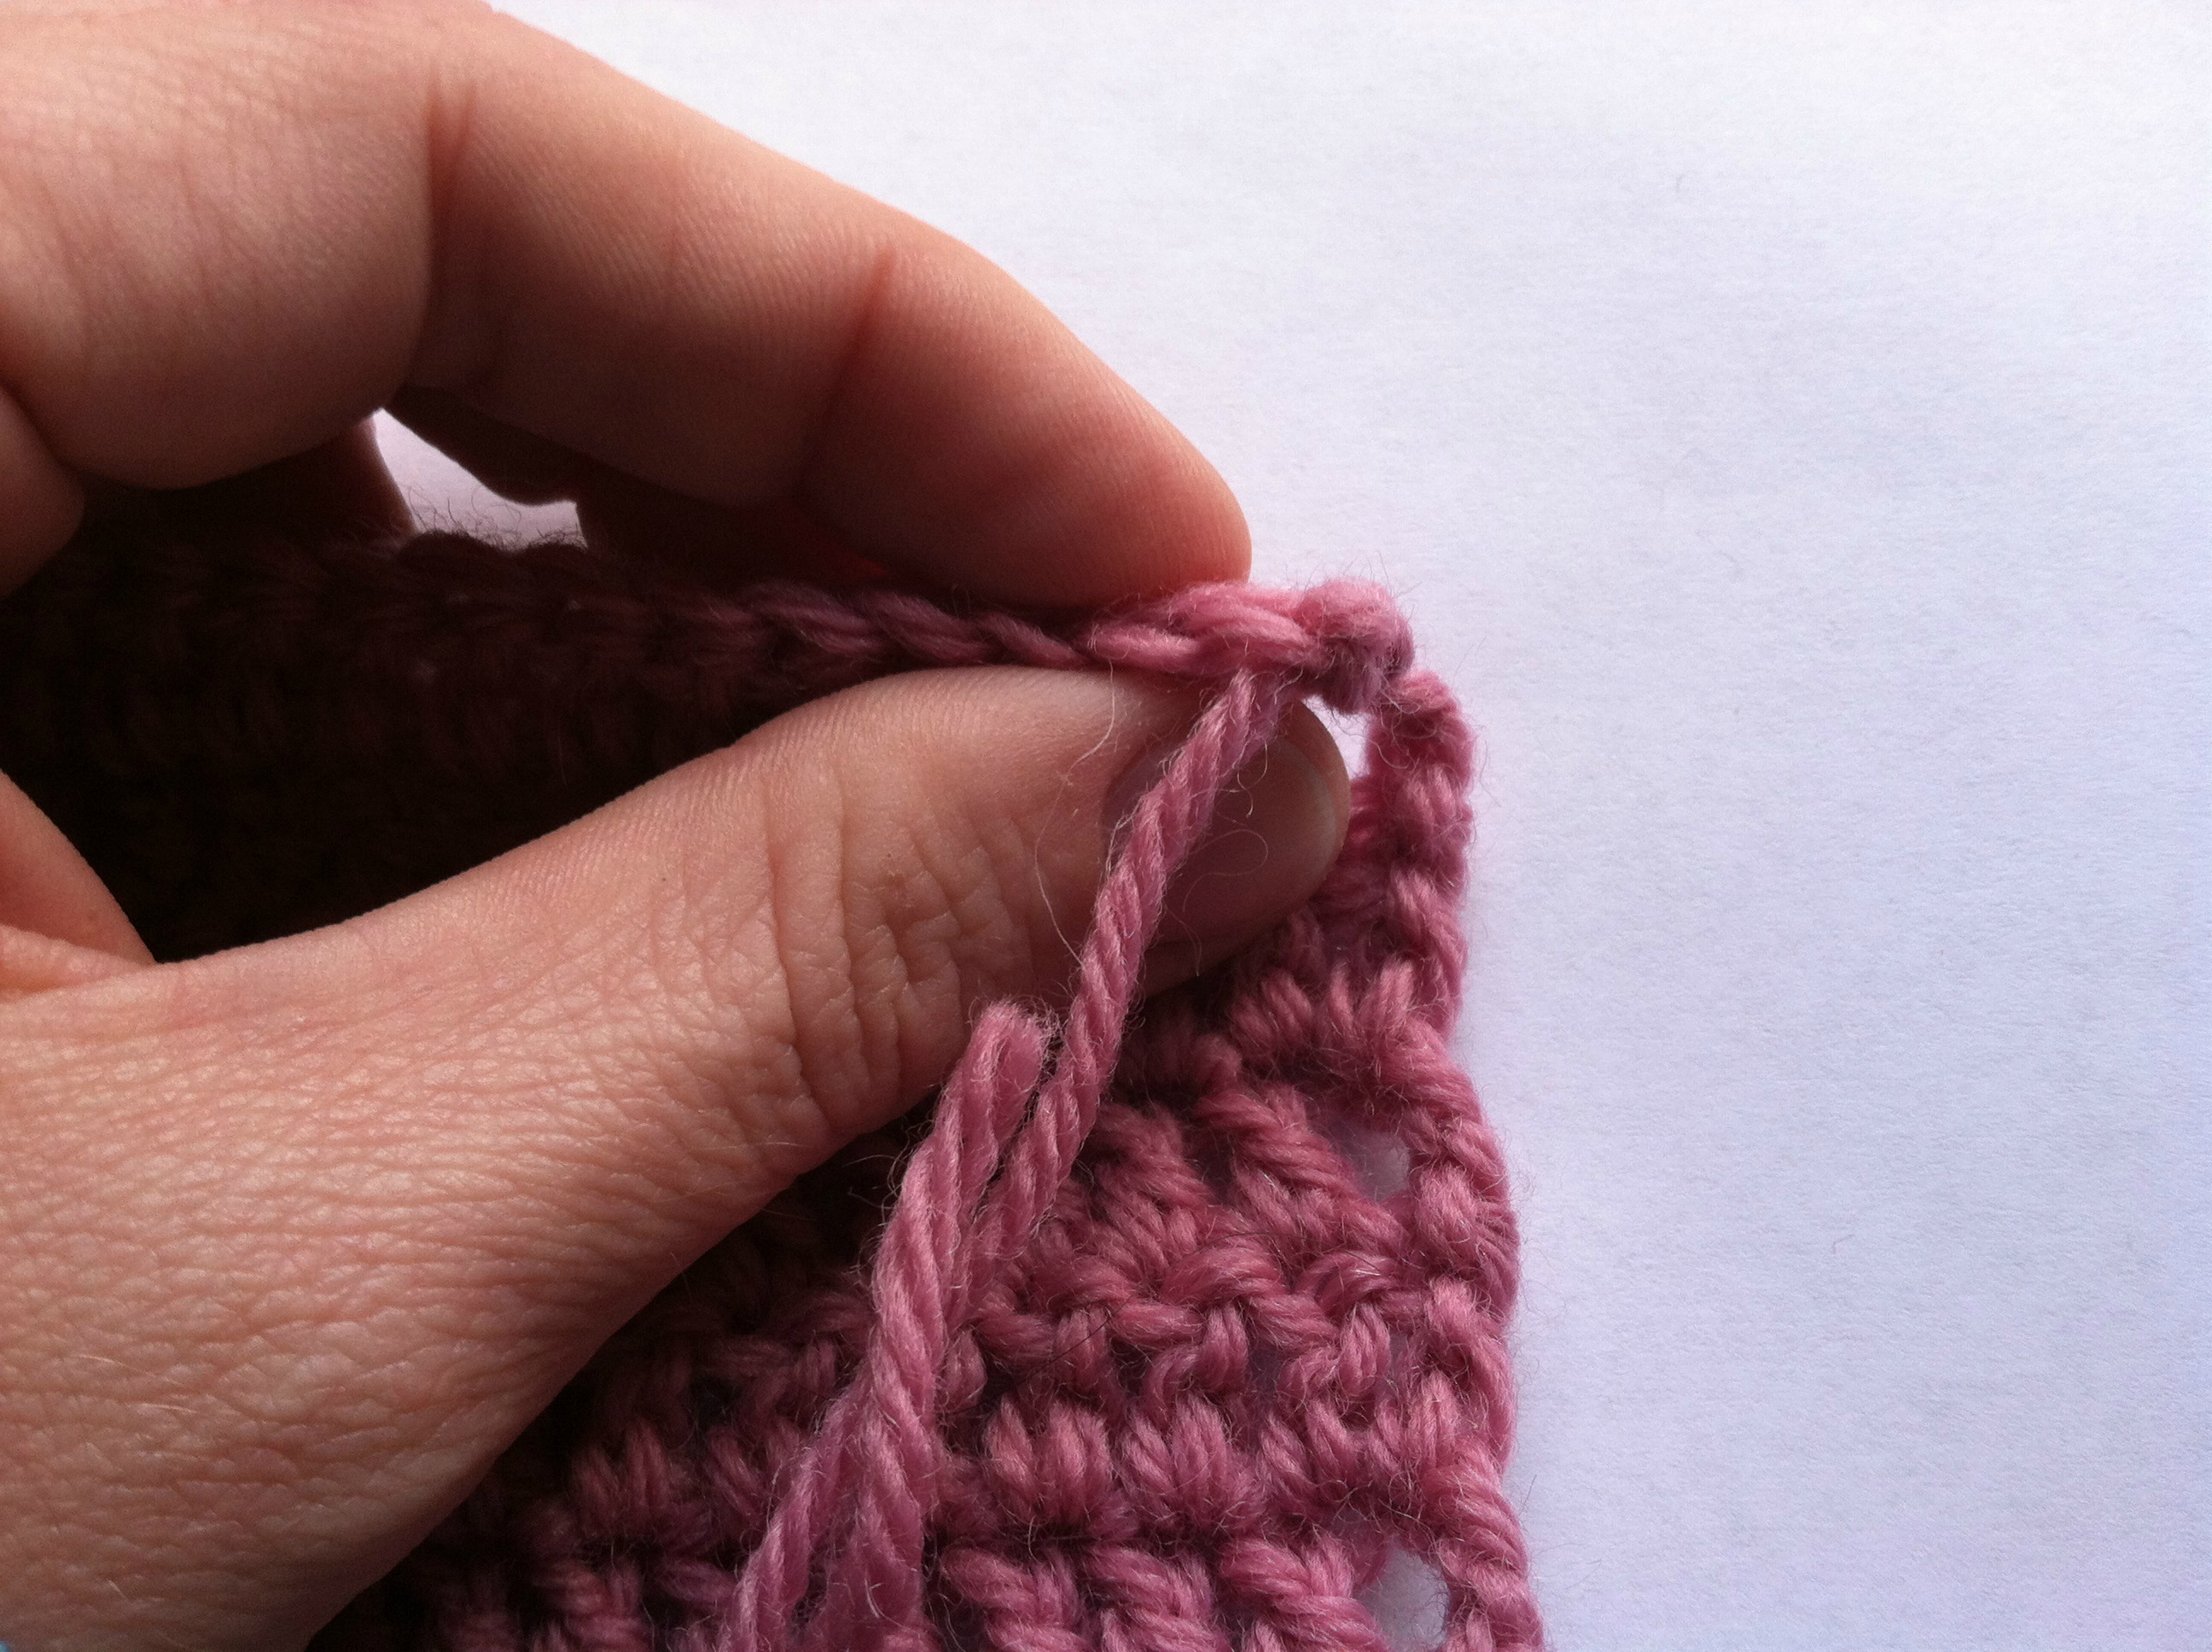
Step Three:
On taller stitches (I skip this step on single crochet), go through the middle of the stitch to get to the bottom of the row. Pull yarn all the way through.
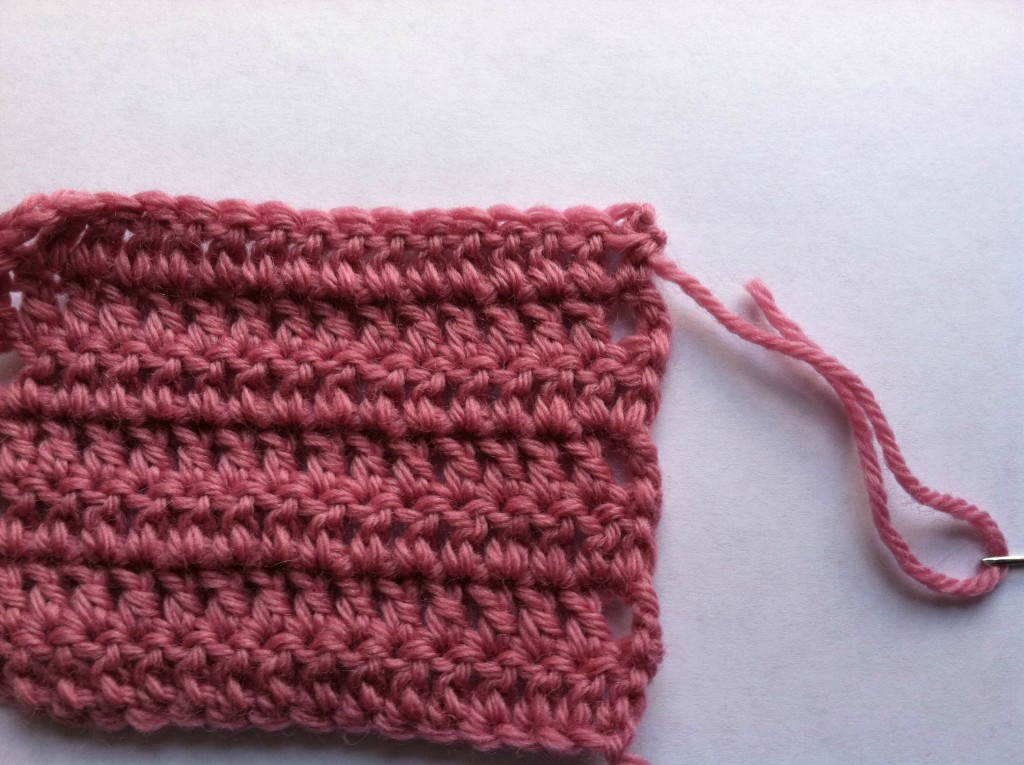
Step Four:
Insert needle through the bottoms of stitches. You can see these show up as inverted-V shapes. Run through 4-6 stitches, making sure to pull the yarn all the way through.
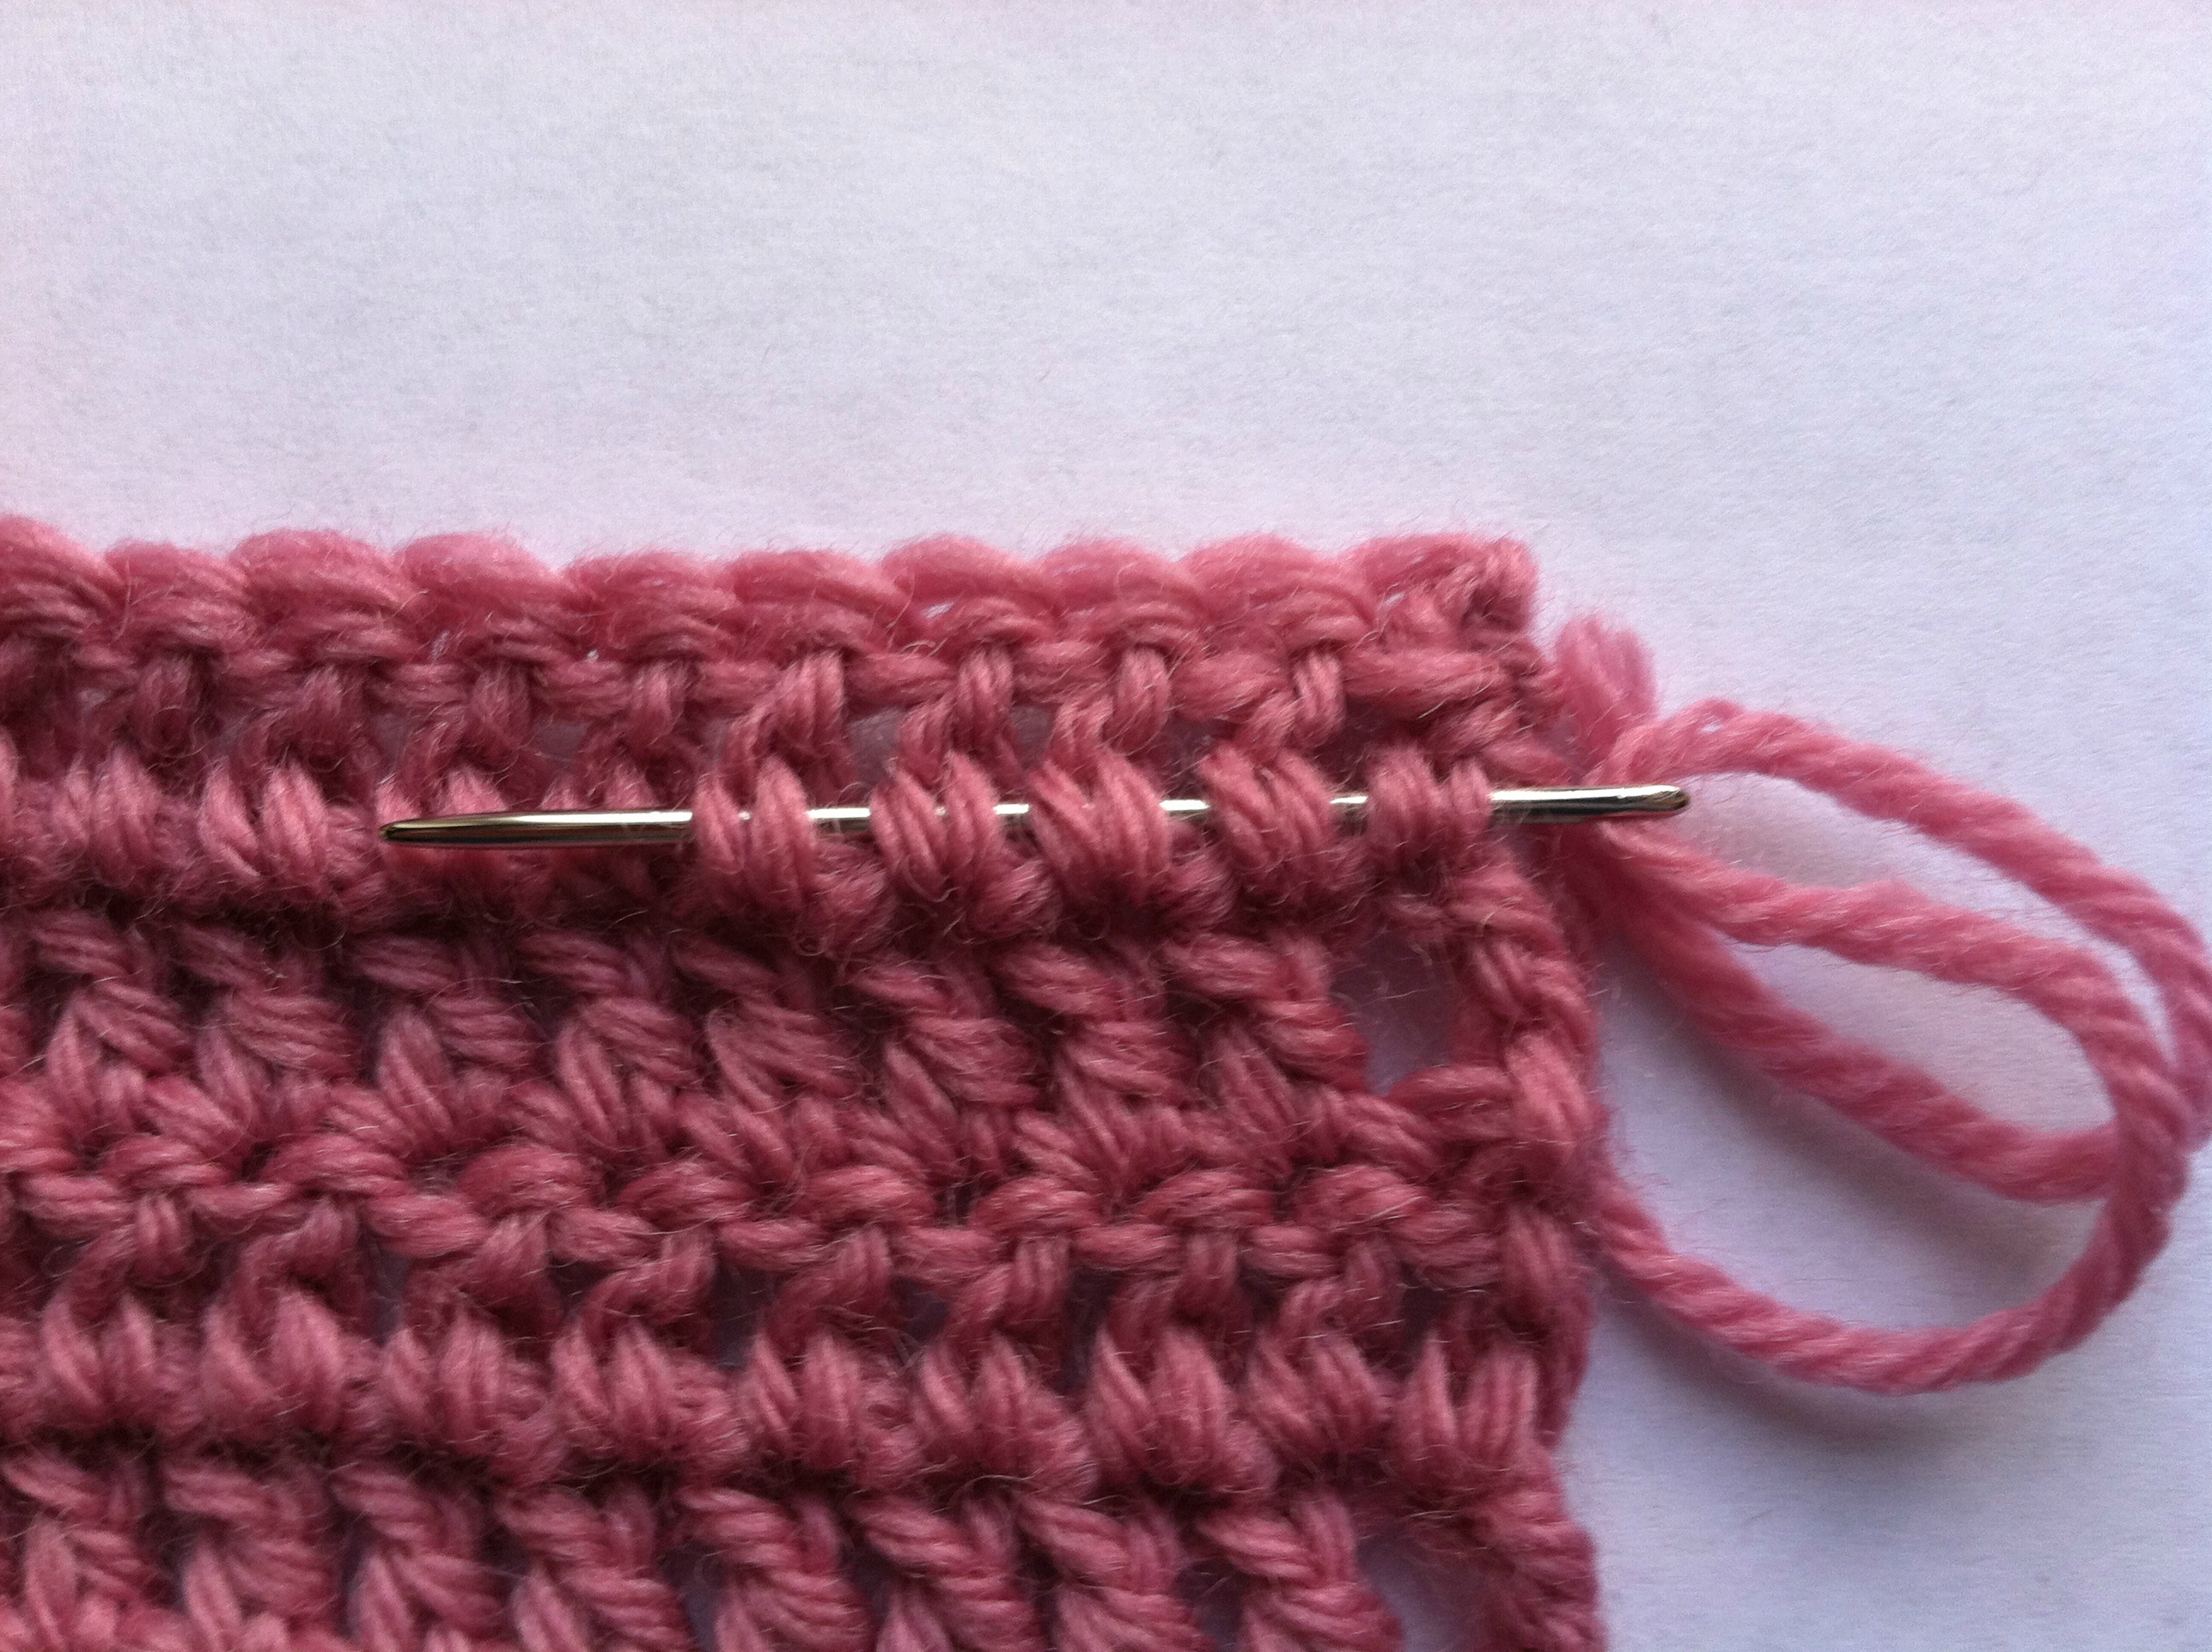
Step Five:
Turn, skip the first half of the last stitch (inverted-V) you went through, then weave the yarn through the same stitches or even a little further and pull yarn through.

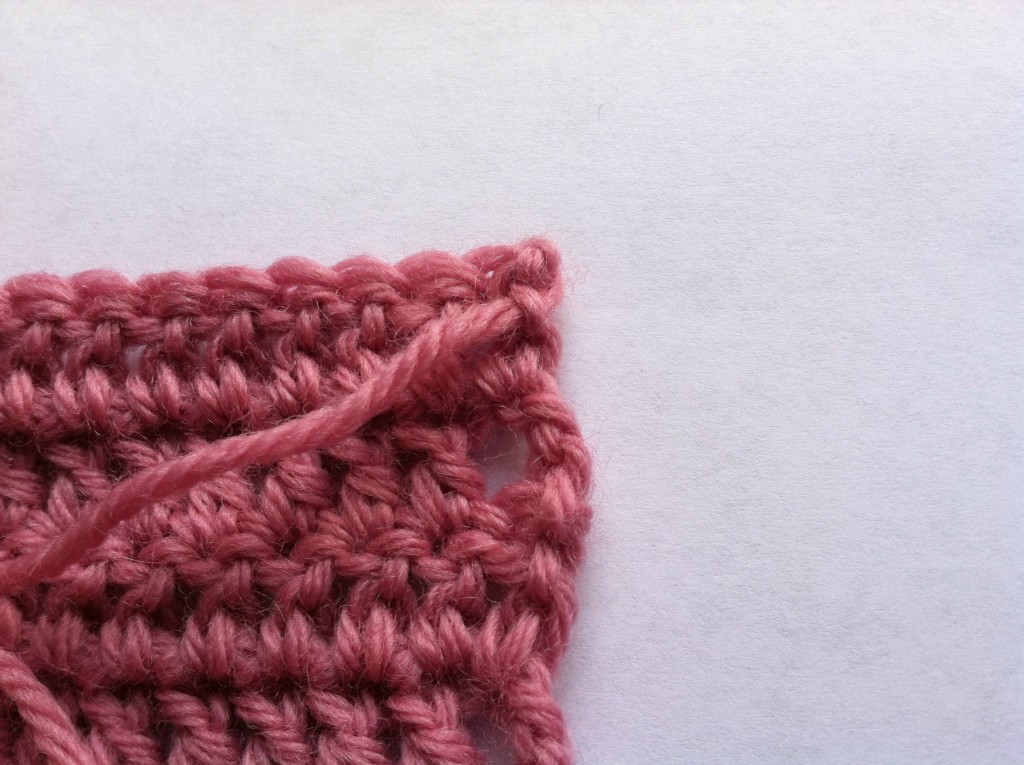
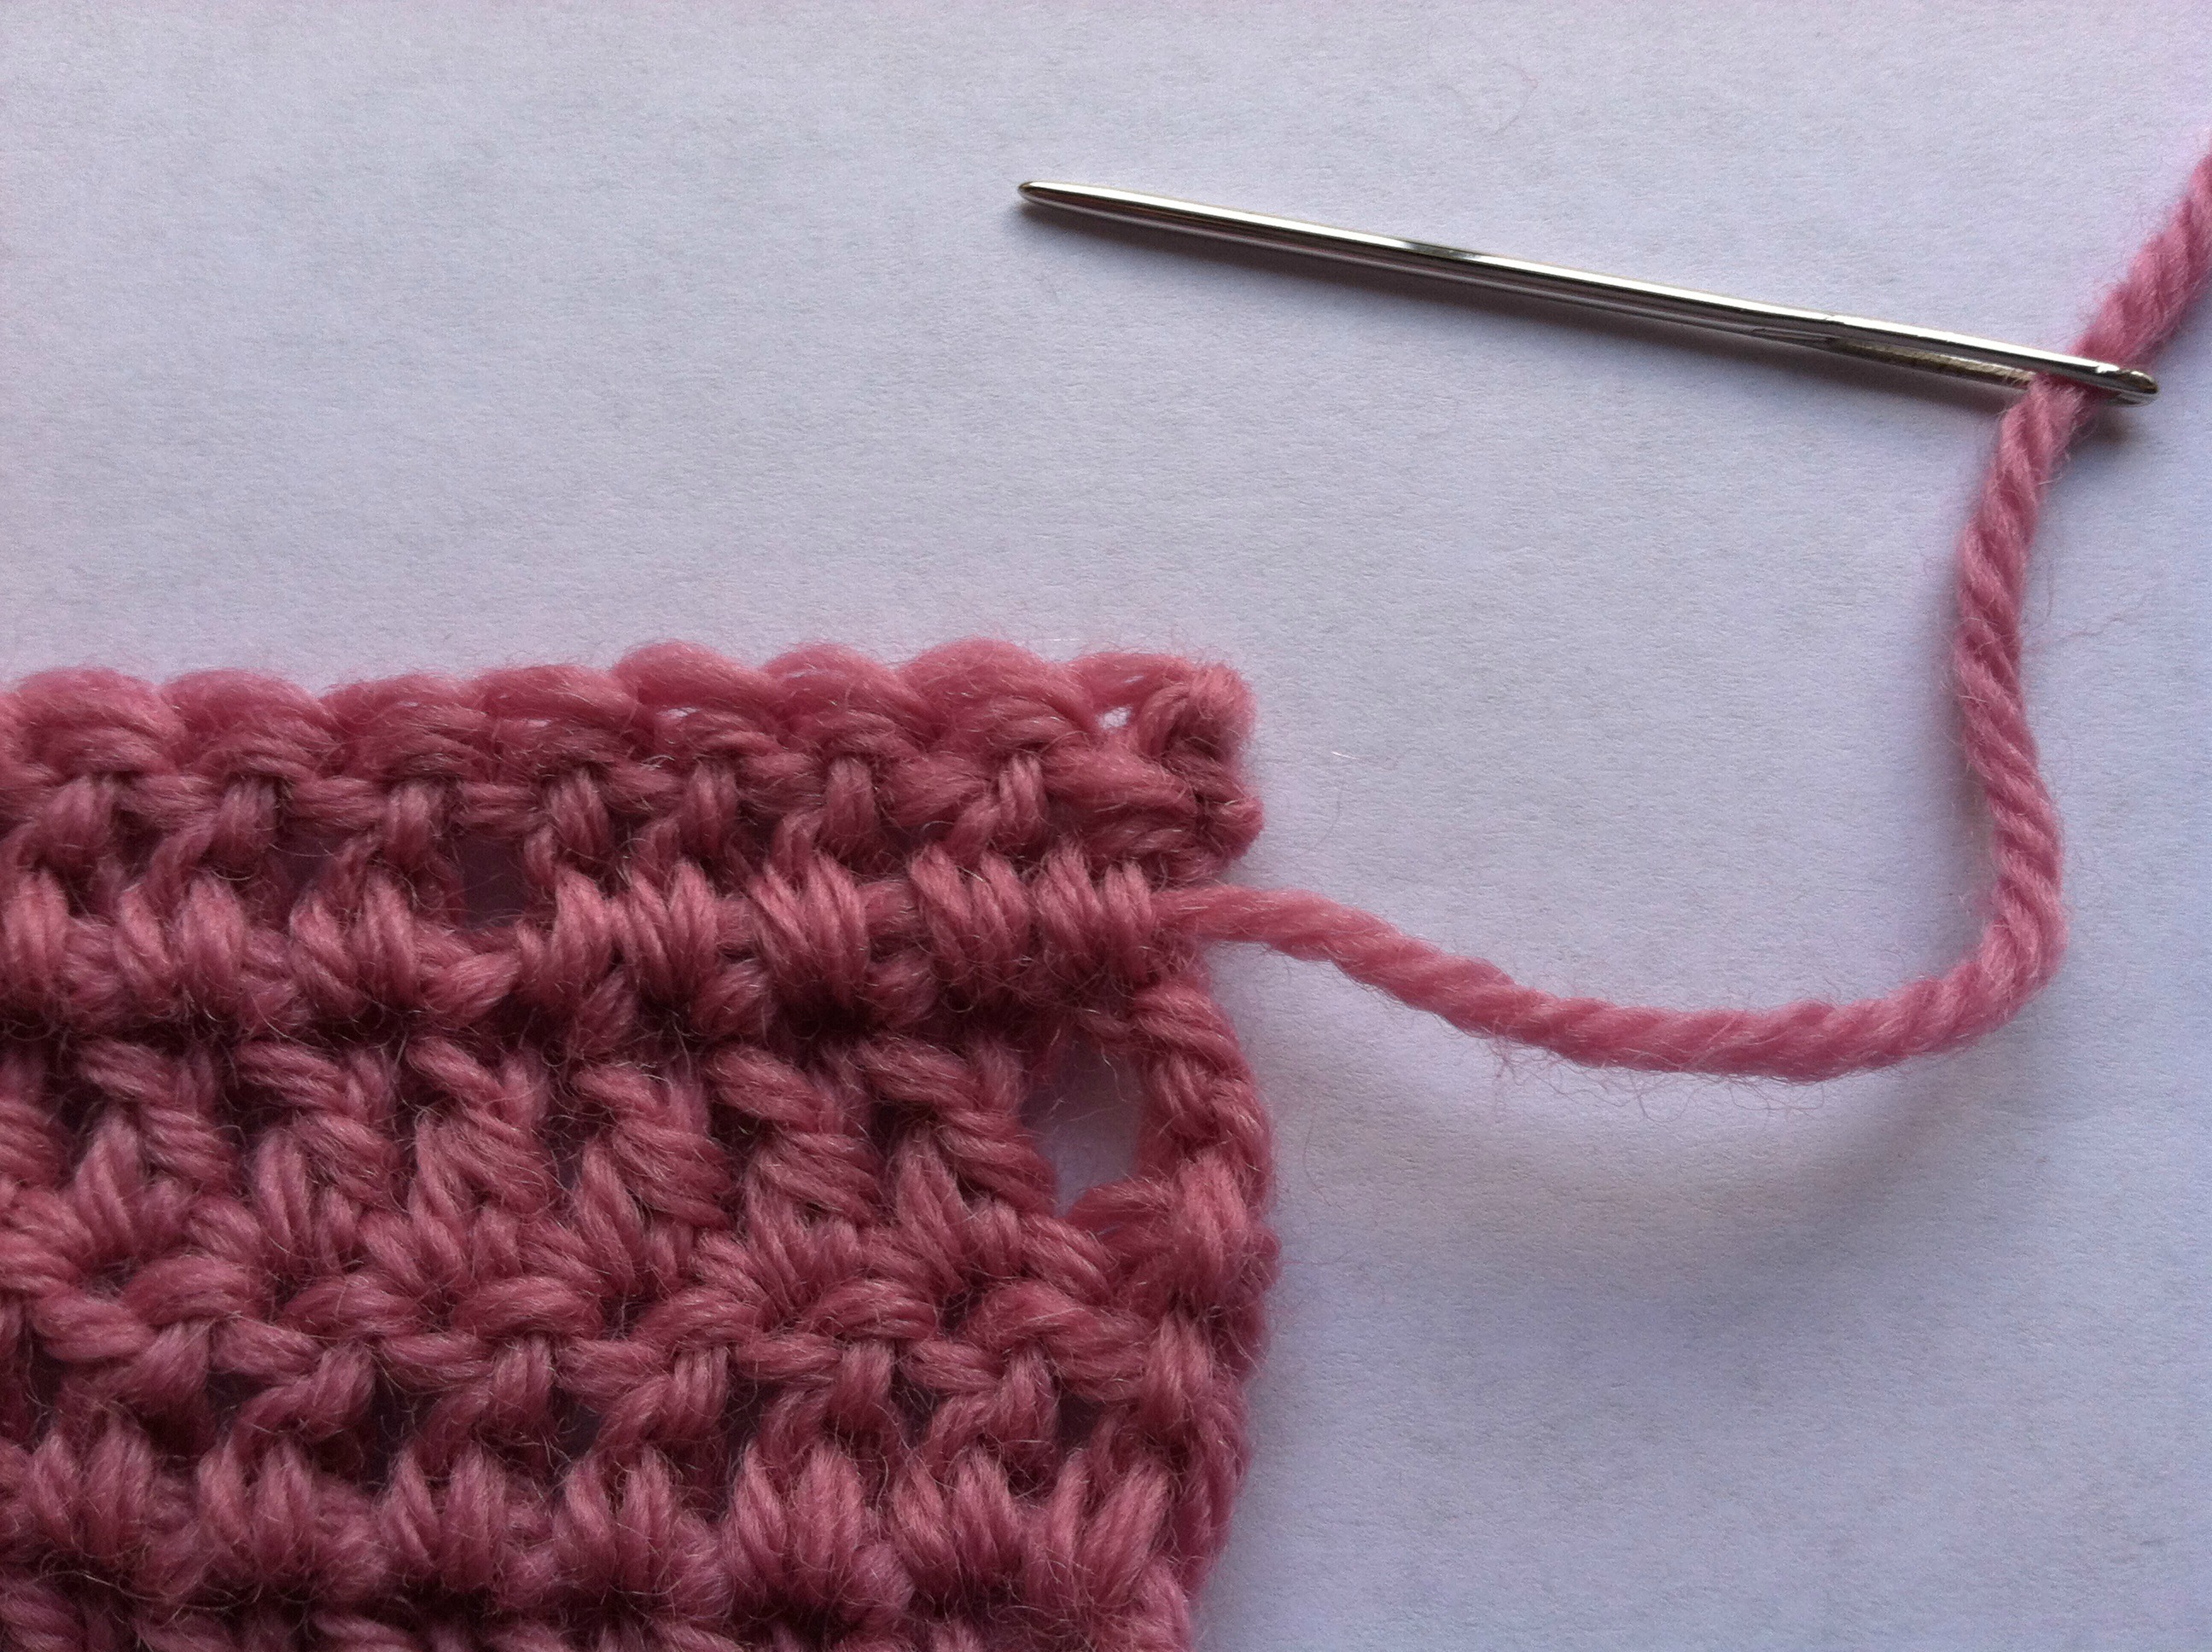
Step Six:
Pull yarn a little tight and cut the end. Carefully ease the yarn back into the stitches and make sure the tension is even.
You’re done! This technique works well for all kinds of stitches and stitch patterns. If the stitch pattern doesn’t have clearly defined rows like the pictures above, try to find some of the inverted-V’s to weave through. I typically try to find at least three if I can. Some stitch patterns are tricky, but if you follow these steps as closely as possible your ends will remain hidden.
Get this special collection of 3 FREE baby blanket patterns from I Like Crochet right now!
I have been asked the question: What do you do if your end is too short to weave in? Try to leave a longer yarn tail next time, but don’t worry! Run your needle through the stitches you want to weave the yarn through, then thread the yarn through the eye of the needle and draw it through. This has happened to me many times, even though I try to be good about leaving long ends. Sometimes it has happened after I have to take apart some of the work and have already trimmed the end. It always works!
Weaving in ends can get pretty tedious, especially on large or complicated projects, but the time and effort you put into doing it right will really pay off. Happy crocheting!
I weave in the ends similarly like you do. With the exception that I tie a square knot at the end of the weaving to two ends where I make the weaves come together at the end. I just do the first step like you’re tying a shoe three times and then cut off the ends as close as possible to the knot. Leaving them loose just gives more chance for the weaving to come undone. Especially after washing a few times.
I have saved some patterns under the “Favorite “ tab. Now how do I retrieve those patterns? Also, how do I access the 700+ collection of crochet patterns?
Hello! Once you are logged in, you can click the “Favorite” button at the top of the page. All of your favorites will end up here: https://www.ilikeknitting.com/list-of-favorites/ I believe the 700+ crochet pattern collection is simply referring to our archive of patterns! When you go to the magazine tab, you should see a menu on the right with all of the pattern categories to browse. Here’s that link: https://www.ilikecrochet.com/magazine/ Hope that helps! – Dana, Editor
I always weave ends in a square so that it does not come undone with washing.
Oh my goodness THANK YOU for the solution when yarn end is too short! Inserting yarn needle into some stitches and then threading the needle. What a difference this is so smart! Thank you
Agree! Great idea that of course I never thought about! ????
Your project has rather large gaps at the end of each row. There’s ways to avoid this when turning.
What are those ways?
I don’t weave, but I lay both yarns (previous and new colour) on the last row and continue crocheting the pattern with the new colour. I find that weaving the ends will stretch the yarn and may leave a bulge or weak spot for the “old colour” to peek out.
The other day someone in the crochet class I’m in asked if you only hide the yarn by going in-between yarns or if you split the yarn when weaving in the ends. I said both. Then another person proceeded to walk me away from the discussion. Was I wrong?
Do you have tutorials on how to weave the ends when you’re using other stitches, such as star stitch or shell stitch, that don’t have even rows? Thank you.
I don’t believe we do, but this is a really good idea! Maybe some fellow crocheters can chime in with tips?
After years of struggling with ends I just learned how to weave ends in and now am a very happy camper! If ends are too short to use needle, I just use a smaller crochet hook and basically weave them into the stitches the same way. Takes longer with a hook but end results are good.
I’m new to this and I’ve been weaving them in as i crotchet hope it holds so far nothing has unravelled.
Thank you very much! This is the best system for end the crochets!
Have a nice week!
Marianne
Any suggestions for C2C?
The technique described should work without issue but if you’re unsure, crochet a swatch of the pattern changing the yarn once at an end and again within the pattern at any point. Then practice weaving in the two ends to see if the results are satisfactory. You can use a yarn needle or a crochet hook to carry out the technique, either works as well. Good luck Alice!
I weave in like you said and when I splice on a new piece I tie them together
Then when done I weave in the ends and pull them snug and put Fray Check on about an inch cut off and evenly distribute it among the stitches making sure it ends inside the stitch
This dries clear and playable
What is fray check??????
Hi there! This is fray check: https://www.joann.com/fray-check-with-fabric-guide-tip/10687903.html
Hope this helps! – Nicola, Editor
This is the greatest technique. I have a blanket with many color changes and this will make the finished blanket look very neat and tidy. Thanks very much.
I having finished off a tunsian piece luckily with very bulky morino wool so hiding ends was easy, however, to avoid them coming apart I did have to knot them or I’d end up with an end that pulled out (leaving a fluff ball where it was cut) I even tried splitting the yarn to interweave one yarn with another) But for less fluffy yarns this will be great. I will use it on another project I’m finishing right away.
Unorthodox but I’ve found this holds up under washing, drying, and all kinds of wear.
1.I weave thru the project an inch or two
2. then split the yarn ply.
3. I pick an unobtrusive strand, put half over and half under and tie a tight square not, cutting the ends close. The knot disappears into the pattern and in many years i haven’t had one come undone.
I Absolutely love,Love, Idea Thank you!
I have done this too and thought i was just taking the lazy way out but what ever works, right
this was great advice, I have never seen weaving the ends through more than 1 stitch, this looks very easy!
I use a crochet hook a few sizes smaller than the one I made the project with to weave the end through the work
I have done this, too. It works well for blankets.
I make a slip knot on the end next to my project then use a regular needle a big one cause I find the yarn needles not sharp enough for tight stitched projects! Then I weave the tail in diff directions so it don’t come out! If different colors I just do the same but weave in the tails own colors!
I find it very difficult when making squares for a baby afghan, no real place to hide them and just hope they stay where I put them.
Show us how with treble and double crochet stitchEs.
Thank you for this idea for a future article! – Nicola, Editor
I weave them in & then when I cut my yarn I put a little dot of fabric glue on the end so it doesn’t fray out. It is clear & washes well.
Thank you for the answer to a problem I have dealt with for a long time!
I make a “Russian knot” by running the yarn back through itself with a metal needle- a couple of inches, after placing the new yard in the loop this makes. Then i do the same on the new piece of yarn. Pulling each strand away from each other tightens the yarn and it is not too bulky. I never have loose ends doing this except at the very end.
What is a Russian knot???
Hi Dorothy, here is a tutorial on the Russian Knot: https://www.ilikecrochet.com/daily/crochet-techniques/finishing-techniques/how-to-do-a-russian-join/
– Nicola, Editor
I try to weave the ends in as I go along instead of waiting till the end. Or I will weave them in during a long phone call.
So my question is how do you deal with an end when the yarn colour is different from surrounding? I’m in midst if intarsia project. which is really stretching my skills and I’m finding I have odd pale blue stitches ( water) surrounded by various shades of green or pink. Anyway I’m not happy with colour from blue bleeding through where it’s weaved in.
Any ideas?
Hello! You will need to weave each color of yarn back into the place where that color appears as opposed to weaving it into a different color section to avoid it showing through. If the stitches are small and there’s not lot of room, try to weave them in on the wrong side of the piece and insert the yarn needle in such a way that splits the yarn to hopefully hide the color you are weaving in. Hope that helps! – Nicola, Editor