


These cute, and partially three-dimensional, snowflakes commemorate the magical feeling of being home for a white Christmas! While the snowflakes make great tree ornaments or decorative home accents, they can also be used as a garland; simply string several of them together and hang them from a mantel or staircase railing.
Skill Level: Intermediate
Size: Approximately 6.5 inches tall x 6 inches wide
Gauge: Gauge is not important for this project.
Materials
Yarn:
 Red Heart Classic (100% Acrylic; 190 yards [174 meters]/100 grams): 1 White (MC, 1 ball), 686 Paddy Green (CC1, 1 ball), 902 Jockey Red (CC2, 1 ball), 681 Mist Green (CC3, 1 ball)

Hook: US size H/8 (5.0 mm)
Notions: Stitch markers, tapestry needle, polyester fiberfill
Special Stitches
Picot: Ch 8, insert hook into first ch, yo, pull through all lps on hook.
Pattern Notes
This pattern is worked in the round.
Do not join rounds unless otherwise stated.
Use a stitch marker to mark the first stitch of each round.
Pattern
Snowflake Base (make 2 – one for each type of Snowflake)
Rnd 1: With MC, make a magic circle (adjustable ring), ch 1, work 6 sc in ring, tighten yarn tail to close ring, place st marker. (6 sc)
Rnd 2: *Work 2 sc in next st; rep from * around. (12 sc)
Rnd 3: *Work 2 sc in next st, sc in next st; rep from * around. (18 sc)
Rnd 4: *Work 2 sc in next st, sc in next 2 sts; rep from * around. (24 sc)
Rnd 5: *Work 2 sc in next st, sc in next 3 sts; rep from * around. (30 sc)
Rnd 6: *Work 2 sc in next st, sc in next 4 sts; rep from * around. (36 sc)
Rnd 7: *Sc in next st, ch 6, sk next 2 sts; rep from * around, join with sl st to first sc. (12 ch-6 sps, 12 sc)
Rnd 8: Sc in first st, 3 sc in next ch-6 sp, *ch 8, sk next st, 3 sc in next ch-6 sp, sc in next st, 3 sc in next ch-6 sp; rep from * 4 times, ch 8, sk next st, 3 sc in next ch-6 sp. (6 ch-8 sps, 42 sc)
Rnd 9: *Work (sl st, ch 4, sl st, ch 6, sl st, ch 4, sl st) in next st, sl st in next 3 sts, work (4 sc, picot, 4 sc) in next ch-8 sp, sl st in next 3 sts; rep from * around. (60 sl sts, 12 ch-4 sps, 6 ch-6 sps, 48 sc, 6 picots)
Fasten off, leaving an 18” length of yarn.
Make the ornament hanger by weaving the leftover 18” length of yarn to Base of the nearest picot on Rnd 9. Once at the base of the picot, form an approximately 3” loop, and then, being careful not to tighten the loop, weave the remaining length of yarn into the Snowflake Base and discard.
Snowflake Center
Holly
Rnds 1-5: With MC, rep Rnds 1-5 of Snowflake Base. At end of Rnd 5, change to CC1.
Rnd 6: Working in FLs for this rnd only, *with CC1, work (sl st, ch 3 and sc in 2nd and 3rd ch from hook (1 Holly Leaf made), sl st, ch 3 and sc in 2nd and 3rd ch from hook (1 Holly Leaf made), sl st) in next st, change to MC, sc in next 4 sts, change to CC1; rep from * around. (18 sl sts, 24 sc, 12 holly leaves)
Fasten off, leaving an 18” length of MC.
Wreath
Rnd 1: With MC, rep Rnd 1 of Snowflake Base, change to CC1. (6 sc)
Rnd 2: Rep Rnd 2 of Snowflake Base. (12 sc)
Rnd 3: Working in FLs for this rnd only, *work (sl st, ch 3, sl st, ch 3, sl st) in next st; rep from * around, change to MC. (36 sl sts, 24 ch-3 sps)
Rnd 4: Working in BLs of previous rnd, rep Rnd 3 of Snowflake Base. (18 sc)
Rnds 5-7: Rep Rnds 4-6 of Snowflake Base.
Rnd 8: Working in FLs for this rnd only, *work (sl st, ch 4, sl st, ch 4, sl st) in next st, sl st in next 5 sts; rep from * around. (48 sl sts, 12 ch-4 sps)
Fasten off, leaving an 18” length of MC.
Finishing
Snowflake with Holly Center
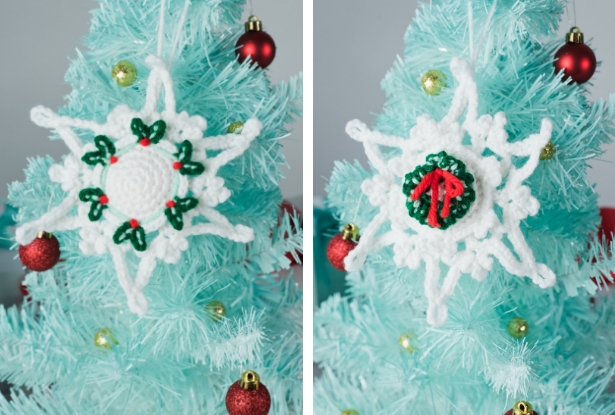
- Using the leftover 18” length of yarn and working through the BLs of Rnd 6 of the Holly Center, sew 1/2 of the Holly Center onto the center of one of the Snowflake Bases. Make sure to align the Holly Leaves with the picots on Rnd 9 of the Snowflake Base. Once 1/2 of the Holly Center has been sewn onto the Snowflake Base, stuff the space between the Holly Center and the Snowflake Base with polyester fiberfill. Then, finish sewing the Holly Center to the Snowflake Base while adding any polyester fiberfill necessary to completely fill the space between the two pieces.
- With CC2, place a French Knot berry at the base of each set of Holly Leaves.
- Cut a 48” length of CC3. Using the photo of the Snowflake as a guide, weave the 48” length of CC3 down the middle of each Holly Leaf and in a line between each Holly Berry.
- Because the Snowflake points tend to curl while the Snowflake is being made, flatten the points by bending them against a hard surface until each one is properly positioned. Then, hang and enjoy!
Snowflake with Wreath Center
- Using the leftover 18” length of yarn and working through the BLs of Rnd 8 of the Wreath Center, sew 1/2 of the Wreath Center onto the center of one of the Snowflake Bases. Make sure to align the ch-4 sps on Rnd 8 with the picots on Rnd 9 of the Snowflake Base. Once 1/2 of the Wreath Center has been sewn onto the Snowflake Base, stuff the space between the Wreath Center and the Snowflake Base with polyester fiberfill. Then, finish sewing the Wreath Center to the Snowflake Base while adding any polyester fiberfill necessary to completely fill the space between the two pieces.
- Cut a 48” length of CC3. Using the photo of the Snowflake as a guide, weave the 48” length of CC3 through all of the ch-3 sps that form the Wreath.
- Cut a 7” length of CC2 and weave 1/2 of the length around and through the space between two of the ch-3 sps at the top center of the Wreath. Tie the two ends into a bow.
- Because the Snowflake points tend to curl while the Snowflake is being made, flatten the points by bending them against a hard surface until each one is properly positioned. Then, hang and enjoy!