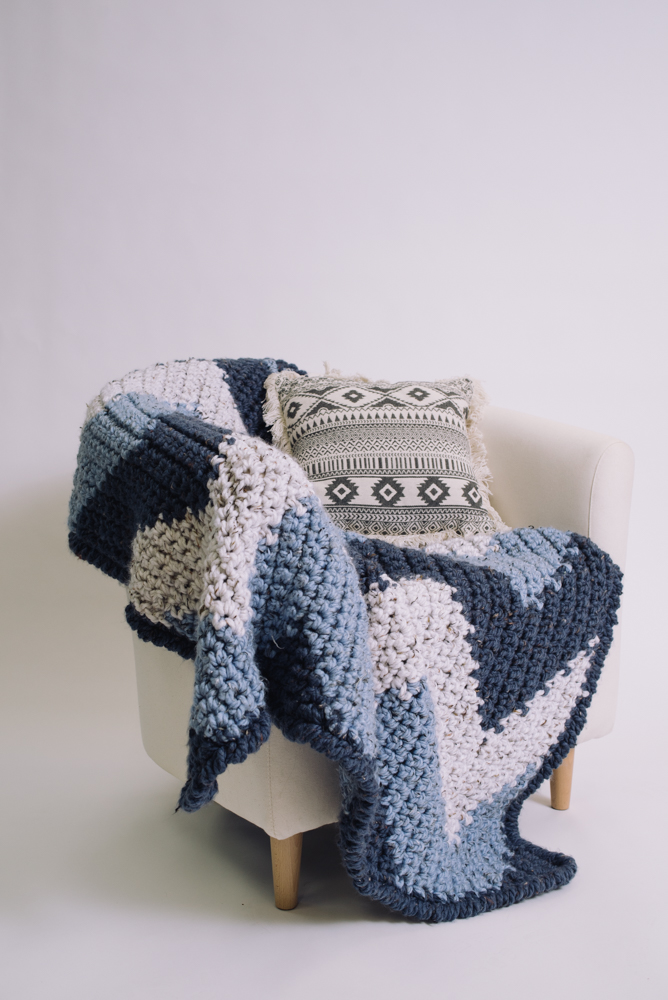
While we can often be tempted by tiny, frilly crocheted blankets when a friend or family member is expecting, sometimes the better part of valor is stitching something thick and durable that the baby can hang onto into the toddler years and beyond. This cushy blanket is great for small people to play on as well as sleep under. Once you have a few rows finished this pattern is really easy to memorize.
Time: Weekend Project
Skill Level: Easy
Finished Size: 48” square
Gauge: 5 sts and 6 rows = 4” [10 cm] in sc
Materials
 Yarn: Premier Yarns Mega Tweed (97% Acrylic, 3% Viscose; 74 yards [68 meters]/170 grams): #1007-17 Denim Tweed (MC, 5 skeins), #1007-16 Stream Tweed (CC1, 4 skeins), #1007-01 White Tweed (CC2, 3 skeins)
Hook: US size Q (16.0 mm)
Notions: Tapestry needle
Pattern Notes
Use a separate ball of yarn for each color change; do not cut yarn but allow it to float up the wrong side of the work.
Always use the new color for the last yo of the last sc in the old color.
Pattern
Mat
With MC, ch 56.
Row 1 (RS): With MC, sc in 2nd ch from hook and next 4 ch, with CC1 sc in next 9 ch, with CC2 sc in next 9 ch, with MC sc in next 9 ch, with CC1 sc in next 9 ch, with CC2 sc in next 9 ch, with MC sc in last 5 ch. Ch 1, turn. (55 sc)
Row 2 (WS): With MC sc in first 6 sc, with CC2 sc in next 9 sc, with CC1 sc in next 9 sc, with MC sc in next 9 sc, with CC2 sc in next 9 sc, with CC1 sc in next 9 sc, with MC sc in last 4 sc. Ch 1, turn.
Row 3: With MC, sc in first 3 sc, with CC1 sc in next 9 sc, with CC2 sc in next 9 sc, with MC sc in next 9 sc, with CC1 sc in next 9 sc, with CC2 sc in next 9 sc, with MC sc in last 7 sc. Ch 1, turn.
Row 4: With MC sc in first 8 sc, with CC2 sc in next 9 sc, with CC1 sc in next 9 sc, with MC sc in next 9 sc, with CC2 sc in next 9 sc, with CC1 sc in next 9 sc, with MC sc in last 2 sc. Ch 1, turn.
Row 5: With MC, sc in first sc, with CC1 sc in next 9 sc, with CC2 sc in next 9 sc, with MC sc in next 9 sc, with CC1 sc in next 9 sc, with CC2 sc in next 9 sc, with MC sc in each of last 9 sc. Change to CC1, ch 1, turn.
Row 6: With CC1 sc in first sc, with MC sc in next 9 sc, with CC2 sc in next 9 sc, with CC1 sc in next 9 sc, with MC sc in next 9 sc, with CC2 sc in next 9 sc, with CC1 sc in next 9 sc. Ch 1, turn.
Row 7: With CC1 sc in first 8 sc, with CC2 sc in next 9 sc, with MC sc in next 9 sc, with CC1 sc in next 9 sc, with CC2 sc in next 9 sc, with MC sc in next 9 sc, with CC1 sc in next 2 sc. Ch 1, turn.
Row 8: With CC1 sc in first 3 sc, with MC sc in next 9 sc, with CC2 sc in next 9 sc, with CC1 sc in next 9 sc, with MC sc in next 9 sc, with CC2 sc in next 9 sc, with CC1 sc in next 7 sc. Ch 1, turn.
Row 9: With CC1 sc in each of first 6 sc, with CC2 sc in next 9 sc, with MC sc in next 9 sc, with CC1 sc in next 9 sc, with CC2 sc in next 9 sc, with MC sc in next 9 sc, with CC1 sc in next 4 sc. Ch 1, turn.
Row 10: With CC1 sc in first 5 sc, with MC sc in next 9 sc, with CC2 sc in next 9 sc, with CC1 sc in next 9 sc, with MC sc in next 9 sc, with CC2 sc in next 9 sc, with CC1 sc in next 5 sc. Ch 1, turn.
Row 11: With CC1 sc in first 4 sc, with CC2 sc in next 9 sc, with MC sc in next 9 sc, with CC1 sc in next 9 sc, with CC2 sc in next 9 sc, with MC sc in next 9 sc, with CC1 sc in next 6 sc. Ch 1, turn.
Row 12: Rep Row 10.
Row 13: Rep Row 9.
Row 14: Rep Row 8.
Row 15: Rep Row 7.
Row 16: Rep Row 6.
Row 17: Rep Row 5.
Row 18: Rep Row 4.
Row 19: Rep Row 3.
Row 20: Rep Row 2.
Row 21: With MC sc in first 5 sc, with CC1 sc in next 9 sc, with CC2 sc in next 9 sc, with MC sc in next 9 sc, with CC1 sc in next 9 sc, with CC2 sc in next 9 sc, with MC sc in each of last 5 sc. Ch 1, turn.
Rep Rows 2-21 for patt until work meas 48” or desired height.
Finishing
Edging
Rnd 1: With MC, beg in any st, sc around blanket, working 3 sc in each corner, join rnd with sl st in first sc. Ch 1, do not turn.
Rnd 2: Rev sc in each st around, join rnd with sl st in first st.
Fasten off.
Weave in all ends.
Block if desired.


Do you guys have a pattern for a zig zag afghan or blanket??
Hi! you may like the following patterns:
https://www.ilikecrochet.com/magazine/crochet-afghan-patterns/the-new-arrow-throw/
https://www.ilikecrochet.com/magazine/crochet-afghan-patterns/luna-bobble-stitch-lapghan/
https://www.ilikecrochet.com/magazine/crochet-afghan-patterns/ocean-sunrise-throw/
https://www.ilikecrochet.com/magazine/crochet-afghan-patterns/popcorn-peaks-chevron-blanket/
https://www.ilikecrochet.com/magazine/crochet-afghan-patterns/sunflower-fields-forever-throw/
https://www.ilikecrochet.com/magazine/crochet-afghan-patterns/snowplace-like-home-chevron-blanket/
https://www.ilikecrochet.com/magazine/crochet-afghan-patterns/autumn-zig-zag-throw/
-Nicola, Editor
I can’t see what the blanket actually looks like when made.Are there any other images
Hi! There are additional photos here on the pattern page. Here is one you can click with the blanket laying flat: https://www.ilikecrochet.com/wp-content/uploads/Chevron-Mountain-Peaks-Blanket-small-0468.jpg
– Nicola, Editor
I am new here & have only done one afghan in my life!! I made it to fit a queen size bed!! With this one, if I just used one color, would that still be a total of 12 skeins? And I would only ch 56?
Hi Mary, I think you would roughly need the same amount of yarn. Without the color changes, I imagine you would just repeat the first row but skip all the color changes. Hope this helps! – Nicola, Editor
Is there a special technique for weaving in loose ends when you use chunky yarn? It is so fat that it looks bad when I try to weave it in, and the ends often wind up sticking out no matter what I do.
Hello! I’ve reached out to the designer for advice and she or I will reply as soon as possible. Thanks! – Nicola, Editor
I don’t understand what you mean by, “Use a separate ball of yarn for each color change; do not cut yarn but allow it to float up the wrong side of the work.” Does that mean in the first row I would have 3 balls of the main color, and 2 each of the secondary colors? what does it look like as each color “floats up the wrong side of the work”?
Hello! I’ve reached out to the designer for advice and she or I will reply as soon as possible. Thanks! – Nicola, Editor
Hi Elizabeth! You are correct about the number of balls of each color. We don’t appear to have taken photos of the other side of the blanket, but I’m chatting with the designer to see if she remembers! – Nicola, Editor
We think the invisible floats method was used. You can watch her video tutorial about that here: https://www.youtube.com/watch?v=8DunnVRRmRQ
Hope this helps! – Nicola, Editor
lovely patterns, I have copied a few to make as Christmas gifts. Many Thanks.
Lynda Johnson