


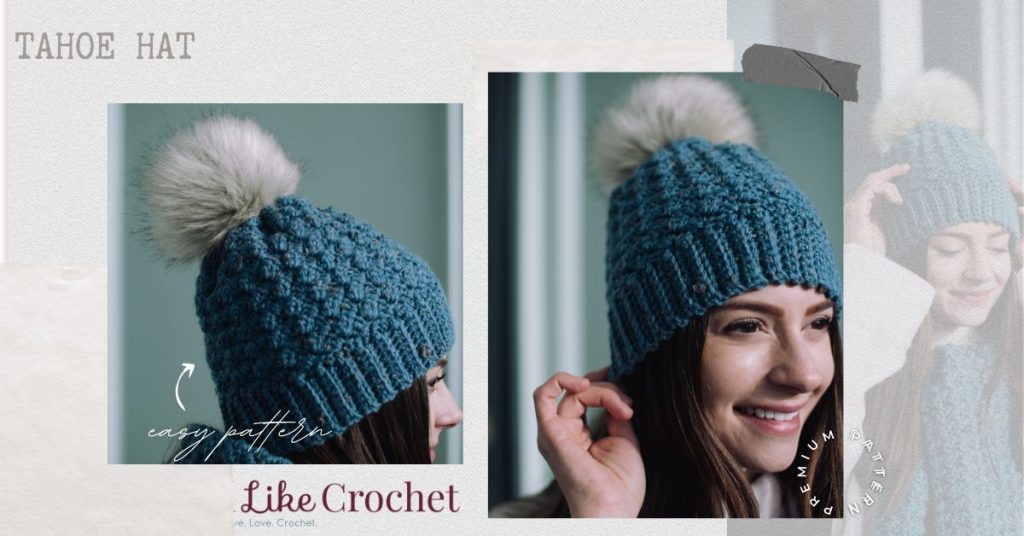
Finish off your look and keep the cold away with the versatile Tahoe Hat and Scarf set. The textured stitches, combined with a tweed yarn, and twisted fringe ends give it a classic touch that you are sure to love.
Time: 1 Day Project
Skill Level: Easy
Size: Shown in adult medium size (size is adjustable)
For approximate sizes, please see chart below:
| Hat Size | Hat Circumference | Hat Height |
| Preemie | 10” / 25.5 cm | 4” / 10 cm |
| Newborn | 12” /30.5 cm | 5” / 12.5 cm |
| 3-6 mos | 14” / 35.5 cm | 5½” / 14 cm |
| 6-12 mos | 16” / 40.5 cm | 6½” / 16.5 cm |
| Toddler (1-3yrs) | 18” / 45.5 cm | 7” / 17.5 cm |
| Child (3-10yrs) | 20” / 51 cm | 7½” / 19 cm |
| Teen / Adult Small | 21” / 53 cm | 8” / 20 cm |
| Adult Medium | 22” / 56 cm | 8½” / 21.5 cm |
| Adult Large | 23” / 58 cm | 8½” / 21.5 cm |
Gauge: 16 sc blo = 4” [10 cm]
Materials
 Yarn: Stylecraft Special Aran with Wool (77% acrylic, 20% wool, 3% viscose; 816 meters / 400 grams): 3391 Atlantic Blue Nepp (1 ball)
Hook: US size H/8 (5.00 mm)
Notions: Tapestry needle, Faux Fur detachable pom-pom (optional)
Abbreviations
blo – back loop only
Pattern Notes
To adjust the circumference to fit different sizes, Rnd 1 of the hat must be a multiple of 3 sts; if your brim number is a number that is not divisible by 3, you will need to work one or more decreases to arrive at an appropriate stitch total.
The hat height can also be adjusted by increasing or decreasing the number of rounds worked in the pattern.
- The hat begins with the ribbing worked in rows sideways; then continued in rounds from the bottom to the top.
- The top of the hat is worked in joined rnds, turning at the end of each rnd and working in the opposite direction, this creates a neater seam and texture of the pattern.
- If you crochet loosely, you may find going down a hook size to create the brim useful.
Pattern
Brim
Ch 10.
Row 1: Sc in 2nd ch from hook and in each remaining ch across, turn. (9 sts)
Rows 2–70: Ch 1 (does not count as st throughout), sc blo in each st across, turn.
Fold the piece in half, hold Row 1 edge above the last row edge. Ch 1 and sl st the short sides together inserting the hook through the back loops of the stitches on both sides to create a circular band. Turn the piece inside out, so that the seam will be hidden on the wrong side.
Hat
You may find it helpful to add a stitch marker in the first stitch of the rnd.
Rnd 1 (RS): Ch 1, sc in the same place as the ch 1, sc in each row-end around to last 2 rows, dc2tog over the next 2 row-ends, sl st in the top of the beg sc to join. (69 sts)
Rnd 2 (RS): Ch 1 (does not count as st throughout), (sc, 2 dc) in same sc as join, sk next 2 dc, [ (sc, 2 dc) in next sc, sk next 2 dc] around, sl st in top of the beg sc to join, turn.
Rnd 3: Sl st to work in the first sc of the previous rnd (you will need to place your hook backwards slightly), ch1, [ (1sc, 2dc) in the same st, miss 2sts ] repeat from [ … ] around, sl st to the top of the beginning sc to join, turn
Rnds 4 – 16: Repeat Rnd 3
Fasten off but leave a long yarn tail for sewing the top together
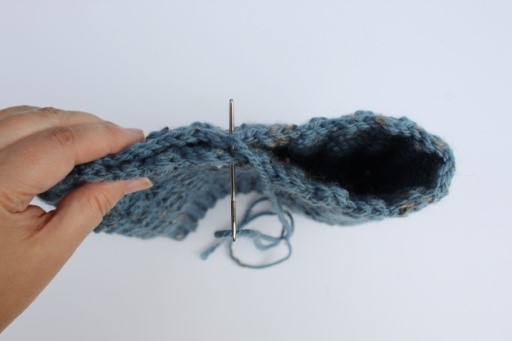
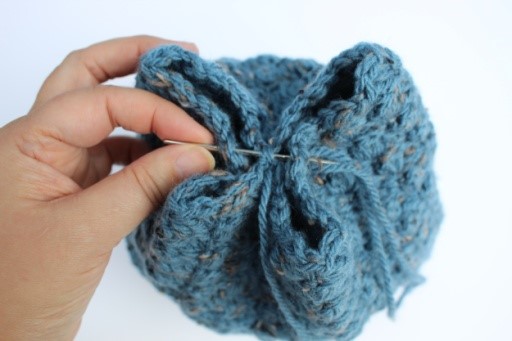
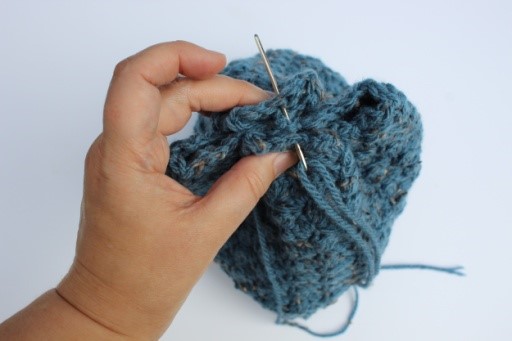
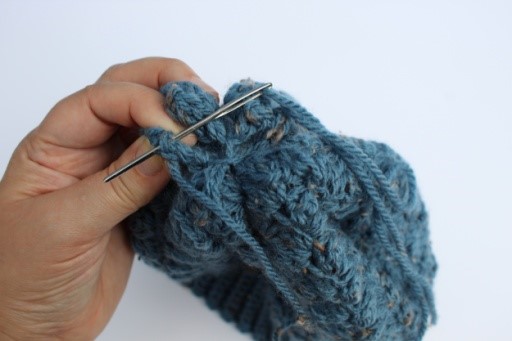
Finishing
See supporting images.
- Turn hat inside out; place hat down flat with ribbing seam in the center; sew together the seam center st with the st on the opposite side
- Bring both of the other sides together at the center and sew them together to create four sections
- Repeat the previous step until you have eight sections; sew together the sides of each section to close the top of the hat. Fasten off and weave in ends.
Leave plain or attach a pom-pom to the top of the hat for extra detail.
How do I get the rows that are missing in this pattern? I would love to make it. thank you, Carol C
Any missing rows have already been added to the pattern. Let me know if you have any questions! – Nicola, Editor
This is a lovely pattern but I am having trouble finding yarn in my stash that will work!
Do you have any other suggestions for yarn other than Stylecraft that might be used for this hat?
Hi Nina! I recommend checking YarnSub! https://yarnsub.com/yarns/stylecraft/special_aran_with_wool
Hope this helps! – Nicola, Editor
on hat: Row one says to sc around but in row two it says to skip two dc. One of these is wrong or you skipped a row, since repeating row two as is makes since. Probably needs a new row two and then repeat row 3. Looks fun
Hello Ann! I’ve reached out to the designer for advice and she or I will reply as soon as possible. Thanks! – Nicola, Editor
I apologize, some rows were missing! They’ve been added back in now. Happy crocheting! – Nicola, Editor
Is the hat being attached to the brim in Rnd 1 of the hat?
Hello Jeannine! I’ve reached out to the designer for advice and she or I will reply as soon as possible. Thanks! – Nicola, Editor
I apologize, some rows were missing! They’ve been added back in now. Happy crocheting! – Nicola, Editor
The last supporting images did not print.
Hello! You will need to open up the files in the downloads section and print them off separately. – Nicola, Editor