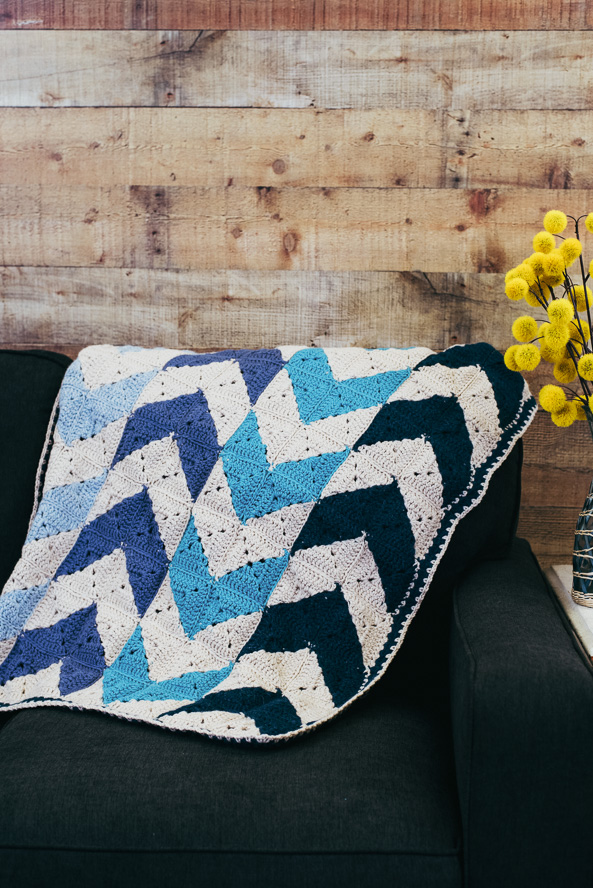
Brighten any room in your home with this bold and blue arrow throw. This blanket is comprised of squares that are divided into triangles of different colors. Joining each square together with the slip stitch, the arrows will begin to form with the connecting triangles.
Skill Level: Easy
Size: 38” / [16.5 cm] x 30.5” / [78 cm] after blocking; each Square = 3.5” / [9 cm]
Materials
Yarn: Garnstudio Drops Nepal (65% Wool, 35% Alpaca); 82 yards [75 meters]/50 grams): 206 Light Beige Mix (A, 8 balls), 8905 Deep Ocean (B, 2 balls), 8907 Fog (C, 2 balls), 8911 Sea Blue (D, 2 balls), 6314 Denim Blue (E, 2 balls)
Hook: US size J/10 (6.0 mm)
Notions: Removable markers, tapestry needle
Special Stitches
3 dc-cl
Yo, insert hook in st or sp indicated and draw up a loop (3 loops on hook), yo, pull through 2 loops on hook (2 loops on hook), *yo, insert hook in same st or sp and draw up a loop, yo, pull through 2 loops on hook; rep from * once more (4 loops on hook), yo, pull through all 4 loops on hook.
Pattern Notes
To make the blanket, you’ll need 20 squares of each color combo: (beige + deep ocean 1), (beige + fog 2) (beige + sea blue 3) and (beige + denim blue 4).
The squares are made up of 2 triangles, one of each color.
Blanket Pattern
Square (make 80)
With first color, ch 4, join with sl st in first ch to form a ring.
Rnd 1: Work (3 dc, ch 2, 3 dc) into ring, ch 1, pull up a loop of your new color and ch 1, work (3 dc, ch 2, 3 dc, ch 2) into ring, sl st into top of first dc.
Rnd 2: Ch 3, turn, dc in same (corner) st, work 3 dc along the side, work (2 dc, ch 2, 2 dc) in corner sp, work 3 dc into next side, work (2 dc, ch 2) in corner sp, pull up the alternate color through the loop, work 2 dc in corner sp, work 3 dc along the side, work (2 dc, ch 2, 2 dc) in corner sp, work 3 dc along next side, work (2 dc, ch 2) in corner sp, sl st into top of ch-3 of first color.
Rnd 3: Ch 3, turn, dc in same (corner) st, work 7 dc along the side, work (2 dc, ch 2, 2 dc) in corner sp, work 7 dc along next side, work (2 dc, ch 2) in corner sp, pull up the alternate color through the loop, work 2 dc in corner sp, work 7 dc along the side, work (2 dc, ch 2, 2 dc) in corner sp, work 7 along the next side, work (2 dc, ch 2) in corner sp, sl st into top of ch-3 of first color.
Fasten off and tie small knots where the two yarn ends meet to prevent the corners from falling apart.
Finishing
Assembly
With right sides held together and working through outer loops only, sl st Squares together with A following the diagram.
Border
Rnd 1: With A, sc around entire edge, working (2 sc, ch 2, 2 sc) in each corner sp. Fasten off A.
Rnd 2: Join B in any corner ch-2 sp, work (3 dc-cl, ch 3, 3 dc-cl) in each corner sp, *ch 1, sk next st, 3 dc-cl in next sc; rep from * around, join with sl st to top of first 3dc-cl. Fasten off B.
Rnd 3: Join A in any corner ch-2 sp, ch 1 (does not count as st), work (sc, ch 2, sc) in same corner sp, (*sk next 3 dc-cl, ch 2, sc in next ch-1 sp; rep from * to next corner, work (sc, ch 2, sc) in next corner); rep from * around, join with sl st to first sc.
Fasten off.


At first glance of this throw, I didn’t realize it was granny squares. Great idea!!!
I noticed that the diagram for the New Arrow Throw only shows it in black and white, and doesn’t indicate how and where to assemble the various colors, Is there a way to get the color key to show, if there is one for this pattern? If not, how does one know which colors to place where?