


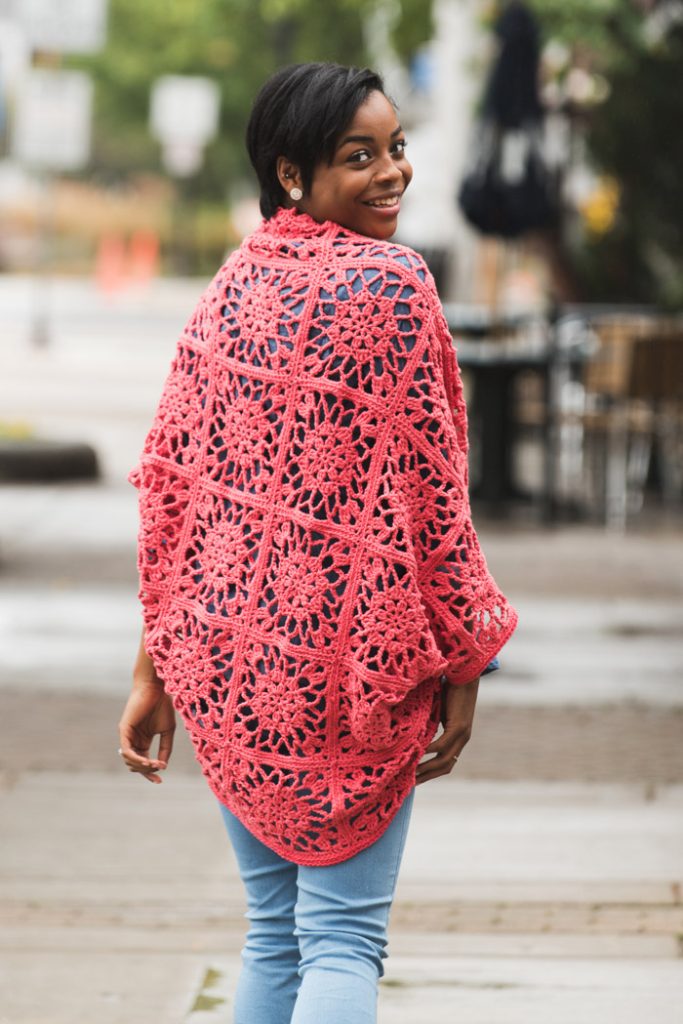
With it’s quirky, vintage granny square design, the Grapefruit Sorbet Shrug will leave you hearing retro tunes playing. It won’t be long before you’re eager to start planning a delightful spring brunches full of fun, fruity drinks!
Skill Level: Intermediate
Size: Small/Medium (Medium/Large) Finished Measurement 39 (45)” / [99 (114) cm] width x 39 (45)” / [99 (114) cm] length
Shown in size Small/Medium.
Gauge: 15 sts and 17 rows = 4” (10cm) in sc.
Materials
 Yarn: Garnstudio Drops Paris (100% Cotton; 82 yards [75 meters]/50 grams): Raspberry (14 (20) balls)
Hook/Needles: US size 7 (4.5mm)
Notions: Tapestry needle
Abbreviations
st(s) – stitch(es)
ch – chain stitch
sl st – slip stitch
sc – single crochet
hdc – half double crochet
dc – double crochet
tr – triple crochet
blsc – back loop single crochet
cl – cluster stitch
trcl – triple crochet cluster stitch
Special Stitches
Back Loop Single Crochet (blsc)
Insert hook in next st (but only in the back loop), YO, pull back through that st (2 loops on hook), YO, pull through all 2 loops on hook.
Cluster Stitch (cl)
YO, insert hook into the next st, YO, pull back through that st (3 loops on hook), YO, pull through 2 loops, *YO, insert hook into same st, YO, pull back through that st, YO, pull through 2 loops; rep from * once more (4 loops on hook), YO, pull through all 4 loops on hook.
Triple Crochet Cluster Stitch (trcl)
YO twice, insert hook into next st, YO, pull back through that st (4 loops on hook), YO, pull through 2 loops, YO, pull through 2 loops, *YO twice, insert hook into same st, YO, pull back through that st, YO, pull through 2 loops. YO, pull through 2 loops; rep from * once more (4 loops on hook), YO, pull through all 4 loops on hook.
Pattern Notes
This shrug consists of squares, worked in the round and seamed together to create one larger square. The large square is then folded in half and partly seamed up the sides to form the armholes.
Pattern
Square (make 36 [49])
Create a magic circle.
Rnd 1: Ch 3 (counts as first dc and ch 1), *(dc, ch 1) in magic circle; rep from * 6 more times, sl st in first dc of this rnd. (8 sts)
Rnd 2: Sl st in ch-1 sp, ch 2, cl in same ch-1 sp, ch 3, *cl in next ch-1 sp, ch 3; rep from * 6 more times, sl st in first cl of this rnd. (16 sts)
Rnd 3: *Ch 1, (dc, tr, dc) in next ch-3 sp, ch 1, sl st in next st; rep from * 7 more times. (32 sts)
Rnd 4: Sl st in ch-1 sp and dc, sl st in tr, ch 1, sc in same st, ch 6, sk next st, tr in sl st, ch 6, *sk next st, sc in tr, ch 6, sk next st, tr in sl st, ch 6; rep from * 6 more times, sl st in first sc of this rnd. Fasten off. (16 sts)
Rnd 5: Attach yarn in first ch-6 sp, ch 1, hdc in same sp, *ch 4, hdc in next ch-6 sp, ch 4, hdc in next ch-6 sp, ch 3, (trcl, ch 3, trcl) in next ch-6 sp, ch 3, hdc in next ch-6 sp; rep from * twice more, ch 4, hdc in next ch-6 sp, ch 4, hdc in next ch-6 sp, ch 3, (trcl, ch 3, trcl) in next ch-6 sp, ch 3, sl st in first hdc of this rnd. (16 sts)
Rnd 6: Ch 1, hdc in same st, *4 sc in next ch-4 sp, hdc in next st, 4 sc in next ch-4 sp, hdc in next st, 3 sc in next ch-3 sp, hdc in next st, (2 dc, ch 2, 2 dc) in next ch-3 sp, hdc in next st, 3 sc in next ch-3 sp, hdc in next st; rep from * twice more, 4 sc in next ch-4 sp, hdc in next st, 4 sc in next ch-4 sp, hdc in next st, 3 sc in next ch-3 sp, hdc in next st, (2 dc, ch 2, 2 dc) in next ch-3 sp, hdc in next st, 3 sc in next ch-3 sp, sl st in first hdc of this rnd. (92 sts)
Fasten off. Weave in loose ends.
Assembly
Block finished squares to shape and size 6.5” / [16.5 cm].
Seam all squares together to create one larger square, then block finished square to shape and size 39 (45)” / [99 (114) cm].
Fold square in half with WS facing out (RS facing each other).
Seam up 12.5 (14.5)” / [32 (37) cm] along each side of the square, from the bottom edges up toward the fold line. The remaining 7 (8)” / [18 (20) cm] openings are where the armholes will be.
Turn Shrug right sides out so that seams are facing the inside.
Body and Sleeve Border
Body Border
Rnd 1: Attach yarn to the bottom of the Shrug, ch 1, sc in same st, sc in next 304 (354) sts along Border of Body of the Shrug. Do not sl st in first st of this rnd. (305 (355) sts)
Rnd 2: Start in first st from the previous rnd, blsc in next 305 (355) sts, sl st in first st of
this rnd. (305 (355) sts)
Fasten off. Weave in loose ends.
Armhole Border
Rnd 1: Attach yarn to armhole at seam, ch 1, sc in same st, sc in next 55 (63) sts along Border of armhole. Do not sl st in 1st st of this rnd. (56 (64) sts)
Rnd 2: Start in first st from the previous rnd, blsc in next 56 (64) sts. Do not sl st in first st
of this rnd. (56 (64) sts)
Fasten off. Weave in loose ends.
Rep for other armhole.
Finishing
Weave in all ends.
Block Shrug to size and shape.
Typos. The phone sent the message before it was finished. It should have read:
It would be good to see more photos from different angles, and/or a diagram for stitching the sides.
Thank you for the feedback and I will share that with the team.
I’m not a great fan of making small granny squares, but I love the look of this shrug. It’s a muted color, yet still gives the impression of summer an lightness.