


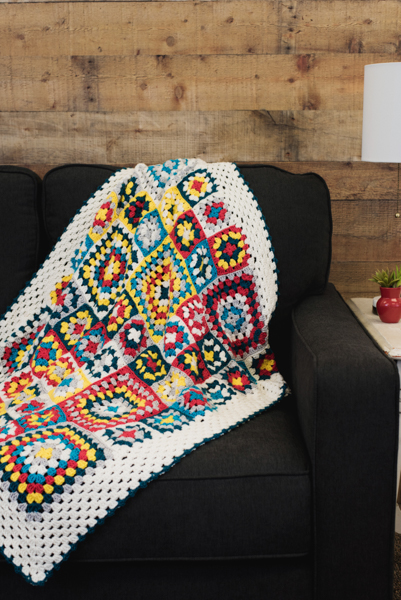
Gone are the days of basic granny squares in boring colors. Spice up the tradition with granny squares that are crocheted in various sizes to give this blanket a patchwork feel. The layout of this blanket and the added border will keep you interested and excited throughout the crochet process.
Skill Level: Easy
Size: 38” / [16.5 cm] x 35” / [89 cm] after blocking
Gauge: Small square = 3.5” / [9 cm]; Large square = 7” / [18 cm]
Materials
Yarn: Scheepjes Merino Soft (50% Wool, 25% Microfibre, 25% Acrylic; 115 yards [105 meters]/50 grams): 602 Raphael (A, 6 balls), 617 Cézanne (B, 2 balls), 603 Michelangelo (C, 2 balls), 621 Picasso (D, 2 balls), 643 Ansingh (E, 2 balls), 644 Duerer (F, 2 balls)
Hook: US size H/8 (5.0 mm)
Notions: Removable markers, tapestry needle
Pattern Notes
Each Round is worked in a different color.
Blanket Pattern
Large Square (make 7)
With first color, ch 4, join with sl st in first ch to form a ring.
Rnd 1 (RS): Ch 5 (counts as dc, ch 2 here and throughout), 3 dc in ring, (ch 2, 3 dc in ring) twice, 2 dc in ring, join with sl st in 3rd ch of beg ch. Fasten off.
Rnd 2: Join 2nd color in any corner ch-2 sp, ch 5, 3 dc in same sp, *ch 1, (3 dc, ch 2, 3 dc) in next ch-2 sp; rep from * twice more, 2 dc in first ch-2 sp, join with sl st in 3rd ch of beg ch. Fasten off.
Rnd 3: Join 3rd color in any corner ch-2 sp, ch 5, 3 dc in same sp, *ch 1, 3 dc in next ch-1 sp, ch 1, (3 dc, ch 2, 3 dc) in next ch-2 sp; rep from * twice more, ch 1, 3 dc in last ch-1 sp, ch 1, 2 dc in first ch-2 sp, join with sl st in 3rd ch of beg ch. Fasten off.
Rnd 4: Join next color in any corner ch-2 sp, ch 5, 3 dc in same sp, *(ch 1, 3 dc) in each ch-1 sp across to next ch-2 sp, ch 1, (3 dc, ch 2, 3 dc) in next ch-2 sp; repeat from * twice more, (ch 1, 3 dc) in each ch-1 sp across to next corner, ch 1, 2 dc in first ch-2 sp, join with sl st in 3rd ch of beg ch. Fasten off.
Rnds 5-8: Rep Rnd 4, changing colors in each Rnd.
Small Square (make 44)
Rnds 1-4: Work same as Rnds 1-4 of Large Square.
Finishing
Assembly
With right sides held together and working through outer loops only, sl st squares together with A as show in assembly diagram.
Border
Rnd 1 (RS): Join A in any corner ch-2 sp, ch 5, work 3 dc in same ch-2 sp, ch 1, (3 dc, ch 1) in each ch-1 sp across to next joined ch-2 sp, *ch 1, dc2tog over same ch-2 sp and next ch-2 sp, (3 dc, ch 1) in each ch-1 sp across to next ch-2 sp; rep from * across to next corner**, (3 dc, ch 2, 3 dc) in next corner ch-2 sp; rep from * around, working 2 dc in same sp as ch-5 at beg of rnd, join with sl st in 3rd ch of beg ch-5.
Rnd 2: Sl st in first corner ch-2 sp, ch 5, 3 dc in same sp, (ch 1, 3 dc) in each ch-1 sp across to next corner ch-2 sp, ch 1, (3 dc, ch 2, 3 dc) in next ch-2 sp; rep from * around, working 2 dc in same sp as ch-5 at beg of rnd, join with sl st in 3rd ch of beg ch-5.
Rnds 3-7: Rep Rnd 2
Picot Edging
Rnd 1 (RS): Join E in any corner ch-2 sp, ch 1 (does not count as st), (sc, ch 3, sc) in same ch-2 sp, (3 sl st through back loop only) in next 3 dc, (sc, ch 3, sc) in each ch-1 sp across to next joined ch-2 sp, (sc, ch 3, sc) in next corner ch-2 sp; rep from * around, join with sl st to first sc. Fasten off.
Weave in any rem ends.
I’m still finding it hard to read the pattern of the granny square it says it’s easy but I need a video to show me how
Hi Lesley, perhaps the videos for granny square from this CAL will help: https://www.ilikecrochet.com/daily/crochet-squares/granny-squares/battenberg-bag-crochet-along/
– Nicola, Editor
I love granny squares. I like to croche granny squares.
In your printer settings BEFORE you hit print you should have the option to scroll thru each page and then tell the printer to print 1-6 pages leaving off all the comments. Under Print it gives you that option, it is set at the default ALL. Super simple to Just change it.
Is there a way to print the pattern without also printing comments and replies? I had no problem downloading and printing the blanket diagram, but the only icon I could find for printing the pattern is on the left side of the screen. When you mouse over the icon it says “share to print”. I got the pattern and all comments and replies. Thank you.
Hi Ruth! Thanks for letting us know – we will have our tech team look at the printer button function. You are welcome to save this pattern by copying and pasting into a word document in the meantime. Hope this helps! – Nicola, Editor
Just select which pages to print when you send it to print for me it was just printing pages 1-3 the rest was comments
I have loved making Granny Square for 45 years and I don’t think I would ever get Bored of them! Thank you for your new pattern.
~~kay~~
I am trying to cancel a renewal , but I am having a hard time finding my credit card information.
Hi Sandra, looks like you might be having trouble accessing your account? Our customer service team can make sure everything is in order if you shoot them an email. We are happy to help! Thanks ???? https://www.ilikecrochet.com/contact-us/
During assembly section of the “The New Easy Granny Blanket”, instructions refer to an “assembly diagram” which I don’t see anywhere here. I’m a paid subscriber. Can I get that diagram? I want to plan this project. Thanks!
Hello Brenda! The diagram you are referring to is on the right hand side of the page under the last photo. I’ve also linked to it below:
https://www.ilikecrochet.com/wp-content/uploads/3-1.jpg
Happy crocheting! – Nicola
Hi Nicola,
As a paying subscriber, I have a question. Why is it that no matter how I change email setting I still get about 70 emails daily, some do have free patterns while some appear to be free until one wants to see instructions. Either way the number of emails is a bit much free or not.
Also as a paying subscriber, I’m repeating that because I don’t understand why even when in site I’m bombarded with pop up interruptions selling me other projects. One would think paying for a subscription is to avoid such things and all patterns within your site “I like crochet” to be included.
Even using your app, which btw there’s two in the App Store, one is the magazine, which again I pay for.
I doesn’t feel or function as a digital magazine.
Is there a way, one that maybe I’m not aware off getting it through IBooks so I using through that app since everything within IBooks functions as it should magazines and books alike.
I hope you could enlighten me, it’s completely possible I over looked or missed something.
Thank you
Marta
Hello Marta! Please contact our customer service team for further assistance: https://www.ilikecrochet.com/contact-us/
I wondering this too. I did click “next” but since that just went to another project, I just went back to the blanket. I don’t understand why it would be the last image or on another “page” if anything it really should have just been inserted under “Assembly”.
I’m glad you asked.
Much appreciated & I’m sure many others do too.
Marta
A paid subscriber
Hi Marta! The assembly diagram is underneath the photos on the right hand side of the page. I’ve pasted a link to it here as well: https://www.ilikecrochet.com/wp-content/uploads/3-1.jpg
Happy crocheting!