


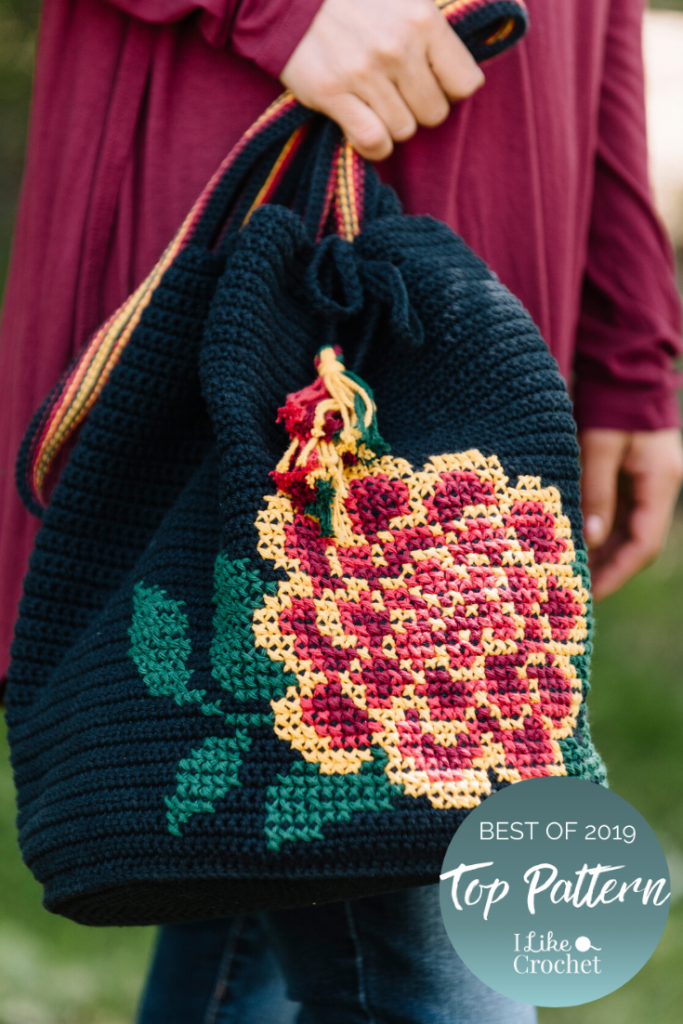
Did you know that Marigolds are symbols of the sun’s beauty in addition to being October’s birth flower? Harness the power of this floral beauty for yourself with this trendy and impressive crochet bag. With a classic bucket bag shape, and embroidered design, this trendy accessory will bring a handmade, boho-chic look to your wardrobe.
Skill Level: Intermediate
Size: 9” / [23 cm] diameter x 13” / [33 cm] tall
Gauge: 19 sts and 20 rows = 4” [10 cm] in sc
Materials
 Yarn: Lily Sugar ‘n Cream (100% Cotton; 120 yards [109 meters]/70.9 grams): Black (MC, 7 balls), Wine (CC1, 1 ball), Country Red (CC2, 1 ball), Dark Pine (CC3, 1 ball).
Peaches & Crème (100% Cotton; 120 yards [109 meters]/70.9 grams): Gold (CC 4, 1 ball).
Hook: US size E/4 (3.5 mm)
Notions: Removable stitch marker, pins, 8” diameter circle of plastic canvas (optional), tapestry needle.
Special Stitches
Reverse sc (reverse single crochet): Insert hook in stitch to the right, yarn over, pull through stitch, yarn over, pull through both loops on hook.
Pattern Notes
The bag is made in two pieces: a 9” / [23 cm] diameter double-layered Round Bottom and a 13” / [33 cm] by 32” / [81 cm] Rectangle that forms the sides of the bag. The Round Bottom pieces are worked in a continuous spiral without joining between rounds. Optional plastic canvas sandwiched between the two layers of the Round Bottom gives the bag strength.
The Rectangle is worked in rows with a buttonhole row near the top to allow for a Drawstring Cord. The Rectangle is embroidered with the marigold motif, seamed into a cylinder, and slip-stitched to the assembled Round Bottom. A border round is added around the top opening of the bag after the Rectangle is embroidered and seamed into a cylinder.
A Strap and the tasseled Drawstring Cord add the finishing touches.
Pattern
Round Bottom (make 2)
With MC, ch 2.
Rnd 1 (RS): Sc 4 times in 2nd ch from the hook. (4 sc)
Rnd 2: Work 2 sc in each st. (8 sts)
Rnd 3: Work 2 sc in each st. (16 sts)
Rnd 4: (Sc, 2 sc in next st) 8 times. (24 sts)
Rnd 5: (Sc in next 2 sts, 2 sc in next st) 8 times. (32 sts)
Rnd 6: Sc in next st, 2 sc in next st, (sc in next 3 sts, 2 sc in next st) 7 times, sc in next 2 sts. (40 sts)
Rnd 7: (Sc in next 4 sts, 2 sc in next st) 8 times. (48 sts)
Rnd 8: Sc in next st, 2 sc in next st. (sc in next 5 sts, 2 sc in next st) 7 times, sc in next 4 sts (56 sts)
Rnd 9: (Sc in next 6 sts, 2 sc in next st) 8 times. (64 sts)
Rnd 10: Sc in next 3 sts, 2 sc in next st, (sc in next 7 sts, 2 sc in next st) 7 times, sc in next 4 sts. (72 sts)
Rnd 11: (Sc in next 8 sts, 2 sc in next st) 8 times. (80 sts)
Rnd 12: Sc in next 4 sts, 2 sc in next st, (sc in next 9 sts, 2 sc in next st) 7 times, sc in next 5 sts. (88 sts)
Rnd 13: (Sc in next 10 sts, 2 sc in next st) 8 times. (96 sts)
Rnd 14: Sc in next 5 sts, 2 sc in next st, (sc in next 11 sts, 2 sc in next st) 7 times, sc in next 6 sts. (104 sts)
Rnd 15: (Sc in next 12 sts, 2 sc in next st) 8 times. (112 sts)
Rnd 16: Sc in next 6 sts, 2 sc in next st, (sc in next 13 sts, 2 sc in next st) 7 times, sc in next 7 sts. (120 sts)
Rnd 17: (Sc in next 14 sts, 2 sc in next st) 8 times. (128 sts)
Rnd 18: Sc in next 7 sts, 2 sc in next st, (sc in next 15 sts, 2 sc in next st) 7 times, sc in next 8 sts. (136 sts)
Rnd 19: (Sc in next 16 sts, 2 sc in next st) 8 times. (144 sts)
Rnd 20: Sc in next 8 sts, 2 sc in next st, (sc in next 17 sts, 2 sc in next st) 7 times, sc in next 9 sts. Sl st to next st. (152 sts)
Fasten off.
Rectangle
With MC, ch 139.
Row 1: Sc in 2nd ch from hook and all ch across. Turn. (138 sts)
Row 2: Ch 1 (does not count as a st here or throughout), sc in each st across. Turn. (138 sts)
Rows 3-58: Rep Row 2
Row 59 (Buttonhole Row for Drawstring Cord): Ch 1, sc in next 8 sts (ch 4, sk next 4 sts, sc in next 13 sts) 7 times, ch 4, sk next 4 sts, sc in next 7 sts. Turn. (138 sts)
Rows 60-63: Rep Row 2.
Fasten off.
Strap
With MC, ch 280.
Row 1: Sl st in each ch. Fasten off. (280 sts)
Row 2: With MC, sl st in the bl of each st across. Fasten off. (280 sts)
Row 3: With CC1, rep Row 2.
Row 4: With CC2, rep Row 2.
Row 5: With CC4, rep Row 2.
Row 6: With CC3, rep Row 2.
Row 7: With CC4, rep Row 2.
Row 8: With CC2, rep Row 2.
Row 9: With CC1, rep Row 2.
Rows 10-11: With MC, rep Row 2.
Finishing
Assemble the Round Bottom pieces: if using the optional plastic canvas, sandwich the canvas between the two Round Bottom pieces with their RS facing out. With MC, sc into each st around, stitching through both Round Bottom pieces to encase the plastic canvas. Fasten off.
Embroider the Marigold Motif on the Rectangle: Mark the 70th st of Row 20 with a removable stitch marker. This st is represented by the X on the Marigold Chart. Thread a yarn needle with a 30” / [76 cm] length of CC1. Working from the center marked st out toward the edges, embroider the marigold motif by sewing an X over each sc of the Rectangle with CC1, CC2, CC3, or CC4 as shown in the Marigold Chart.
Border
Rnd 1: With MC, [reverse sc in next st, sk next st] around Row 63 of Rectangle after embroidering and seaming into a cylinder. (69 sts)
Fasten off.
Seam the Rectangle into a cylinder: Thread a yarn needle with 24” / [61 cm] of MC. Using the mattress stitch, sew the short ends of the Rectangle together to form a cylinder. Add the Border to Row 63 of the cylinder.
Attach the cylinder to the bottom of the bag: Pin Row 1 of the cylinder in place on the Round Bottom of the bag. With MC, sl st each cylinder st to each Round Bottom st, attaching every 10th cylinder st to two consecutive Round Bottom sts.
Attach the strap: With MC, sew Strap to the inside of the bag at desired height, taking care not to cover a buttonhole with the Strap.
Make the Drawstring Cord: Cut 6 44” / [112 cm] lengths of MC. Knot at one end. Braid three groups of 2 strands each to create a 30” / [76 cm] long braid. Knot end and trim ends to 0.5” / [1 cm]. Thread the braid through the buttonholes in Row 59.
Make the Tassels: Cut 8 12” / [30.5 cm] lengths each of CC1, CC2, CC3, and CC4. Fold 4 pieces of CC1 in half and place on a flat surface. Fold 4 pieces of CC2 in half and tuck the ends through the loop formed by CC1. Fold 4 pieces of yarn CC3 in half and tuck the ends through the hairpin loop formed by CC2. Fold 4 pieces of CC4 in half and tuck the ends through the hairpin loop formed by CC3. Tuck the ends of CC4 through the hairpin loop formed by CC1. Place the knot end of the braided cord into the center of the loops. Slowly tighten each loop up to meet the knot by pulling on the ends. Cut a 16” / [40.5 cm] length of CC4 to wrap the top of the tassel. Use a yarn needle to hide the ends of the yarn inside the tassel. Trim tassel to 4” / [10 cm]. Repeat to add a Tassel to the other end of the Drawstring Cord.
I can’t find the marigold chart either
Hi Laura! Charts are available for logged-in Gold Members at the bottom of the pattern and appear as a blue button to click and download. – Dana, Editor
This is so beautiful! You are so talented!!!
Hello,
The view the chart and tassel-making tutorial photos, scroll all the way to the bottom of the page at https://www.ilikecrochet.com/magazine/crochet-bag-patterns/marigold-bucket-bag/ and click the link just below the word “Downloads”. The link is titled “Marigold Chart and Tassels for Marigold Bucket Bag”.
If you are on a desktop computer, the link is on the bottom right below the photos. If you are on a phone, the link is at the very bottom of the page below the comments section.
Susan Kennedy
No marigolds template