


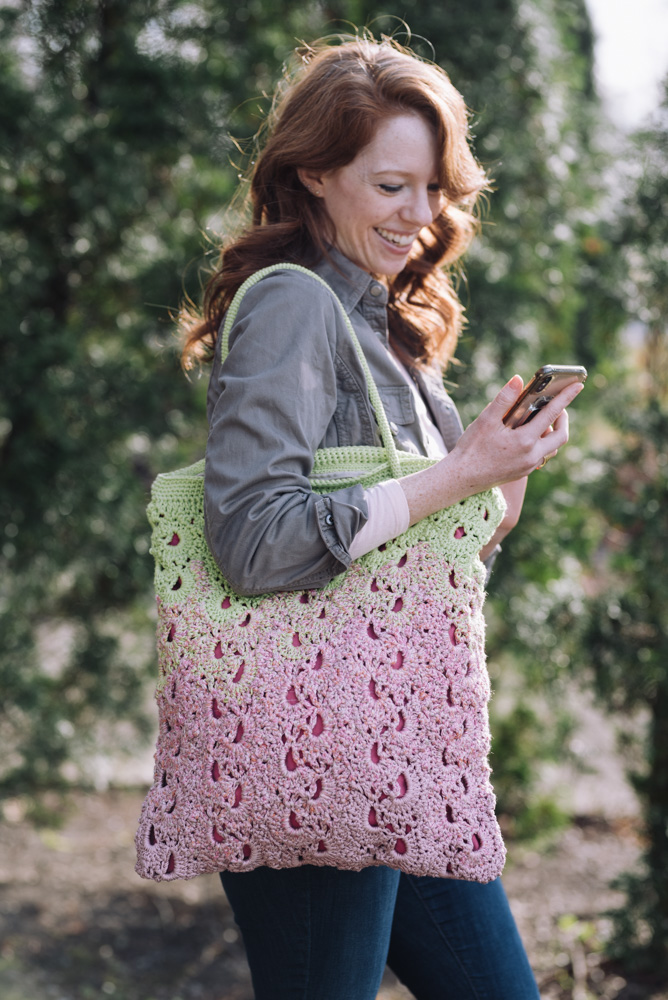
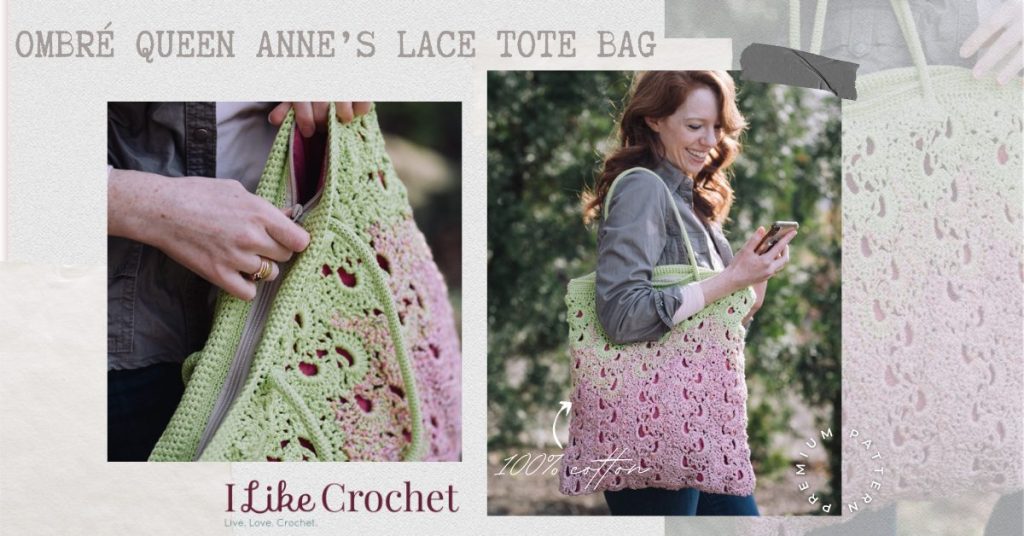
A familiar vintage lace pattern gets the modern ombré treatment with this tote design. Made up of five strips of 28 Queen Anne’s Lace motifs, the yarn is worked double and the strips are joined. Pairing yarn together to create the ombré look is part of the fun!
Skill Level: Intermediate
Size: 17” / [44 cm] width x 19” / [48 cm] depth
Gauge: 2 motifs = 4” [10 cm] horizontally and vertically, measured at widest points.
 Yarn: Rico Design Essentials Cotton DK (100% Cotton; 142 yards [130 meters/,50 grams): 86 Pistachio (A, 4 balls), 19 Dusky Pink (C, 3 balls)
Rico Design Creative Lazy Hazy Summer Cotton (49% cotton, 46 Acrylic, 5% Polyester; 164 yards [150 meters]/50 grams): r 006, Pistachio 86 (B, 4 balls)
Hook: US size 9/I (5.5mm) for Bag, US size (3mm) for handles and edge of zipper.
Notions: Toning cotton lining fabric, (1-meter x 50 cm), stitch markers, tapestry needle, two lengths of cord (measuring 68 cm, or desired length),
two strips of flexible yet rigid plastic (28 cm x 4 cm), the kind used for some cutting mats, or ring binders is ideal with corners trimmed into curves.
Pattern
Strips of 14 motifs on each side are made by beg with 2 strands of A, then switching to one strand of A and one strand of B. Further motifs are worked using 2 strands of B, then one strand of C.
To make motif strips:
Ch 6, and join into a ring.
Motif 1: Ch 3, 13 dc into ring, without joining, ch 1, turn, sc in next 2 dc, *ch 4, sc in next 2 dc; rep from * 5 more times (6 lps), ch 6, turn.
Motif 2: Sl st in first free ch-4 lp, ch 3, turn, 13 dc into ch- 6 lp, sl st in first sc of first motif, ch 1, turn, sc in next 2 dc, *ch 4, sc in next 2 dc; rep from * 5 more times (6 lps), ch 6, turn.
Motif 3: Sl st in first free ch-4 lp of adjoining motif, ch 3, turn, 3 dc in ch-6 lp, sl st in next free ch-4 lp of adjoining motif, ch 1, turn, sc in next 2 dc, *ch 4, sc in next 2 dc; rep from * 5 more times (6 lps), sl st in next free ch-4 lp of adjoining motif, ch 6, turn.
Rep Motif 3 to continue making strip.
The following two color combinations are used:
Combination 1 (Make 3)
With A held double, work 3 motifs (two on one side of strip, one on the other).
Cut one strand of A, leaving an end for sewing in later, and join in B.
Work 3 motifs in new combination, as before. Cut A, and join in B.
Using just B, work 3 motifs as before.
Cut one strand of B and add one strand of C. Work 2 motifs of B and C together.
Cut B and with 2 strands of C, work 4 motifs.
Cut one strand of C, join in B. Work 3 motifs in C and B together.
Cut C. and with 2 strands of B, make 3 motifs.
Cut one strand of B and add in A. Work 3 motifs using B and A.
Cut B and add C. with 2 strands of C, work 4 motifs. (28 motifs; 14 each side of strip)
Combination 2 (Make 2)
A+A = 4 motifs
A+B = 3 motifs
B+B = 2 motifs
B+C = -2 motifs
C+C = 6 motifs
C+B = 2 motifs
B+B = 3 motifs
B+A = 3 motifs
A+A = 3 motifs. (28 motifs, 14 each side of strip.)
Joining strips
Alternating combinations 1 and 2, lay strips side by side. All should be facing the same direction. Pin the middle picot of the 3 to the corresponding space on the next strip, the top and bottom will be staggered slightly. On the wrong side, using Color A and a 3.0mm crochet hook, crochet edges of strips together top and bottom, where A is used. Use C to crochet middle sections together.
Once all 5 strips have been joined into a rectangle, fold in half with the A sections at the top. Pin the sides in the same way that you joined the strips and crochet together on the wrong side.
Neatening top edge
Using double A and 5.5mm hook, fill in spaces using a combination of crochet sts of different sizes, from sc, through hdc, dc, tr, and dtr, the aim being to achieve a straight edge. (140 sts).
Border
Rnd 1: Sc around.
Rnds 2-5: Rep rnd 1.
Finishing
Fasten off.
Weave in all ends.
Handles (Purchased ones may be substituted)
Handles are made by crocheting small sc tabs of 8 sts at each end of tubular scs worked around a length of cord. Cord is then inserted into bag from the front, then tied off through a strip of rigid but flexible plastic to anchor it. Tabs are sewn down. Example used tube of 7 sts, but you may need to add sts if using a thicker cord.
For closure, backstitch around zipper with 3mm stitches and yarn used singly, pick up backstitches with a 3mm hook and crochet 3 rounds of sc. Leave a long end and sew to top inside edge of bag at start of 5-rnd sc border.
Make a fabric lining in a toning colour and sew along inside of zipper and at corners.
I would love to try making this stitch into a shawl, shrug or even a cardi.
Can this be made smaller? Like a small or medium purse size? I’m assuming you just make less squares?
Hello Lorraine! I’ve reached out to the designer for advice and she or I will reply as soon as possible. Thanks! – Nicola, Editor
This is really super. I will try some time soon.