


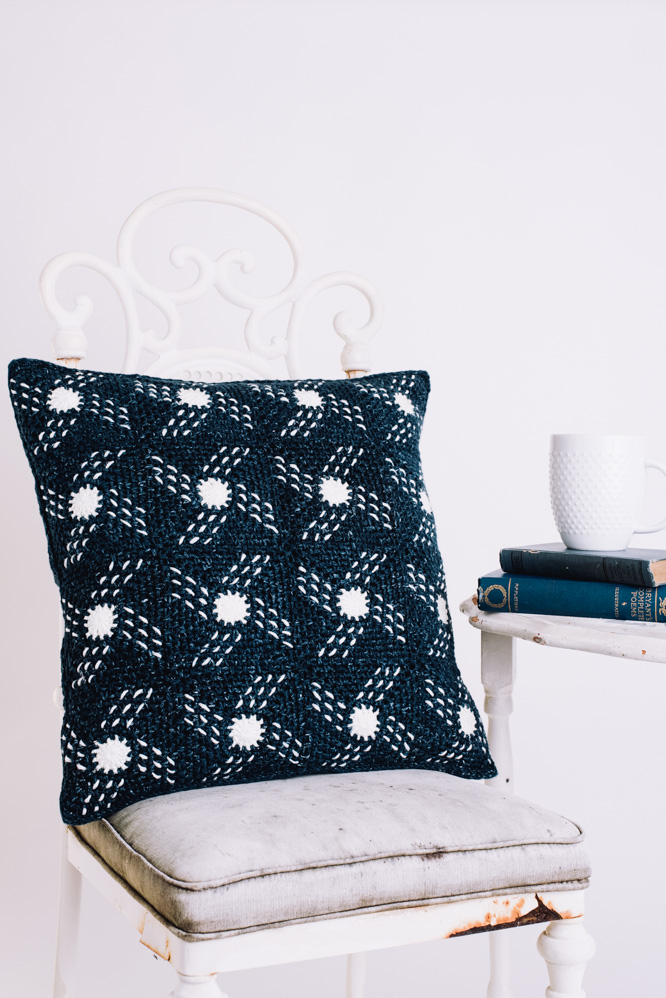
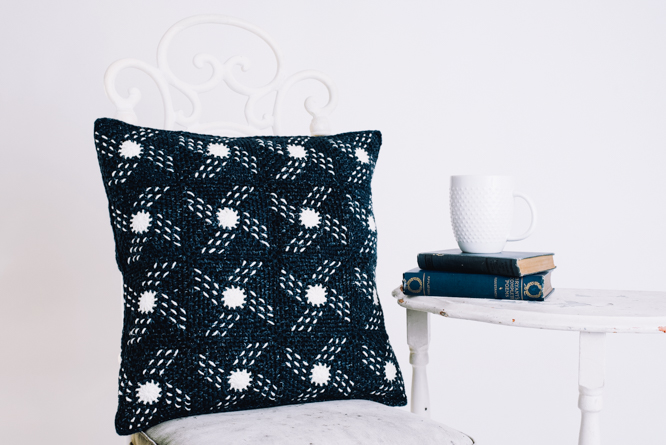
Inspired by Japanese Sashiko embroidery, white pinwheels embroidered on dark denim indigo are a fun update to a classic pairing of colors. Turn the pillow over for a completely different look.
Skill level: Intermediate
Size: 18” square
Gauge: Motif = 4.5” square, 17.75 sts and 17.75 rows = 4” [10 cm] in stitch pattern, blocked
Materials
 Yarn: DMC Natura Just Cotton Medium Denim (100% Cotton; 82 yards [75 meters]/50 grams): 07 Indigo (A, 8 balls); DMC Natura Just Cotton Medium (100% Cotton; 82 yards [75 meters]/50 grams): 03 Vanille (B, 1 ball).
Hooks: US size 4/E (3.5 mm), US size 7 (4.5 mm)
Notions: Tapestry needle, safety pins, 18” square pillow form, four 1.25” button (optional)
Special Stitches
Standing sc st (Standing single crochet stitch): With slip knot on hook, insert hook into designated st, yo, pull lp through, yo, pull through both lps on hook completing the Standing sc st.
Pattern Notes
Embroidery is done after motifs and back panels are blocked. This reduces chance of bleeding with darker colors.
Buttons are crocheted, but four 1.25” purchased buttons can be substituted.
Pattern
Motif (make 16)
With larger hook and B, make magic ring.
Rnd 1 (RS): Ch 3 (counts as first dc), work 11 dc in ring, sl st in top of beg ch-3 to join. Fasten off. Pull magic ring tight. (12 dc)
Rnd 2: With A, sl st in sp between any 2 dc, ch 1, sc in same sp, *ch 2, sc in next sp between 2 dc (corner made), (ch 1, sc in next sp between 2 dc) 2 times; rep from * 3 more times, ending with ch 1, sl st in first sc to join. (8 ch-1 sps, 4 ch-2 sps)
Rnd 3: Sl st in corner sp, ch 1, sc in same sp, ch 2, sc in same sp (corner made), *(ch 1, sc in next ch-1 sp) 2 times, ch 1**, sc in next ch-2 sp, ch 2, sc in same sp (corner made); rep from * 3 more times, ending last rep at **, sl st in first sc to join. (12 ch-1 sps, 4 ch-2 sps)
Rnd 4: Rep Rnd 3 but (ch 1, sc in next ch-1 sp) 3 times between corners. (16 ch-1 sps, 4 ch-2 sps)
Rnd 5: Rep Rnd 3 but (ch 1, sc in next ch-1 sp) 4 times between corners. (20 ch-1 sps, 4 ch-2 sps)
Rnd 6: Rep Rnd 3 but (ch 1, sc in next ch-1 sp) 5 times between corners. (24 ch-1 sps, 4 ch-2 sps)
Rnd 7: Rep Rnd 3 but (ch 1, sc in next ch-1 sp) 6 times between corners. (28 ch-1 sps, 4 ch-2 sps)
Rnd 8: Rep Rnd 3 but (ch 1, sc in next ch-1 sp) 7 times between corners. (32 ch-1 sps, 4 ch-2 sps)
Fasten off. Weave in loose ends. Block 4.5” square.
Motif embroidery
With approx. 24” length of B, weave yarn through ch-1 sps directly left of the diagonal corner increase rows (see photo diagram). Embroidery is done in two halves and will require two 24” lengths of B for each motif.
Note: Loose ends from embroidery can be woven in after motifs are joined so seams joining motifs can also be used to hide tail ends.
Front
Joining Motifs
Front is assembled by forming 4 horizontal strips of 4 motifs each, then joining strips vertically. The only difference in joining is that with the vertical rows, there is a ch-1 between motifs.
Note: When joining, some sc sts will share same sp as embroidery sts.
Joining Horizontal Rows of Motifs
Holding two motifs with RS tog and working through both thicknesses at the same time, join A with Standing sc st in corner ch-2 sp, *(ch 1, sc in next ch-1 sp) 8 times, ch 1, sc in corner ch-2 sp. Place next 2 motifs RS tog, sc tog in corner ch-2 sp of next pair of motifs and continue across from * 3 more times. Fasten off. Add 2 more strips in same fashion until all 16 motifs have been joined horizontally.
Joining Vertical Rows of Motifs
Holding two strips with RS tog and working through both thicknesses at the same time, join A with Standing sc st in corner ch-2 sp, *(ch 1, sc in next ch-1 sp) 8 times, ch 1, sc in corner ch-2 sp**, ch 1, sc in next corner ch-2 sp; rep from * 3 more times, ending last rep at **. Fasten off. Join rem strips in same fashion until all strips have been joined vertically.
Weave in loose ends.
Back
Panel A
With larger hook and A, ch 80.
Row 1 (RS): Sc in 2nd ch from hook, (ch 1, sk 1 ch, sc in next ch) across, turn. (40 sc)
Row 2: Ch 1, sc in first ch-1 sp, (ch 1, sk next sc, sc in next ch-1 sp) across, ending with ch 1, sc in last sc, turn. (40 sc)
Rows 3-49: Rep Row 2 until panel meas 11” from beg. Fasten off.
Reinforcement edging row (RS): Turn panel around to work on other side. With A, sl st in first ch-1 sp of Row 1, (ch 1, sl st in next ch-1 sp) across, ending with sl st in bottom of last sc. Fasten off.
Weave in loose ends. Block to 18” wide x 11” tall.
Panel B (buttonhole panel)
With larger hook and A, ch 80.
Row 1 (RS): Sc in 2nd ch from hook, (ch 1, skip 1 ch, sc in next ch) across, turn. (40 sc)
Row 2: Ch 1, sc in first ch-1 sp, (ch 1, sk next sc, sc in next ch-1 sp) across, ending with ch 1, sc in last sc, turn. (40 sc)
Rows 3-40: Rep Row 2 until panel meas 9” from beg.
Row 41 (buttonhole row): Ch 1, sk first sc and sc in first ch-1 sp, (ch 1, sc in next sp) 6 times, *ch 5, sk 5 sts, sc in next ch-1 sp, (ch 1, sc in next sp) 5 times; rep from * 3 more times, ending with ch 1, sc in last sc, turn. (4 buttonholes)
Row 42: Sl st in first ch-1 sp, *sl st in next sc, (sl st in next ch-1 sp, sl st in next sc) 5 times**, sl st in next 5 ch of button lp; rep from * 3 more times, ending last rep at **, sl st in last ch-1 sp, sc in last sc. Fasten off.
Weave in loose ends. Block 18” wide and 9” tall.
Panels A and B Embroidery
Note: All exposed sts will be directly above each other.
Measure 2.25” from top edge and 6.75” from bottom edge of both panels (not from button/buttonhole edge at pillow’s center). Mark with safety pins. Markers indicate middle row for three rows of embroidery.
With approx. 5.5′ length of B, weave yarn through ch-1 sps 2 rows below marked row. Rotate work and weave marked row making sure exposed stitches are directly on top of each other. Rotate work and work last row 2 rows above row completed. Weave in ends.
Buttons
Note: Buttons are worked in a spiral and are not joined at ends of rnds. RS faces up while working. WS will be exposed side of button. Finished button measures approx. 1.25” across. Purchased buttons may be used.
With smaller hook and B, make magic ring.
Rnd 1: Ch 1, work 8 sc in ring. Pull magic ring tight. (8 sc)
Rnd 2: Work 2 sc in each sc. (16 sc)
Rnd 3: Work 1 sc in each sc. (16 sc)
Rnd 4: Work 1 sc in first sc, (sk 1 sc, work 1 sc in next sc) 7 times. (8 sc)
Rnd 5: Work 1 sl st in first sc, (skip 1 sc, work sl st in next sc) 3 times. Pull tight. Fasten off. (4 sl st)
Pull magic ring tight again if necessary and thread first tail to inside of button if not held in front while working. Knot both ends tog tight and trim ends to 6”. Tail ends will be used to sew buttons to Panel A.
Pillow Assembly
With WS facing, place Front piece at bottom of stack. With RS facing, place Panel A on top of Front piece, bottom edges even, then place Panel B on top, top edge even with top edge of front piece. Buttonholes should be approx. at center of pillow.
Mark areas on Panel A where buttons will be sewn. Sew on buttons by threading both loose ends from buttons on either side of a sc st and knot in place.
Weave in loose ends. Button closed.
Tack corners at buttonhole ends of Panel B to Panel A (it is not necessary to secure the entire area where Panel B overlaps Panel A).
Finishing
Rnd 1: With WS tog, pin Front and Back tog.
With Front side facing and working through both thicknesses, join A with sl st in last ch of any ch-2 corner sp, sl st in next sc, (sl st in next ch-1 sp, sl st in next sc) across to next corner, sl st in each ch of corner ch-2 sp. Continue working around in same fashion easing sides of Panel A and B to fit Front (Back panels may stretch lengthwise due to stitch pattern used).
To reduce bulk in seam where Back panels overlap, crochet Front to just Panel B, ending with sl st in first ch of corner ch-2 sp.
Fasten off. Thread tail end under first sl st and then back through center of last sl st made.
Weave in loose ends. Insert pillow form and button closed.
I guess it’s time to let my subscription expire because I can’t, except for the main photo, print the additional pattern photos any longer so I don’t have stitch or button placement for the back or the “how to” photos. So sad.
Hi Ellen, I believe we made this change because consumers were writing to us about the additional photos using up too much printer ink. However, I completely understand your point of view as well! Though not an easy solution, you are welcome to right click and copy or save the additional photos and print them out individually or in a word doc and print from there.
I apologize for the inconvenience and I hope this suggestion helps! – Nicola, Editor
Thank you for the images showing how to do the embroidery. Much appreciated!
This pillow pattern is awesome and can be used with many other colors for any decor. The ease of the embroidering is also a plus for this pillow cover.