


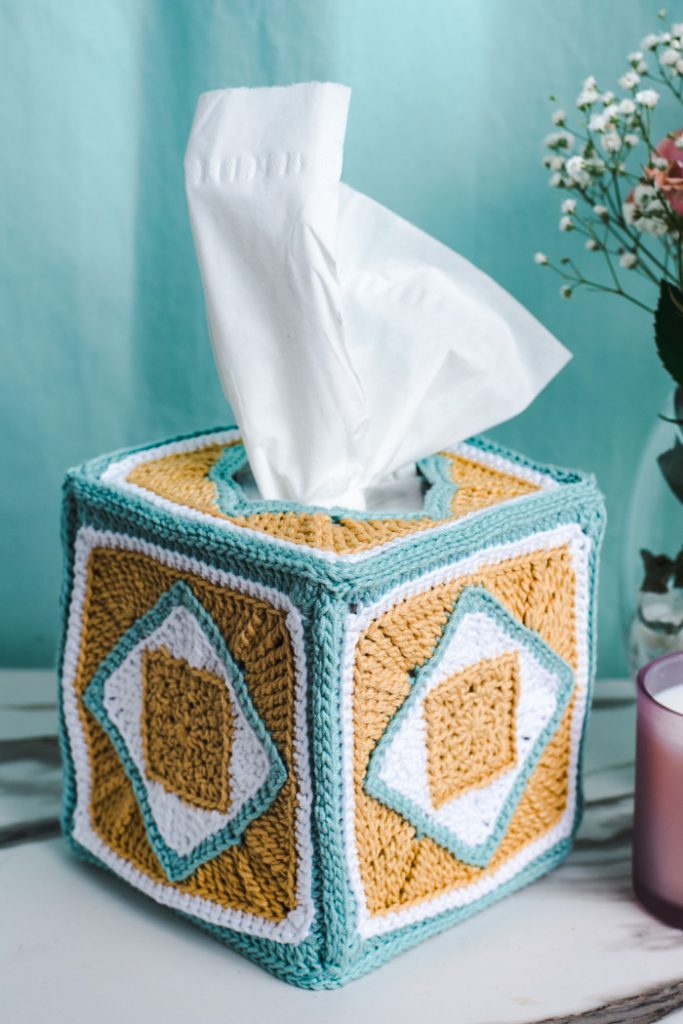
Bring a modern twist to a beloved crochet classic with the Granny Square Tissue Topper, designed to update the timeless granny square motif. This topper features a square-within-a-square design, giving the traditional pattern a fresh, contemporary flair. It’s perfect for adding a splash of color and whimsy to any room in your home, whether it’s the living room, bathroom, or office.
Crafted to fit boutique-sized tissue boxes, this crochet tissue topper brings both charm and practicality, transforming an everyday item into a piece of art. The intricate yet easy-to-follow stitch pattern ensures a satisfying project that adds personality and a touch of handmade elegance to your décor. Whether you’re looking to brighten up a space or give a thoughtful gift, this modern update on a crochet classic is the perfect finishing touch.
Skill Level: Intermediate
Size: Fits standard boutique style tissue box
Gauge: Rnds 1-3 = 1.75” x 1.75” square
Materials
 Yarn: Omega Sinfonia (100% Cotton; 218 yards [199 meters]/100 grams):
#817 lt. teal (C1, 1 skein), #869 gold (C2, 1 skein), #801 white C3, 1 skein)
Hook: US size C/2 (2.75mm)
Notions: Tapestry needle
Special Stitches
Extended treble crochet (ext tr)
Double treble crochet (dtr)
Extended double treble crochet (ext dtr)
Treble treble crochet (trtr)
Pattern Notes
Joins at end of rounds made with a sl st are not counted in stitch counts.
Slip stitches are included in stitch counts and are worked into as sts where indicated.
Slip stitches used to join ends of rounds are not included in stitch counts.
Back loop is farthest away loop at top of indicated stitch.
Front loop is closest loop at top of indicated stitch.
Use the invisible join to join rnds.
At the ends of some rounds, the work is turned to the other side. Pay careful attention to whether or not the work is turned at the end of a round.
Pattern
Side Squares (make 4)
Rnd 1 (WS): With C2, ch 4 (first 3 chs count as first dc), 2 dc in 4th ch from hook, ch 1, [3 dc, ch 1 in same ch] 3 times, join with sl st to top of beg ch-3. (12 dc)
Rnd 2: Ch 1, sc in same st as join, (hdc, ch 1, hdc) in next st, sc in next st, ch 1, sk next ch-1 sp, [sc in next st, (hdc, ch 1, hdc) in next st, sc in next st, ch 1, sk next ch-1 sp] around, join with sl st to first sc, turn. (16 sts)
Rnd 3: Ch 2, hdc in next ch-1 sp, hdc in next 2 sts to corner ch-1 sp, (2 hdc, ch 1, 2 hdc) in ch-1 sp, [hdc in each of next 2 sts, hdc in next sl st, hdc in each of next 2 sts to next ch-1 corner sp, (2 hdc, ch 1, 2 hdc) in ch-1 sp] 3 times, join with a sl st to top of beg ch-2. Do not turn. Fasten off. (36 sts)
Rnd 4 (RS): With C3, slip knot on hook and working in back lps only, sl st to any ch-1 corner sp, [sc in next st, hdc in next st, dc in next st, tr in next st, (2 dtr, ch 1, 2 dtr) in next ch-1 sp (corner made), tr in next st, dc in next st, hdc in next st, sc in next st, [sl st in next corner ch-1 sp, sc in next st, hdc in next st, dc in next st, tr in next st, (2 dtr, ch 1, 2 dtr) in next ch-1 sp, tr in next st, dc in next st, hdc in next st, sc in next st] 3 times, join with sl st in first sl st of rnd, turn. Fasten off. (52 sts)
Rnd 5 (WS): With C1, sc join to any ch-1 sp corner, working in front lps only, (sc, ch 1, 2 sc) in same ch-1 sp, sc in each st to next ch-1 corner sp, [(2 sc, ch 1, 2 sc) in next ch-1 sp, sc in each st to next ch-1 corner] around, join with sl st to first sc of rnd. Fasten off. Turn to RS. (68 sc)
Rnd 6 (RS): With C2 and working in back lps only, sl st join in any corner ch-1 sp, [sc in next st, hdc in next st, dc in next st, tr in next st, ext tr in next st, dtr in next st, ext dtr in next st, trtr in next st, (2 trtr, ch1, 2 trtr) in next ch-1 corner sp, trtr in next st, ext dtrc in next st, dtr in next st, ex tr in next st, tr in next st, dc in next st, ext hdc in next st, hdc next st, sc in next st, sl st in next st] 4 times, ending with sl st in first sl st, turn. Fasten off. (84 sts)
Rnd 7 (WS): Working in front lps only, sc join white to any ch-1 corner sp, (sc, ch 1, 2 sc) in same ch-1 sp, sc in each of next 9 sts, sc in sl st, sc in each of next st across to next ch-1 sp, (2 sc, ch 1, 2 sc in next ch-1 sp) sc in each st across to next ch-1 sp] around, join to first sc, turn. Fasten off. (100 sc)
Rnd 8 (Uneven edging): Working in back lps only, hdc join C1 to any ch-1 corner sp, (hdc, ch 1, 2 dc) in same ch-1 sp, dc in each st across to next corner ch-1 sp, (2 dc, ch 1, 2 hdc in next ch-1 sp), hdc in each st across to next ch-1 sp, (2 hdc, ch 1, 2 dc) in ch-1 sp, dc in each st across to next ch-1 sp, (2 dc, ch 1, 2 hdc) in ch-1 sp, hdc in each st across, join to first hdc of rnd, turn. Fasten off. (116 sc)
Note: Dc sts are top and bottom edges of square and hdc sts are side edges.
Top Square
With C2, ch 56, join to form a ring.
Rnd 1: Ch 1, sc in same st as join, sc in each of next 6 chs, [(2 sc, ch 1, 2 sc) in next ch, sc in each of next 13 chs] 3 times, (2 sc, ch 1, 2 sc) in next ch, join to first ch of rnd. (68 sc)
Rnds 2-3: Rep Rnds 6-7 same as for Side Squares.
Rnd 4: Sc join C1 to any corner ch-1 sp, (sc, ch 1, 2 sc) in same ch-1, [sc in each st across to next ch-1 sp, (2 sc, ch 1, 2 sc) in ch-1 sp] 3 times, sc in each st across, join to first sc of rnd. Fasten off.
Block all Side Squares to meas 4.75” wide (hdc stitched sides) x 5.25” high (dc stitched edges) and Top Squares to meas 4.75” x 4.75”. Allow to thoroughly dry.
Assembly
- Place side hdc sts of 2 squares with WS together, inserting hook through both layers with C1 sl knot on hook, sl st to any ch-1 corner, sl st with even tension in same manner to opposite end of side edge. Fasten off. Rep to join all 4 granny square sides of tissue topper together.
- Place Top Square with WS together with top edges of all 4 squares, pinning if necessary. With RS of top facing and inserting hook in same manner as above, sl st top to squares, easing if necessary. Fasten off.
Finishing
Bottom Edging
Rnd 1: With RS facing and working in back lp only, join C1 with sl st to back lp of any st at bottom edge, skipping ends of side seams, sl st with even tension in sts at around bottom edge to first st of rnd. Do not join.
Rnd 2: Sl st with even tension in back lp only of each st around, join to first st of rnd. Fasten off.
Weave in all ends.