


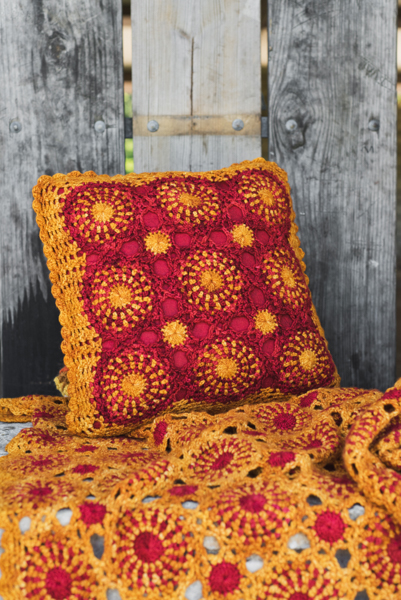
Chrysanthemum motifs seem to bloom out of the pillow on this beautiful fall design. The bright pops of color will transport the brilliance outdoors to the inside of your home when you work up the easily joined motifs.
Skill Level: Intermediate
Size: 18” square
Gauge: Larger Motif = approx. 5” wide, unblocked and before joining
Gauge is not critical for this project
Materials
Yarn: Malabrigo Yarn Merino Worsted (100% Merino Wool; 210 yards [192 meters]/100 grams): 102 Sealing Wax (MC), 2 skeins; 096 Sunset (CC), 2 skeins
Hook: US size H/8 (5 mm)
Notions: Removable markers (or safety pins); tapestry needle; 18” square pillow form; 5/8 yards red wool blend felt; thread to match felt; sewing needle.
Special Stitches
Standing sc st (Standing single crochet stitch): With slip knot on hook, insert hook into designated st, yo, pull lp through, yo, pull through both lps on hook completing the Standing sc st.
Pattern Notes
Color changes are made by removing hook and placing loop on a removable marker so that yarn can be carried up the back on alternate rounds minimizing the number of ends to weave in later.
Pattern
Larger Motif (make 9 for each side)
With CC, make magic ring.
Rnd 1: Ch 3 (counts as first dc), work 15 dc in ring, sl st in top of first dc, remove hook and place loop on removable marker, hold in back, pull magic ring tight – 16 dc.
Rnd 2: With MC, start with a standing sc st on opposite side of where Rnd 1 ended, ch 1, (sc in next st, ch 1) 15 times to end, sl st in top of first sc, remove hook and place loop on removable marker, hold in back.
Rnd 3: Remove removable marker from Rnd 1 and insert hook in loop, ch 1, sc in ch-1 sp made in Rnd 2 that is directly above last st made in Rnd 1, ch 1, (sc in next sp, ch 1) 15 times to end, sl st in top of first sc, remove hook and place loop on removable marker, hold in back.
Rnd 4: Remove removable marker from Rnd 2 and insert hook in loop, ch 1, sc in ch-1 sp made in Rnd 3 that is directly above the st made in Rnd 2, ch 2, (sc in next sc, ch 2) 15 times to end, sl st in top of first sc, remove hook and place loop on removable marker, hold in back.
Rnd 5: Remove removable marker from Rnd 3 and insert hook in loop, ch 1, sc in ch-2 sp made in Rnd 4 that is directly above the st made in Rnd 3, ch 2, (sc in next sc, ch 2) 15 times to end, sl st in top of first sc. Fasten off.
Rnd 6: Remove removable marker from Rnd 4 and insert hook in loop, ch 1, sc in ch-2 sp made in Rnd 5 that is directly above the st made in Rnd 4, ch 3, sc in same sp, (sc in next sp, ch 3, sc in same sp) 15 times to end, sl st in first sc.
Rnd 7: Sl st in next sp, ch 1, sc in same sp, ch 3, sc in same sp, (sc in next sp, ch 3, sc in same sp) 15 times to end, sl st in first sc. Fasten off.
Note: The above instruction for Rnd 7 is for the first motif only. Connecting motifs are joined as follows:
Rnd 7 (Connecting Rnd): Work same as Rnd 7 above until reaching side of motif to join, (sc in next sp, ch 1, remove hook from loop and insert hook (front to back) in corresponding ch-3 sp on motif being joined, insert hook into loop and draw through ch-3 sp, ch 2, sc in same sp) twice, motifs are now joined on one side. Continue around as written in Rnd 7 above. If more motifs need to be joined, rep between ( ), ending with sl st in first sc. Fasten off.
Note: All Large Motifs are joined at the top, bottom, and sides in 2 adjacent ch-3 loops. There will always be 2 unjoined ch-3 loops between joins of Larger Motifs. These free-standing ch-3 loops will later be joined to Smaller Motifs.
Connecting Larger Motifs
Work 3 Larger Motifs and join across to create the first row. On the second row, the first motif will be joined to the side of the last motif on the bottom. The next motif will be joined to the top of the first motif from Row 2 and then to the side of second motif from Row 1. The third motif will be joined to the top of the motif in Row 2 and the side of the top motif on Row 1. Join the last three motifs in the same manner as Row 2. Weave in ends.
Smaller motif (make 4 for each side)
With CC, make magic ring.
Rnd 1: Ch 3 (counts as first dc), work 15 dc in ring, sl st in top of first dc. Fasten off. Pull magic ring tight – 16 dc.
Rnd 2 (Connecting Rnd): With MC, make a standing sc st in any dc in Rnd 1, (sc in next dc, ch 2, remove hook from loop and insert hook (front to back) in corresponding ch-3 loop of Larger Motif being joined, insert hook into loop and draw through ch-3 sp, ch 2, sc in next dc of Smaller Motif) 8 times, ending with sl st in first sc. Fasten off. Weave in ends.
Border (both sides of pillow)
Rnd 1: Make a standing sc st in any center motif, counting 3 ch-3 sps from left where center and corner motif are joined, ch 3, sc in same sp, (sc in next sp, ch 3, sc in same sp) around, sl st in first sc.
Note: Do not work in area where motifs are joined. There will be 6 ch-3 sps in center motifs and 10 ch-3 sps in corner motifs.
Rnd 2: Sl st in next sp, ch 1, sc in same sp, ch 3, sc in same sp, sc in next sp, ch 3, sc in same sp, [(sc in next sp, ch 4, sc in same sp) twice (the ch-4 sps are made in the last and first open ch-3 sps of the two joined motifs), (sc in next sp, ch 3, sc in same sp) 4 times, ch 3 (corner made), (sc in next sp, ch 3, sc in same sp) 4 times, (sc in next sp, ch 4, sc in same sp) twice, (sc in next sp, ch 3, sc in same sp) 4 times] 4 times, ending with sc in next sp, ch 3, (sc in same sp) twice, sl st in first sc.
Rnd 3: Rep Rnd 2, working (sc, ch 4, sc in same sp) in corner sp.
Rnd 4: Sl st in next sp, ch 1, sc in same sp, ch 3, sc in same sp, [(sc in next sp, ch 3, sc in same sp) to next corner, (sc, ch 5, sc) in corner sp] 4 times, (sc in next sp, ch 3, sc in same sp) to end, sl st in first sc.
Rnd 5: Sl st in next sp, ch 1, sc in same sp, ch 3, sc in same sp, [(sc in next sp, ch 3, sc in same sp) to next corner, (sc, ch 3, 2 sc, ch 3, sc) in corner sp] 4 times, (sc in next sp, ch 3, sc in same sp) to end, sl st in first sc. Fasten off. Weave in ends.
Pillow Liner
Cut two 18¼” squares from felt. Using something round (like a coffee mug) as a guide, place guide in corner of squares and trace around so that each corner maintains the same roundness as the blocked pillow’s corners. Sew together with 3/8” seam allowance leaving one side open between sewn corners. Clip seam, turn inside out. Insert pillow form and sew closed.
Finishing
Block both sides approx. 17” square
Note: Pillow has negative ease so that it will lie flat and tight over pillow form.
With WS together, use removable markers or safety pins to hold pillow front and back in place. The edging rnd is worked through both sides at the same time so each sp must align exactly.
Edging Rnd (worked through both sides of pillow at the same time)
With CC, make a standing sc st in any ch-3 sp, (hdc, dc, hdc, sc) in same ch-3 sp, *(sc, hdc, dc, hdc, sc) in next sp; rep from * until 3 sides of the pillow have been worked together.
Insert pillow form and continue in pattern to end. Sl st in first sc.
Fasten off. Weave in ends.
Thank you very much – by chance I have many red and yellow yarns and now I think this patterns will good for me!
Have a nice week!
Marianne