


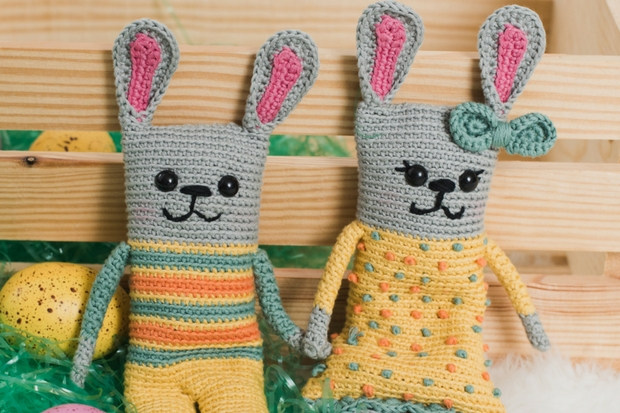
Stuffed with plastic granules and lavender, these bunnies are the perfect anti-stress toy and the most beautiful lavender bags. When crocheted with a worsted weight yarn and stuffed with normal stuffing, they transform in the cutest amigurumi toys.
Skill Level: Easy
Size: approximately 10.5”
Gauge: 30 sts and 28 rows = 4” [10 cm] in backloop sc st
Materials
 Yarn: DMC Natura Just Cotton (100% Cotton; 170 yards [155 meters]/50 grams): 09 Gris Argent (MC, 1 ball), 16 Tournesol (CC1, 1 ball), 52 Geranium (CC2, 1 ball), 20 Jade (CC3, 1 ball), 47 Safran (CC4, 1 ball), 11 Noir (CC5, 1 ball)
Hook: US size 11/2 (2.5 mm)
Notions: Tapestry needle, 2 pair of 9 mm black safety eyes, 4 tbsp plastic granules, 3 tbsp dried lavender, 1 mini pompon maker (or another tool to help you make a tiny pompon), 1 removable stitch marker to mark the end of the round
Special Stitches
3 sc inc: Make 3 sc in next st.
sc inc: Make 2 sc in next st.
shell st: *Sk 2 sts, 5 dc in the next st, sk 2 sts, sc in next st; rep from *.
Pattern Notes
The rabbits are worked with the join as you go technique, except for some tiny details like the bow and the ears. The face and the dots are embroidered on afterwards. The blush on the cheeks is simply done with some cosmetic blush.
For the arms you’ll need to go through both layers of the arm and the next stitch on the body.
For the main shape of Robin the Rabbit there’s no need for decreases and increases, which is what makes this pattern suitable for a beginner.
The crocheted fabric of the ears is quite firm. Sewing them into place might be easier with a sharp needle.
Working through the back loops only gives these cuties a more modern and distinct look. The minimalistic shape also adds to this.
CC2, CC4 and CC5 – you don’t need much of these colors, a leftover of approximately 10g should suffice.
Robin the Rabbit Pattern
Arms
With MC.
Rnd 1: Work 6 sc in a magic loop. (6 sc)
Rnds 2-4: Sc in each st around. (6 sc)
Rnds 5-14: With CC3, sc in each st around. (6sc)
Legs
With MC, ch 10.
Rnd 1: Sc in the 2nd ch from hook, sc in next 7 sts, 3 sc inc in the next st, work in the other side of ch, sc in next7 sts, sc inc in next st. (20 sc)
Rnds 2-5: Sc in each st around. (20 sc)
Rnd 6: Change to CC1, sc in eacht st around. (20 sc)
Rnds 7-20: Sc in each st around. (20 sc)
Rnd 21: Sc in next 3 sts, leaving rem sts unworked.
Fasten off the first leg. Do not fasten off the second leg.
Body
Cont with Rnd 21 of second and first leg.
Rnd 21: Join the two legs, sc in every st of the first leg, cont to sc in every st of the second leg (40 sc)
Rnds 22-25: Sc in each st around. (40 sc)
Rnds 26-27: *With CC3, sc in every st around. (40 sc)
Rnd 28: With CC1, sc in every st around. (40 sc)
Rnd 29-30: With CC4, sc in every st around. (40 sc)
Rnd 31: With CC1, sc in every st around. (40 sc)
Rnds 32-37: Rep Rnds 26-31 once more.
Rnds 38-39: With CC3, sc in every st around. (40 sc)
Rnd 40: With CC1, sc i next 9 sts, join one arm with sc in 3 sts, sc in next 18 sts, join the other arm with sc in 3 sts, sc in next 7 sts. (40 sc)
Rnds 41-55: With MC, sc in every st around. (40 sc)
Rnd 56: Sc in next 12 sts, leaving rem sts unworked.
Fasten off, leaving a long tail.
Ears – part 1
With CC2, make 2.
Ch 11.
Row 1: Sc in the 2nd ch from hook, sc in next 6 ch, hdc in next 2 ch, 3 hdc inc in the last ch, work in the opposite side of the ch, hdc in next 2 ch, sc in next 7 ch. (21 sc)
Fasten off.
Ears – part 2
With MC, make 2.
Ch 11.
Row 1: Sc in the 2nd ch from hook, sc in next 6 ch, hdc in next 2 ch, 3 hdc inc in the last ch, work in the opposite side of the ch, hdc in next 2 ch, sc in next 7 ch. (21 sc)
Row 2: Join Ears Part 1 and Part 2 by going through both loops of the first st of Ear_Part 2 and the front loop of first st of Ear_Part 1, sc in next 10 sts, 3 sc inc, sc in next 10 sts, turn. (23 sc)
Row 3: sc in next 7 sts, hdc in next st, hdc inc in next st, hdc in next st, (hdc inc in next st) 3 times, hdc in next st, hdc inc in next st, sc in next 7 sts (27 sc)
Fasten off, leaving a long tail.
Fold the sides of Ear to the center and secure with 3 sts.
Put the Ears in between the two layers of Head (one in every corner), attach with 3 to 4 sts.
Tail
Use a mini pompon maker to make the tail.
Attach the tail on Row 24 of Bunny.
Finishing
Place the eyes on Row 47 and leave 5 sts in between the two eyes.
Use the picture as a guideline to embroider the face.
Stuff Bunny with 2 tbsp of plastic granules, 2 tbsp of dried lavender and top off with 1 tbsp plastic granules. Your bunny should be lightly stuffed until right below the nose. This gives the stuffing room to move around and makes the bunny squishable. If necessary add a bit more plastic granules.
Sew Head close. Use a tiny bit of blush for the cheeks of the rabbit.
Fasten off and hide all tail ends inside Body of the rabbit.
Rita the Rabbit Pattern
Repeat instructions of Robin the Rabbit Arms, Ears, Tail, and Finishing.
Legs
With MC, Ch 10.
Rnd 1: Sc in 2nd ch from hook, sc in next 7 ch, 3 sc inc, work in the other side of the ch, sc in next 7 ch, sc inc. (20 sc)
Rnds 2-14: Sc in each st around. (20 sc)
Rnd 15: Sc in next 3 sts, leaving rem sts unworked.
Fasten off the first leg. Do not fasten off the second leg.
Body
With CC1, cont on Rnd 15 of the second and first leg.
Rnd 15: *Join the two legs, sc in first 10 sts of the first leg, ch 6, sc in 2nd ch from hook, sc in the next 4 ch, sc in next 10 sts of the first leg; rep from * once for the second leg. (40 sc, 2 ch 6 with 5 sc)
Rnd 16: *Sc in next10 sts, sc in next 4 ch, sc inc in last ch, work in the sc on the other side of ch, 15 sc; rep from * once more. (62 sc)
Rnd 17: Sc in next 15 sts, sc dec, sc in next 29 sts, sc dec, sc in next 14 sts. (58 sc, 2 sc dec)
Rnd 18: Sc in next 14 sts, sc dec, sc in next 28 sts, sc dec, sc in next 14 sts. (56 sc, 2 sc dec)
Rnd 19: Sc in next 14 sts, sc dec, sc in next 27 sts, sc dec, sc in next 13 sts. (54 sc, 2 sc dec)
Rnd 20: Sc in next 14 sts, sc dec, sc in next 26 sts, sc dec, sc in next 12 sts. (52 sc, 2 sc dec)
Rnd 21: Sc in next 14 sts, sc dec, sc in next 25 sts, sc dec, sc in next 11 sts. (50 sc, 2 sc dec)
Rnd 22: Sc in next 13 sts, sc dec, sc in next 24 sts, sc dec, sc in next 11 sts. (48 sc, 2 sc dec)
Rnd 23: Sc in next 12 sts, sc dec, sc in next 23 sts, sc dec, sc in next 11 sts. (46 sc, 2 sc dec)
Rnd 24: Sc in next 11 sts, sc dec, sc in next 23 sts, sc dec, sc in next 10 sts. (44 sc, 2 sc dec)
Rnd 25: Sc in next 11 sts, sc dec, sc in next 21 sts, sc dec, sc in next 10 sts. (42 sc, 2 sc dec)
Rnd 26: Sc in next 11 sts, sc dec, sc in next 21 sts, sc dec, sc in next 8 sts. (40 sc, 2 sc dec)
Rnd 27: Sc in next 11 sts, sc dec, sc in next 19 sts, sc dec, sc in next 8 sts. (38 sc, 2 sc dec)
Rnds 28-39: Sc in next 40 sts. (40 sc)
Rnd 40: Sc in next 9 sts, sc in next 3 sts to join one arm, sc in next 18 sts, sc in next 3 sts to join the other arm, sc in next 7 sts. (40 sc)
Rnds 41-55: With MC, sc in every st around. (40 sc)
Rnd 56: Sc in next 12 sts, leaving rem sts unworked.
Fasten off, leaving a long tail.
Bow (make 2)
Rnd 1: With CC3, work 6 sc in a magic loop. (6 sc)
Rnd 2: Sc inc in every st around. (12 sc)
Rnd 3: *Sc in next st, sc inc; rep from * 5 more times. (18 sc)
Fasten off, leaving a long tail.
Fold the sides of the circle to the center and secure with 3 sts. Sew the two circles together, this is the center of your circle. Wrap the remaining yarn a few times around the center and attach the Bow with a few sts to Head. Work tails to the inside of Head.
Finishing techniques dress
Dress
Border
With CC3, join with sl st in the front loop of the first st of Rnd 16.
Sc in same st, make 9 shell sts, sk next 2 sts, sc in next st, sk next 2 sts, 9 dc in next st, sk next 2 sts, sc in next st, sl st in first sc made. (10 shell st, 11 sc)
Polka dots
Cut a long tail of CC3 and CC4. Randomly place some french knots on the dress.
To make a french knot insert your needle through a stitch and come back up, wrap the yarn 3 times around your needle, insert the needle right beside the place where you came up with the needle. Skip a few stitches and come back up with your needle in the next place where you want to make a french knot. Gently pull your yarn to form the knot. Repeat this proces as much as you like.
View this post on Instagram