


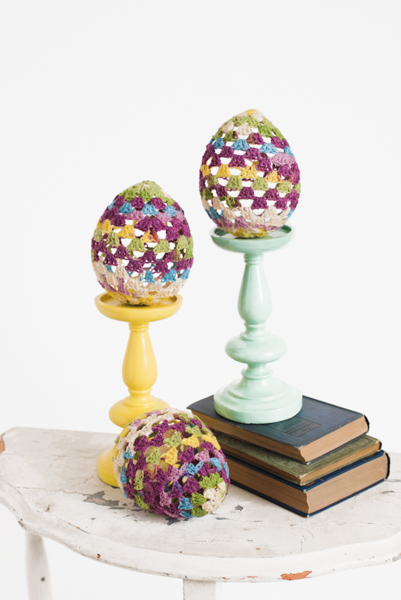
Crochet your own version of the classic Faberge egg. Worked around a water balloon and then stiffened, these eggs are a fun spring project and a great way to showcase beautiful leftover sock yarn.
Skill Level: Easy
Size: 6” tall x 4” wide
Gauge: 18 sts and 24 rows = 4” [10 cm] in St st after wet blocking
Materials
 Yarn: Patons Kroy Socks (75% Washable wool, 25% Nylon; 166 yards [152 meters]/50 grams): #55315 Sweet Stripes (MC, 1 ball).
Hook: US size G/6 (4.0 mm)
Notions: Tapestry needle, Elmer’s Glue or Mod Podge, water balloons (no more than 6” tall when blown up), water, sponge, straight pin
Pattern Notes
This pattern is worked from the top down, fat end of the balloon first.
Once work is wrapped around balloon, be careful not to pop balloon with hook or needle.
One ball of yarn makes 3 eggs at suggested size.
Pattern
Ch 4.
Rnd 1: Work 11 dc in 4th ch from hook, sl st in 3rd ch to join. (12 sts)
Rnd 2: Ch 3, 2 dc in same st, sk next st, *3 dc in next st, sk next st; rep from * around, sl st to join. (6 3-dc clusters)
Fasten off. Weave in starting tail.
Rnd 3: Sl st in next 2 sts to reach sp between clusters, ch 3, (2 dc, ch 2, 3 dc) in same sp, ch 2, 3 dc in next sp between clusters, *ch 2, (3 dc, ch 2, 3 dc) in next sp between clusters, ch 2, 3 dc in next sp between clusters; rep from * once more, ch 2, sl st in first st to join. (9 3-dc clusters)
Rnds 4-6: Sl st in next 2 sts to reach ch- sp, (ch 3, 2 dc) in same ch-sp, ch 2, *3 dc in next ch-2 sp, ch 2; rep from * around, sl st in first st to join. (9 3-dc clusters)
Rnd 7: Sl st in next 2 sts to reach ch-sp, ch 3, (2 dc, ch 2, 3 dc) in same sp, ch 2, (3 dc in next ch-2 sp, ch 2) twice, *(3 dc, ch 2, 3 dc) in next ch-2 sp, ch 2, (3 dc in next ch-2 sp, ch 2) twice; rep from * once more, sl st in first st to join. (12 3-dc clusters)
Rnds 8-13: Sl st in next 2 sts to reach ch-sp, ch 3, 2 dc in same ch-2 sp, ch 2, *3 dc in next ch-2 sp, ch 2; rep from * around, sl st in first st to join. (12 3-dc clusters)
Insert inflated balloon’s small side with knot into the piece and work the decrease rows around it so that the work closes with the balloon inside.
Add more rows here if needed to cover balloon up to where it begins to narrow again. The work should be tight around the balloon, but not squeezing it enough to risk popping.
Rnd 14: Sl st in next 2 sts to reach ch-sp, ch 3, sk next ch-2 sp, dc in next ch-2 sp, ch 2, 3 dc in next ch-2 sp, ch 2, *dc in next 2 ch-2 sp, ch 2, 3 dc in next ch sp, ch 2; rep from * twice more, sl st in 3rd ch to join. (4 3-dc clusters, 8 dc)
Rnd 15: Sk next sp between dcs, sl st in next ch-2 sp, ch 3, 2 dc in same ch-sp, ch 2, 3 dc in next ch-2 sp, ch 2, *sk next 2 dc, 3 dc in next ch-2 sp, ch 2, 3 dc in next ch-2 sp, ch 2; rep from * twice more, sl st in first st of 3-dc cluster to join. (8 3-dc clusters)
Note: You will have skipped every sp between the dcs and worked in every ch-2 sp between clusters. Decrease row complete.
Rnd 16: Sl st in next 2 sts to reach ch-sp, ch 3, dc in same ch-sp, *2 dc in next ch-2 sp; rep from * 6 more times. (16 dcs)
Fasten off leaving long tail for sewing. Thread yarn through back loops of remaining 16 sts. Pull tight to close around balloon.
Weave in ends, taking care not to pop balloon with yarn needle.
Finishing
Stiffening
- Mix one part Glue/Mod Podge and one part water in a shallow bowl.
- Using sponge, dab glue mixture onto work until fully saturated.
- Place egg on the edges of a small bowl or cup to dry.
- Dry for 24 hours, rotating every few hours. Egg should be hard.
- Rep Steps 1-4 of your egg desire.
- With a pin, gently pop the balloon. Use the pin to fish out the popped balloon from one of the chain spaces.
Tips
- Make sure that the work is completely dry before popping the balloon. Also try to pierce the balloon slowly so it pops with less force. This will prevent the work from collapsing when the balloon is popped.
- Stiffen the work within 24 hours of blowing up the balloon. The balloons begin to sag within the work if you don’t use them right away, which can mess up the shape during stiffening.
- To store, put in a small box with very little space around it, like a gift box or shoe box, then put in larger decoration box. This keeps the eggs from being crushed by big ceramic bunnies (from experience).