


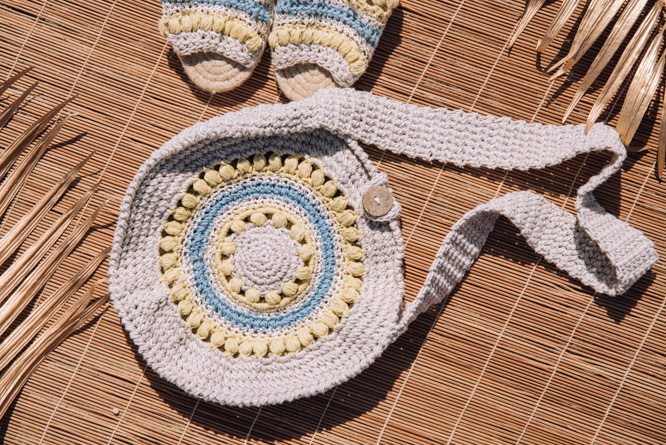
The Maya Mandala Crochet Bag combines textured stitches and colored lines with subtle accents of glassy beaded yarn to create a one-of-a-kind boho style accessory. Once you’ve finished your bag, use the remaining yarn to make a matching pair of Maya Espadrilles Sandals.
Time: 10-14 Hours Pattern
Skill Level: Easy
Size: 10” (15”) [25.4 (38.1) cm] diameter.
Shown is size 10”.
Gauge: 18 sts and 15 rows = 4” [10 cm] in tight Special Single Crochet 2 Together (sp-sc2tog) st with MC. (Gauge is not that crucial for this project)
Materials
Yarn:
 Garnstudio DROPS Bomull-Lin (53% cotton, 47% linen; 93 yards [85 meters]/50 grams): 03 light beige (MC, 2 (3) balls)

Garnstudio DROPS Belle (53% cotton, 33% viscose, 14% linen; 131 yards [120 meters]/50 grams): 04 dandelion (CC1, 1 ball), 13 dark jeans blue (CC3, 1 ball).

Rosários 4 Paillettes (100% polyester; 150 yards [137 meters]/25 grams): 01 (CC2, 1 ball)
Hook: US size US E/4 (3.5 mm).
Notions: Tapestry needle, one 1” button.
Special Stitches
Buttonhole loop: Place st markers where you want to start and finish the loop. Connect both marked sts with a chain long enough to go over the button, taking into account that the loop will stretch slightly with use. Turn, dc/sc in marked st, dc/sc around chain to fill loop, dc/sc in marked st. Fasten off.
Crab stitch (crab st): *Insert hook in next st to the right, yo, pull up a lp, yo, draw through both lps on hook; rep from * in each sc around, sl st in first st to join.
Puff stitch (puff st): [Yo, insert hook in indicated st, yo again and draw a lp through] 5 times, yo and draw through all 11 lps on hook, ch 1.
Special Single Crochet 2 Together (sp-sc2tog): Insert hook in last st worked, yo, pull up a lp (2 lps on hook), insert hook in next st, yo, pull up a lp (3 lps on hook), yo and draw through all 3 lps on hook. This variation of the classic sc2tog will allow you to keep the same number of sts in the row/round.
Pattern Notes
This pattern is worked flat, in the round for the sides and in rows for the strap. One button will serve as a closure.
Chains at the beginning of rounds do not count as sts.
Rounds are joined with sl st unless otherwise stated.
Pattern
Sides (make 2)
With MC, make magic ring.
Rnd 1: Ch 1, 12 sc in ring, join with sl st to beg sc. (12 sts)
Rnd 2: Ch 1, *2 sc in next st, sc in next st; rep from * to end, join. (18 sts)
Rnd 3: Ch 1, * 2 sc in next st, 1 sc, 1sc; rep from * to end, join. (24 sts)
Rnd 4: Ch 1, sc2tog, sp-sc2tog to end, working last sp-sc2tog over last st of rnd and first st of next rnd, join. (24 sc2togs)
With CC1
Rnd 5: Sl st in next st, *puff st in next st, sk next st, ch 2; rep from * to end, join. (12 puff sts)
Rnd 6: Ch 1, [4 sc in next ch-2 sp] to end, join. (48 sts)
With CC2
Rnd 7: Ch 2, *sc in next st, ch 1; rep from * to end, join. (48 sts, 48 ch)
Rnd 8: Rep Rnd 7.
With CC3
Rnd 9: Skipping ch-1 sps, ch 1, *2 sc in next sc, sc in next 3 sc; rep from * to end, join. (60 sts)
Rnd 10: Rep Rnd 4. (60 sc2togs)
With CC2
Rnds 11-12: Rep Rnds 7-8. (60 sts, 60 ch)
With CC1
Rnd 12: Rep Rnd 9. (75 sts)
Rnd 13: Rep Rnd 5. (37 puff sts)
With MC
Rnd 14: Ch 1, [3 sc in next ch-2 sp] to end, join. (111 sts)
Rnds 15-18: Rep Rnd 4. (111 sc2togs)
For size M only:
Rnds 19-23: Rep Rnd 4.
Rnd 24: Ch 1, *2 sc in next sc, sc in next 3 sc; rep from * to last 3 sts, sc in last 3 sc, join. (138 sts)
Rnds 24-29: Rep Rnd 4. (138 sc2togs)
All sizes:
Fasten off.
Strap
With MC, ch 7 (10).
Row 1: Ch 1, sc2tog, 5 (8) sp-sc2tog, sc in last st, turn. (7 (10) sts)
Rep Row 1 until strap measures 50” (70”) or desired length, keeping in mind that the strap will stretch once weight is added to the bag. Fasten off.
Finishing
Using tapestry needle, sew short edges of strap together to form a ring, making sure strap is not twisted.
Join strap and sides
Hold one side and strap with WS together.
Rnd 1: With RS facing and working through both thicknesses, join MC with sl st at any point, work in crab st to join both pieces for approximately ¾ of the circumference then continue with crab st only along the side’s remaining edge to the end of the circumference. Fasten off.
Rep Rnd 1 for the other side of the bag.
Place a buttonhole loop in the top edge of one of the sides. Sew a button aligned with the buttonhole on the opposite side (RS).
Weave in all ends. Blocking/ironing is optional, but I recommend it for a better finished look.
I like making Afghans and Dollies.
Well send me some patterns then.
Hi Betty, you can browse our entire afghans category here: https://www.ilikecrochet.com/category/crochet-afghan-patterns/ Just copy and paste that URL in the browser if the link isn’t clickable. 🙂 As for doilies, we have a few you can check out here: https://www.ilikecrochet.com/?s=doily Enjoy! -Dana, Editor
I like making Afghans and Dollies.
I will have a do making this bag
Wow! I absolutely Love the Look of this,, Retro Cool! I am looking forward to making it,,thanks So Much for the free pattern!