


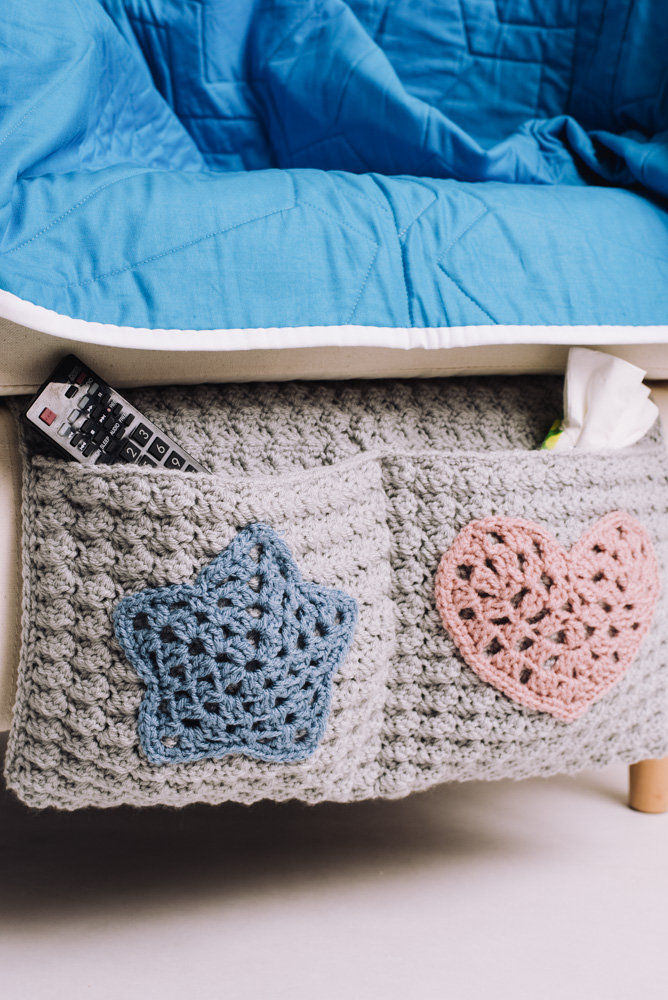
This bed pocket is just right for all those bedside essentials. The simple textured stitch and fun star and heart appliques make it cute and practical for your kids (or yourself) to store things they/you might need in the middle of the night.
Skill Level: Beginner
Size: 18” wide x 15.5” tall
Gauge: 5 sets of pattern stitch (sc 2 dc) and 12 rows = 4” [10 cm]
Materials
 Yarn: Hobby Lobby I Love This Yarn (100% Acrylic; 355 yards [325 meters]/199 grams): 200 Graymist (MC, 2 skeins), 96 Stonewash (C1, 1 skein), 101 Rosy Cheeks (C2, 1 skein)
Hook: US size H/8 (5 mm)
Notions: Tapestry needle, plastic canvas (white or clear – 2 pieces each approx. 6.5” x 10.5”)
Special Stitches
2dc-CL (2 double crochet cluster): Yo, insert hook in next st, yo, pull up a lp, yo, pull through 2 lps, yo, insert hook in same st, yo, pull up a lp, yo, pull through 2 lps, yo, pull through all 3 lps on hook.
Pattern Notes
Pattern is worked back and forth in rows.
Once rectangle is complete, project is folded according to measurements given to create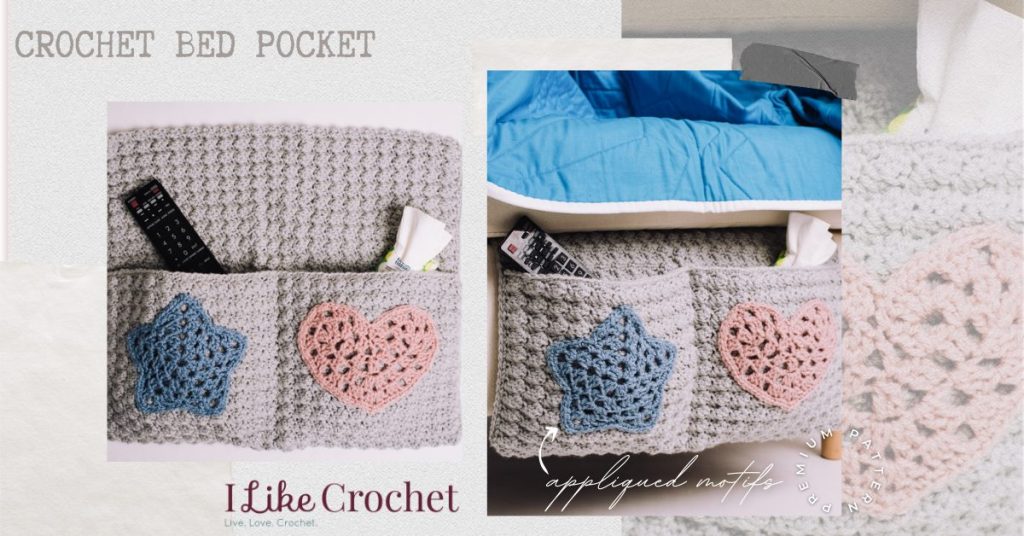 pocket
Pattern
With MC, ch 68.
Row 1: Working in back bar of ch, sc in 2nd ch from hook and in each ch across. Turn. (67 sc)
Row 2: Ch 1, (sc, 2 dc) in first st, *sk next 2 sts, (sc, 2 dc) in next st; rep from * across (22 shells) to last 3 sts, sk next 2 sts, sc in last st. Turn.
Row 3: Ch 1, (sc, 2 dc) in first sc, (sc, 2 dc) in each sc across to last sc, sc in last sc. Turn.
Rep Row 3 until rectangle measures 24” long.
Fasten off.
Star
With C1, ch 4.
Rnd 1: Dc in 4th ch from hook, (ch 3, 2 dc in same ch) 4 times, ch 3, sl st to top of starting ch-3.
Rnd 2: Sl st in next dc and next sp, (ch 3, dc, ch 3, 2 dc) in same sp, (2 dc, ch 3, 2 dc) in each ch-3 sp around, join with sl st in top of starting ch-3.
Rnd 3: Sl st in next dc and next sp, (ch 3, dc, ch 3, 2 dc, ch 2) in same sp, sc in between next 2 sets of 2 dc, (ch 2, 2 dc, ch 3, 2 dc, ch 2) in next ch-3 sp, ch 2, sl st to top of starting ch-3.
Rnd 4: Sl st in next dc and in next sp, (ch 3, dc, ch 3, 2 dc, ch 2) in same sp, (sc in next ch-2 sp) 2 times, *(ch 2, 2 dc, ch 3, 2dc, ch 2) in next ch-3 sp, (sc in next ch-2 sp) 2 times; rep from * around, ending with ch-2, sl st to top of starting ch-3.
Rnd 5: Ch 1, sc in same st, sc in next st, *(2 sc, ch 2, 2 sc) in next ch-3 sp, sc in next 2 dc, 2 sc in next ch-2 sp, sl st in each of next 2 sc, 2 sc in next ch-2 sp, sc in each of next 2 dc; rep from * around, join with sl st to first sc. Fasten off.
Heart
With C2, ch 20.
Row 1: Dc in 4th ch from hook, ch 1, sk next ch, 2 dc in next ch, ch 1, sk next ch, 2 dc in next ch, sk next 3 ch, 2dc-CL, sk next 3 chs, 2 dc in next ch, ch 1, sk next ch, 2 dc in next ch, ch 1, sk next ch, 2 dc in last ch. Do not turn.
Rnd 2: Now working in rnds, ch 3, dc in same st, ch 2, 2 dc in side bottom of last dc of Row 1, (ch 2, 2 dc in next sp) 3 times, ch 2, (2 dc, ch 2, 2 dc) all in ch where 2dc-CL was made, (ch 2, 2 dc in next sp) 3 times, ch 2, 2 dc in bottom side of turning ch from Row 1, ch 2, 2 dc in top of turning ch, (ch 2, 2 dc in next sp) 2 times, dc in center 2dc-CL, (2 dc in next sp, ch 2) 2 times, sl st to starting ch-3.
Rnd 3: Ch 3, 2 dc in same sp, ch 2, (3 dc in next sp, ch 2) 3 times, 3 dc in next sp, (2 dc, ch 2, 2 dc) in next sp (bottom point), (3 dc in next sp, ch 2) 6 times, 3 dc in next sp, sk next 2 dc, sc in next dc (center top), 3 dc in next sp, ch 2, 3 dc in last sp, ch 2, sl st to top of starting ch-3.
Rnd 4: Sc in each dc around and work 2 sc in each sp around, join with sl st to first sc.
Fasten off.
Finishing
Weave in ends.
With RS facing fold rectangle so approximately 8.5” length forms the pocket. Pin in place.
Using photo as a guide, pin star and heart in place.
Sew to each side using tapestry needle and matching yarn.
Using tapestry needle and MC, sew center of pocket making sure to go through both thicknesses.
With RS (front) facing and MC, sc along both edges making sure to go through both thicknesses when closing up each side of the pockets.
Optional: With tapestry needle and MC, sew rectangles of plastic canvas to back side of project for added stability and strength.
This could be made longer as to fold over an arm of a chair; and attach it with velcro, buttons, or some other way). Then items can be near you as you do your knitting, crocheting, crosswords, or watch TV.
This might be great for an elderly walker side pocket.
I’m getting ready to make a couple of these, for my daughter and myself. Between remotes and phones, glass case etc this will make it easier to keep the nightstand for lamps, drinks meds… lol
That is what I was thinking also. I am going to try and make it for both sides.
I like the idea of a long strip with a pocket on each side of the bed – has anyone made it?
Has anyone made this where you have a pocket on each side of the bed, where instead of finishing off the tuck you continue on so the pockets are connected with a long strip of the crochet? I hope I explained this well. We have a sleep memory bed and it is a very light mattress and anything that is tucked usually falls out so I was thinking if you just did a long crochet strip that attaches the pockets it would have something to hold on to and would not slip out of the mattress. I am going to try to do it. Thank you for the great idea!!!!
I would like to know if you have a book that can teach me how to crochet that is easy to do, with pictures and of course words how to do it. I really would like to do this but I don’t know anything how to start this, please help me to learn this
Hi Linda! This video collection might be what you are looking for! https://www.ilikecrochet.com/toc/videos-back-to-basics-11-essential-techniques-and-stitches-for-every-crocheter/
Happy crocheting! – Nicola, Editor
I will be doing a number of these (adapted length with buttons for walkers) for the seniors in Kyle, in the Pine Ridge Reservation, South Dakota.
I’m making this now using white peaches and cream for our bedroom (husband’s side). I need to know if there will be enough to tuck (see above) or should I sew a long piece of fabric to my work?
Hi Patricia! So glad to hear that you are making this! Here’s a photo (also on the right hand side of the page) that shows the length of he part that goes under the mattress: https://www.ilikecrochet.com/wp-content/uploads/Crochet-Bed-Pocket-small-1542.jpg
I would say that you could probably make that part longer as needed by starting with a longer chain! Hope that helps! – Nicola, Editor
Hi there – I’ve been a subscriber since the beginning and have a question. Is there any way I can download a pattern with its chart in one go to save it easily to my iPad or computer? It would make things so much easier if I could do that? Thanks 🙂
Hello! That is a wonderful suggestion and I’ve added it to my list of things to look into! Thank you for being a member for so many years! – Nicola, Editor
I really like that idea, too. It would be so much better than carrying paper pages around. I do not use public WiFi even if I am someplace I can connect to. On my iPad would be so much easier!
On my phone at top of browser I have an icon I can push and it converts the Web page to text and pictures, when I go into options it allows me to save yo pdf, dont know if your able to do this also. I have a Samsung s21. I like you find reading the patterns easier on my tablet
“With RS facing fold rectangle so approximately 8.5” length forms the pocket. Pin in place.”
Maybe I am missing it somewhere or just can’t see it, but what does “RS” stand for???
Hi Angela! RS means “right side”. Hope this helps! – Nicola, Editor
This is just what I need. And a perfect way to use some scrap yarn. I am starting tomorrow!!
Wonderful to hear! Would love to see a photo when you’re all done! – Nicola, Editor