


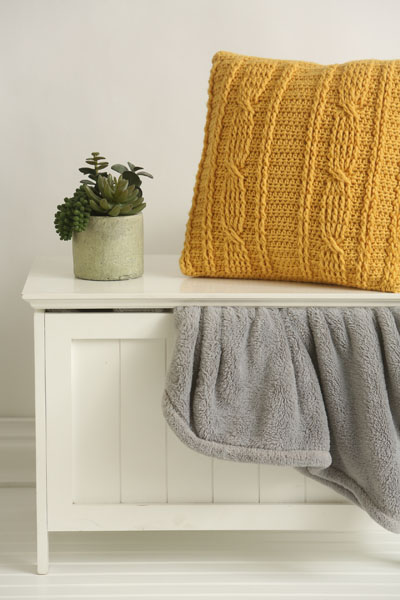
Add a bright pop of golden color and texture to your living space with this cabled pillow. Don’t waste money on designer pillows, when you can easily crochet your own!
Skill Level: Easy
Size: 14″ square
Gauge: 12 sts and 10 rows = 4” [10 cm] in hdc after wet blocking
Materials
Yarn:
![]() Knit Picks Wool of the Andes Superwash Bulky (100% Superwash Wool; 137 yards [125 meters]/100 grams): 26520 Semolina (3 skeins)
Knit Picks Wool of the Andes Superwash Bulky (100% Superwash Wool; 137 yards [125 meters]/100 grams): 26520 Semolina (3 skeins)
Hook: US size I/9 (5.5 mm) crochet hook
Notions: Tapestry needle, 14 x14″ pillow form, five 1” buttons
Pattern Notes
The Crochet Cable Pillow is worked in one piece starting at the lower back, then transition to the cabled front, ending with the upper back flap. The piece is blocked, the back seamed, and buttons added.
Pattern
Lower Back
Ch 48.
Row 1: Hdc in 2nd ch from hook and in each rem ch across row, turn. (46 hdc)
Row 2: Ch 2, hdc in each hdc across row, turn.
Rep Row 2 until piece measure approximately 10″ from beg ch.
Do not fasten off.
Front
Row 1 (RS): Ch 2, hdc in next 2 sts, FPdc around next 2 sts, hdc in next 3 sts, FPdc around next 2 sts, hdc in next 2 sts, FPdc around next 5 sts, hdc in next 2 sts, FPdc around next 2 sts, hdc in next 6 sts, FPdc around next 2 sts, hdc in next 2 sts, FPdc around next 5 sts, hdc in next 2 sts, FPdc around next 2 sts, hdc in next 3 sts, FPdc around next 2 sts, hdc in last 2 sts, turn. (46 sts)
Row 2 (WS): Ch 2, hdc in each st across row, turn.
Row 3-8: Rep Rows 1-2.
Row 9 (Cable Cross): Ch 2, hdc in next 2 sts, FPdc around next 2 FPdc, hdc in next 3 sts, FPdc around next 2 FPdc, hdc in next 2 sts, sk next 3 FPdc, FPtr around next 2 FPdc, hdc in 3rd skipped FPdc, FPtr in first skipped FPdc, FPtr in 2nd skipped FPdc, hdc in next 2 sts, FPdc around next 2 FPdc, hdc in next 6 sts, FPdc around next 2 FPdc, hdc in next 2 sts, FPdc around next 5 FPdc, hdc in next 2 sts, FPdc around next 2 FPdc, hdc in next 3 sts, FPdc around next 2 FPdc, hdc in next 2 sts, turn.
Row 10: Ch 2, hdc in each st across row, turn.
Rows 11-30: Rep Rows 1-10.
Row 31-38: Rep Rows 1-8.
Do not fasten off.
Upper Back
Row 1: Ch 2, hdc in each hdc across row, turn. (46 hdc)
Rep Row 1 until Upper Back piece measure approximately 5.5″.
Buttonhole Row: Ch 2, hdc in next 4 sts, ch 2, sk 1, *hdc in next 8 sts, ch 2, sk 1; rep from * across row, ending with hdc in rem sts, turn.
Next Row: Ch 2, hdc in each hdc and ch-2 sp across row, turn. (46 hdc)
Next Row: Ch 2, hdc in each hdc across row.
Fasten off
Finishing
Weave in all ends and wet block.
With RS facing, overlap 3 rows of Upper Back over Lower Back, seam sides.
Mark button placement and secure buttons to Lower Back. Insert pillow form. Button Back close.
There are some serious errors in this pattern. More rows need to be written out, as the post stitches need to go around the last posts instead of just the row before. maybe rewrite the pattern with a few more rows written out. And I agree as an instructor that this should not be labeled easy.
I like the cable and appreciate the video. But I’m surprised this pattern is considered “easy”.