


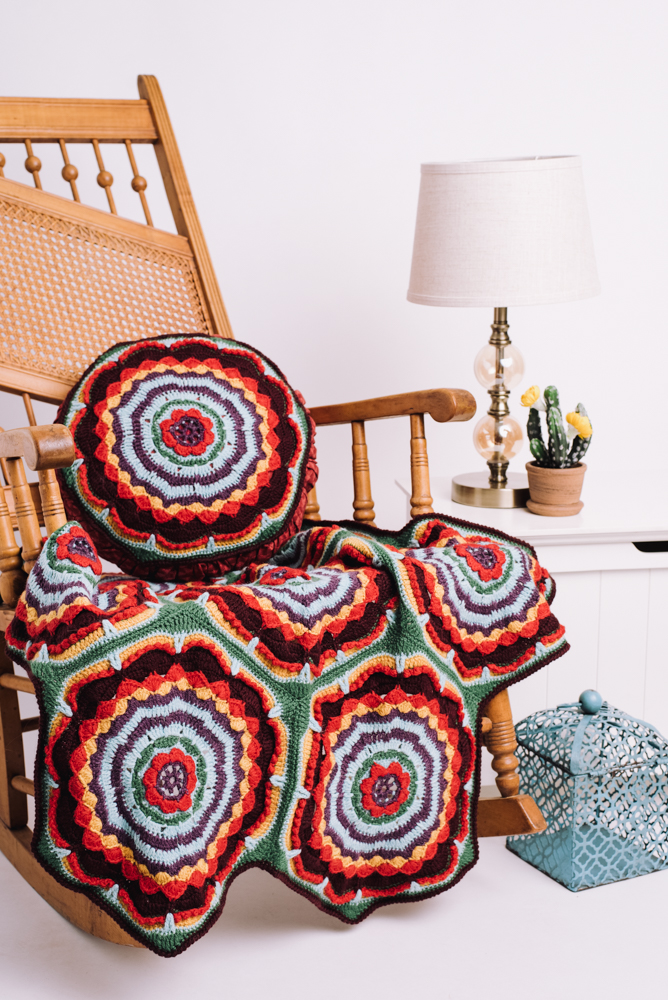
This is a beautiful pillow and throw set that follows a hexagon tile pattern from the Middle East. The tile pattern is translated beautifully into crochet for a stunning way to brighten up your favorite chair.
Skill Level: Intermediate
Size: Pillow = 12”; Throw = 36” wide
Gauge: 1 motif = 12” [30.5 cm]
Materials
 Yarn: Knit Picks Wool of the Andes Sport (100% Wool; 137 yards [125 meters]/50 grams): 25304 Amethyst Heather (CC1, 2 balls), 25297 Red (CC2, 2 balls), 25283 Grass (CC3, 2 balls), 25302 Semolina (CC4, 2 balls), 25662 Currant (CC5, 2 balls), 3 balls 25287 Wonderland (CC6, 2 balls)
Hook: US size E/4 (3.5 mm)
Notions: Tapestry needle, 12” round pillow form, sewing needle and matching thread
Pattern Notes
Each Motif is worked center out.
For the throw, motifs are joined later by stitching them together according to the included diagram.
Since none of the colors can be considered as Main Color, none of the colors have been chosen as MC.
Pattern
Motif (Make 8 total: 7 for throw and 1 for pillow)
With CC1, ch 6, sl st into first ch to make a ring.
Rnd 1: Ch 6 (count as dc, ch 3), (dc, ch 3) 7 times, ending with sl st in 3rd ch of beg ch-6.
Rnd 2: Sl st in next 2 ch, (ch 4, sl st in next ch-3 sp) 7 times, ch 4, sl st in 2nd sl st.
Fasten off.
Rnd 3: Attach CC2, *ch 1, (sc, hdc, 3 dc, hdc, sc) in next ch-4 sp; rep from * around, ending with sl st in first ch.
Fasten off.
Rnd 4: Attach CC6, holding Rnd 3 in front, work from the back, *BPsc in dc on Rnd 1, ch 4; rep from * around, ending with sl st in first BPsc.
Rnd 5: Sl st in next ch-4 sp, ch 3 (count as dc), 5 dc in same ch-4 sp, (sl st in BL of 3rd dc of next scallop on Rnd 3, 6 dc in next ch-4 sp) 7 times, ending with sl st in BL of 3rd dc of next scallop on Rnd 3 and 3rd ch. (48 dc)
Rnd 6: Ch 1, sc in every dc around, ending with sl st in first ch 1.
Rnd 7: Attach CC3, *ch 1, sc in next sc, hdc in next sc, dc in next 2 sc, hdc in next sc, sc in next sc; rep from * around, ending with sl st in first ch.
Fasten off.
Rnd 8: With CC6, *ch 6, sl st in next ch-1 sp; rep around.
Rnd 9: Sl st in next ch-6 sp, ch 3 (count as dc), 3 dc in same ch-6 sp, *dc in between next 2 dc on Rnd 7, 4 dc in same ch-6 sp, 4 dc in next ch-6 sp; rep from * around, ending with sl st in 3rd ch. (72 dc)
Rnd 10: Attach CC1, ch 3 (count as dc), dc in same st, *dc in next 3 dc, FPdc in next dc, dc each of next 3 dc, [2 dc in next dc] twice; rep from * around, ending with 2 dc in last dc, sl st into the 3rd ch. (88 dc)
Fasten off.
Rnd 11: With CC6, ch 3 (count as dc), dc in same st, 2 dc in next dc, [dc in next 3 dc, FPdc in next dc, dc in next 3 dc, (2 dc in next dc) 4 times] 6 times, ending with dc in next 3 dc, FPdc in next dc, dc in next 3 dc, [2 dc in next dc] twice, sl st in 3rd ch. (120 dc)
Fasten off.
Rnd 12: With CC1, ch 3 (count as dc), dc in same st, [dc in next 6 dc, 2 dc in next dc, dc in next 6 dc, (2 dc in next dc) twice] 7 times, dc in next 6 dc, 2 dc in next dc, ending with sl st in 3rd ch. (144 dc)
Rnd 13: *Ch 12, sk next 11 sts, sl st in BL of next dc; rep from * around.
Fasten off.
Rnd 14: Attach CC4, working in front of Rnd 13 into Rnd 12, *ch 3, sl st in same dc, sk next 2 dc, 5 dc in next dc (scallop), sk next 2 dc, sl st in next dc; rep from * around. (24 scallops) Fasten off.
Rnd 15: Attach CC2, ch 3 (count as dc), 6 dc in same ch-3 sp, *sl st in 3rd dc of next scallop, 7 dc in ch-3 sp; rep from *, ending with insert hook in 3rd dc of last scallop and 3rd ch, wrap yarn around hook, pull yarn through all lps on hook.
Fasten off.
Rnd 16: Attach CC5 to first ch-12 sp of Rnd 13, ch 3 (count as dc), 7 dc in same ch-12 sp, *sl st in BL of 4th dc of next scallop, 7 dc in same ch-12 sp, sl st in BL of 4th dc of next scallop, 8 dc in next ch-12 sp; rep from * around, ending with sl st in 4th dc of last scallop and 3rd ch. (180 dc)
Rnd 17: *Ch5, sl st in same st, sc in next dc, hdc in next dc, dc in next 3 dc, tr in next 5 dc, dc in next 3 dc, hdc in next dc, sc in next dc, sl st in next dc; rep from * around.
Fasten off.
Rnd 18: Attach CC3, ch 1, *sk next ch-5-sp, working behind ch-5 sp, sc in next 16 sts; rep from * around, ending with sl st in first ch.
Fasten off.
Rnd 19: Attach CC2, holding ch-5 sp of Rnd 17 in front, work in FL of previous rnd, *[sk next sc, (sc, dc, sc) in next sc] 7 times, sk next sc, sc in next sc; rep from * around, ending with sk next sc, sl st in first sc.
Fasten off.
Rnd 20: Attach CC4, working in BL of Rnd 18, ch 3 (count as dc), dc in every st around, ending with sl st in 3rd ch.
Fasten off.
Rnd 21: Attach CC6, *ch 1, tr in ch-5 sp on Rnd 17, sc in next dc, tr in same ch-5 sp, sc in next 14 dc; rep from * around, ending with sl st in first ch.
Fasten off.
Rnd 22: Attach CC3, ch 1, *sc in next 13 sts, hdc in next st, dc in next st, tr in next 5 sts, dc in next st, hdc in next st, sc in next 12 sc; rep from * around.
Fasten off.
Finishing
Throw
Using tapestry needle, join 7 motifs by stitching every st to the matching st of the previous motif together as shown in the diagram.
Border
Rnd 1: Attach CC5 to a corner of Throw, ch 1, sc in every st around, sl st in first ch 1 to join.
Rnd 2: Reverse sc in every sc around.
Fasten off.
Weave in all ends.
Block Throw to size.
Pillow
Rnd 1: Attach CC5 to a corner of Pillow, ch 1, sc in every st around, sl st in first ch 1 to join.
Rnd 2: Reverse sc in every sc around.
Fasten off.
Weave in all ends.
Place the motif on the pillow form. Sew around the edge to the sides of Pillow.
Weave in any rem ends.
Is there a way to print this pattern?
Hi Valerie! You are welcome to save this pattern by copying and pasting into a word document or by printing the pattern via the printer icon on the left hand side of your screen. Hope this helps! – Nicola, Editor