


Nothing is more frustrating in the land of crochet than putting a lot of time, effort and materials into a garment and having it wind up with a poor, unflattering fit. Sometimes it’s because the pattern simply didn’t come already written in the size we need, sometimes it’s because the pattern writer didn’t have the
Nothing is more frustrating in the land of crochet than putting a lot of time, effort and materials into a garment and having it wind up with a poor, unflattering fit. Sometimes it’s because the pattern simply didn’t come already written in the size we need, sometimes it’s because the pattern writer didn’t have the skill to grade an item properly into the plus sizes (and no, one can’t just make everything larger across the board and still expect it to fit a human being) and sometimes it’s because while we might be plus size and the pattern is plus size, we aren’t plus size in the same place! While it does take some effort to upsize an existing pattern to your own unique body, the ends results will make the effort worthwhile in the end. You don’t have to be intimidated by the prospect of doing your own pattern alterations, you just need a plan of attack.
Let’s talk about the first step – choosing a pattern that is a good candidate to be upsized.
Some patterns are simply easier to adjust than others. Take a close look at the pattern you are thinking of adjusting before you make a yarn commitment. Patterns with large numbers of stitches or rows in the repeat are not good choices – you will wind up with a quarter of a repeat here and a half there, and unless you are gifted at reading your stitches, you may get very tangled up in the wording and have a hard time making an adjustment.
How do you quickly figure out what the stitch and row repeats are in the pattern you’re considering? For stitches in a repeat, look for an instruction in parentheses that is repeated several times.
For example:
(dc in each of next 5 dc, ch 3, sk 2 dc, sc in next dc, ch 3, sk 2 dc) 5 times.
My example has a 10-stitch repeat – the 5 dc that each have a dc in them, the two that were skipped, the one that got an sc, and the next two that were skipped. Now your stitch count may not be an exact multiple of the stitch count in a set of parentheses, but when skimming a pattern, that’s a good, quick clue that the stitch repeat is large, so this may not be a good pattern for your first time at upsizing. Look for a pattern with a smaller stitch repeat – maybe 4-6 stitches.
How about row repeats? Again, skim the pattern and look for an instruction that says something like “Rep Rows 5-8 for pattern 10 times.” If I am repeating Rows 5-8 many times, it’s a good bet that there are four rows in the repeat. If I see something like “Rep Rows 10-21” that’s a twelve row repeat, which may make upsizing the pattern a little difficult.
One more thing to look at in the pattern writing is how lengths are written out. “Rep Row 5-8 for pattern until work measures 20” is going to be easier to work with than “Rep Rows 5-8 sixteen times, then Rows 5-6 once more”.
Lastly, glance at that pattern and make sure there is a schematic. That will give you a quick visual map from which to work when you are looking to see which measurements need to be extended. One of the tricks of plus-size shaping which eludes a lot of designers and editors who don’t often work in those sizes is that you can’t size up the whole pattern by the same ratio or number of inches for every single measurement – this is why you see boxy sweaters where the cross back would fit a linebacker and the armhole opening sags to the knees! Just because we need more room in the bust, waist or hip, doesn’t mean our arms are the length of King Kong’s. The schematic will help you see which measurements need to be extended and which don’t.
Now It’s Like a Puzzle!
How much coverage do you need and where do you need it?
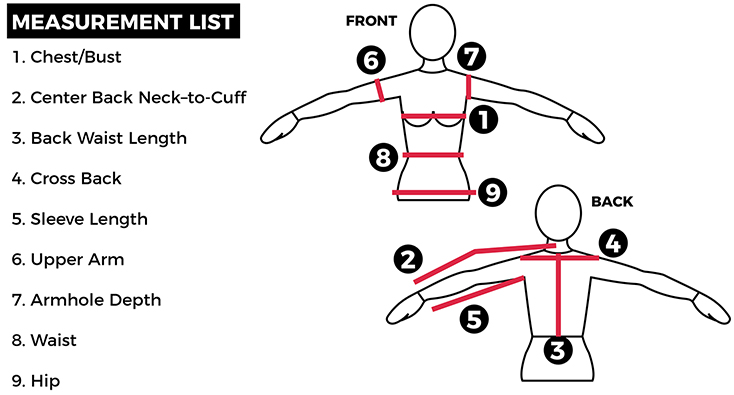
The very first thing you need to do now, is make sure you have accurate measurements of yourself so you know what finished numbers you are aiming for. It’s almost impossible to measure yourself, so invite a like-minded friend over and make an afternoon out of getting measurements for each other. Before you start measuring, it’s a good idea to create a list of all the information you’ll need to record. Use this handy dandy printable checklist as your guide!
But at the very least you’ll need bust, waist, high hip, cross shoulder (back), upper arm circumference and sleeve length. These will be your body measurements; you will still need to add some fabric (called “ease”) to get to your finished measurements.
If you need or want to fly solo, the best way to get a good set of finished measurements is to pick out a sweater you already own that fits you like a dream, and measure that to get the finished measurements for your various pieces.
Print out or scan and copy the schematic on the pattern you’ve chosen so you have a basis from which to work that you can scribble on. Write in your desired finished measurements on the copy so you can see which pieces need adjustment and where.
Now that you know where you want to go, you can make a specific plan on how to get there. You have done the planning, now it’s time to get out your hook and yarn and do some swatching!
Want to learn more? Don’t miss part 2 of our sizing series over on the I Like Crochet blog to learn a few different ways to add fabric where it’s needed.
Great this is just what I’m looking for right now I’m making a sweater for my daughter who is a very big girl and the sweater reminds me of just a square with arms sticking out and I’m not sure that that’s what it supposed to look like, but this measurement stuff is fantastic, so thank you so very much. I appreciate it. I’m sure this will help. me with the sizing of this measurement with her. Thank you again!!!!!
Found this very interesting, thank you very much
Awesome! Thank you!
Thank you, this is very helpful
Very inteesting article on enlarging crochet pattern