


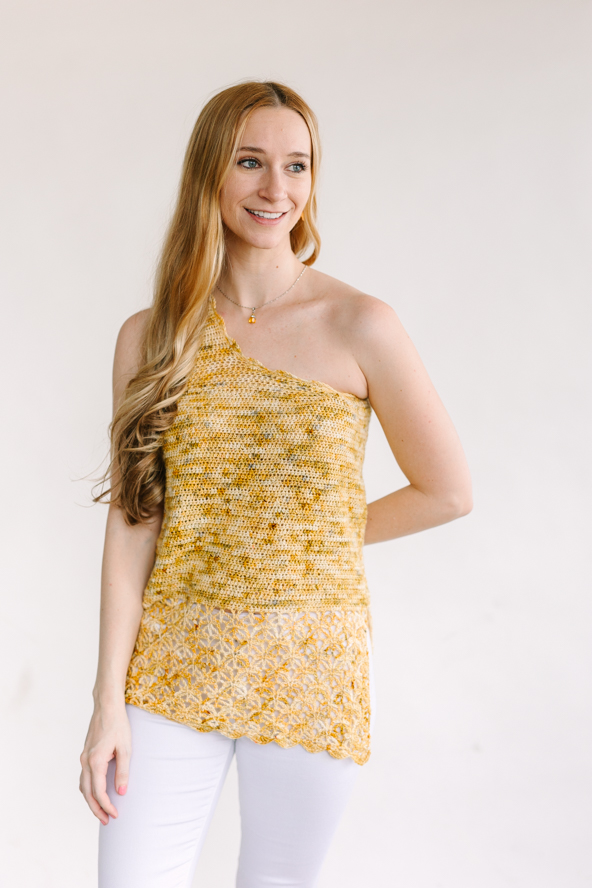
Solina incorporates flirty design, feminine detailing, scalloped edging and more to be the bold shoulder look for spring. Combining a variety of elements, this pattern is intriguing to crochet the entire time. The gentle shell edging along the bottom edge brings the look together connecting the lace section with the easy half double crochet top.
Time: 2-3 weeks
Skill Level: Intermediate
Size: Finished Bust Size 30 (34, 38, 42, 46) 50 (54, 58, 62, 66)”
0-2” positive ease recommended.
Shown in size 34”
Gauge: 20 sts and 16 rows = 4” [10 cm] in hdc st after wet blocking
Materials
 Yarn: Expression Fiber Arts Crema Sock (40% Superwash Merino Wool, 30% Mulberry Silk; 350 yards [320 meters]): Barn Owl 3 (3, 3, 4, 4) 4 (4, 5, 5, 5) balls
*Categorize your yarn by choosing the appropriate size below
Hook: US size D (3.25 mm) for body, US size G (4.00 mm) for lace
Notions: Tapestry needle
Special Stitches
- V-shell: [dc, ch 3, dc, ch 3, dc], in same st.
- V-stitch: [dc, ch 3, dc] in same st.
- Shell: [7 dc] in same st.
- Spike st: sc in dc st 2 rows below, working around ch’s. A spike st is elongated and worked loosely to accommodate the distance it is being worked.
Pattern Notes
- This pattern is made from the bottom up, beginning with one flat panel and then worked in the round after the lace section. You will seam up the lace section at the end.
- The shoulder and neckline shaping are added to create a beautiful rounded edge with a dainty scalloped edging.
- Your lace gauge should measure approximately 2” from spike stitch to spike stitch (it appears to be the center of the “star”).
- If you find yourself working your lace a little tightly, you can go up a hook size. I worked my lace much more tightly than my hdc fabric and went up a hook size for the lace section.
- To create an invisible join with ch 2, slst tightly, ch 1 tightly, and then ch 1 again.
- X’s in the st counts and instructions are a placeholder indicating that the instruction is omitted for the designated size. For example, “dc x (3, 3, 3, 3)…” Indicates that size xs should not be doing this instruction but s, m, l, xl, etc are to dc 3.
Pattern
Leave a long tail at the beginning for seaming.
Instructions will be listed as follows:
XS (S, M, L, XL) 2X (3X, 4X, 5X, 6X)
Body
Ch 159 (183, 199, 223, 239) 263 (279, 303, 319, 343) turn.
Row 1: Dc in 7th ch from hook (with skipped ch-s counts as v-stitch), *sk 3 ch-s, sc in next ch**, sk 3 ch-s, v-shell in next ch * rep from * to * across ending at ** before last 3 ch-s, sk 2 ch-s, [(v-stitch)] in last ch, turn. 18 (21, 23, 26, 28) 31 (33, 36, 38, 41) full v-shells plus 2 halves
Row 2: Ch 1, sc, ch 2, *v-stitch in next sc**, ch 5, sk next v-shell;* rep from * to * across ending at **, ch 2, sc in 3rd ch of skipped 6 chs, turn.
Row 3: Ch 1, sc, *v-shell in ch-3 sp of v-stitch**, spike st in dc from 2 rows below;* rep from * to *, across ending at **, sc in last sc, turn.
Row 4: Ch 4 (counts as dc, ch 1), dc in same st, *ch 5, sk next v-shell**, v-stitch in next sc;* rep from * to * across ending at **, ([dc, ch 1, dc]) in last st, turn.
Row 5: Ch 6 (counts as dc, ch 3), dc in first ch-1 sp, *spike st**, v-shell in ch-3 sp of next v-stitch;* rep from * to *, across ending at **, dc in 4th ch, ch 3, dc in 3rd ch, turn.
Row 6-17: Rep rows 2-5.
Row 18: Ch 1, sc, ch 1, *[(dc, ch 1, dc]) in next sc**, ch 2, sc in the middle dc of v-shell, ch 2;* rep from * to *, across ending at **, ch 2, sc in 3rd ch, turn. 152 (176, 192, 217, 232) 256 (272, 296, 312, 336)
Begin working in joined, turned rounds. If you sized up a hook, switch back now.
Rnd 19: Ch 2, hdc in each st and ch across, slst tightly to first hdc, turn.
Rnds 20-63: Ch 2, hdc in each st around, slst to the beginning hdc, turn.
At this point, try the top on and make sure it is long enough for your preference. You should bring the top edge (hdc edge) up to your armpit. If you like the length, move on. If you want it a little longer/shorter, add/remove some hdc rows until you’re satisfied with it. Don’t forget to account for the size after blocking! Lace has a tendency to grow quite a bit.
Rnd 64: Ch 2, [hdc 5 (6, 7, 8, 9) 10 (11, 12, 13, 14), hdc2tog] around, hdc in any remaining sts, slst to the beginning hdc, turn. 131(154, 171, 195, 211) 235(252, 275, 292, 315)
Rnd 65: Ch 2, [hdc 4 (5, 6, 7, 8) 9 (10, 11, 12, 13), hdc2tog] around, hdc in any remaining sts, slst to the beginning hdc, turn. 110(132, 150, 174, 190) 214(231, 254, 272, 294)
Rnd 66: Ch 2, [hdc 3 (4, 5, 6, 7) 8 (9, 10, 12, 12), hdc2tog] around, hdc in any remaining sts, slst to the beginning hdc, turn. 88 (110, 129, 153, 169) 193 (210, 233, 252, 273)
Shoulder #1 (front)
You should be working on the rs at this point. There isn’t a clear ws and rs but you will be determining that now.
Row 1: Ch 1, sc 6, hdc 34 (45, 55, 66, 75) 86 (95, 106, 116, 126), hdc2tog 2x, turn. 42 (53, 63, 74, 83) 94 (103, 114, 124, 134)
Row 2: Ch 2, hdc2tog 2x, hdc 26 (37, 47, 58, 67) 78 (87, 98, 108, 118), sc 5, slst, turn. 34 (45, 55, 66, 75) 86 (95, 106, 116, 126)
Row 3: Sk 2 (slst and sc), sc 11, hdc 17 (28, 38, 49, 57) 69 (78, 89, 99, 109), hdc2tog 2x, turn. 30 (41, 51, 62, 71) 82 (91, 102, 112, 122)
Row 4: Ch 2, hdc2tog 2x, hdc 15 (26, 36, 47, 56) 67 (76, 87, 97, 107), sc 5, slst, turn. 23 (34, 44, 55, 64) 75 (84, 95, 105, 115)
Row 5: Sk 2, sc 11, hdc 10 (21, 31, 42, 51) 62 (71, 82, 92, 102), turn. 21 (32, 42, 53, 62) 73 (82, 93, 103, 113)
Size XS proceed to Row 6b. All other sizes Row 6a.
Row 6a: Ch 2, hdc x (15, 25, 36, 45) 56 (65, 76, 86, 96), sc 5, slst, turn. x (21, 31, 42, 51) 62 (71, 82, 92, 102)
Row 6b: Ch 2, hdc 12, sc 6, slst, turn. 19 (x, x, x, x) x (x, x, x, x) Proceed to “Top of shoulder”.
Row 7: Sk 2, sc 11, hdc x (8, 18, 29, 38) 49 (58, 69, 79, 89), turn. x (19, 29, 40, 49) 60 (69, 80, 90, 100)
Size S proceed to “Top of shoulder”.
Row 8: Ch 2, hdc x (x, 17, 28, 37) 48 (57, 68, 78, 88), sc 5, slst, turn. x (x, 23, 34, 43) 54 (63, 74, 84, 94)
Row 9: Sk 2, sc 11, hdc x (x, 10, 21, 30) 41 (50, 61, 71, 81), turn. x (x, 21, 32, 41) 52 (61, 72, 82, 92)
Size M proceed to Row 10b. All other sizes Row 10a.
Row 10a: Ch 2, hdc x (x, x, 14, 23) 34 (43, 54, 64, 74), sc 5, slst, turn. x (x, x, 20, 29) 40 (49, 60, 70, 80)
Row 10b: Ch 2, hdc 12, sc 6, slst, turn. x (x, 18, x, x) x (x, x, x, x) Proceed to “Top of shoulder”.
Row 11: Sk 2, sc 11, hdc x (x, x, 7, 16) 27 (36, 47, 57, 67), turn. x (x, x, 18, 27) 38 (47, 58, 68, 78)
Size L proceed to “Top of shoulder”.
Row 12: Ch 2, hdc x (x, x, x, 15) 26 (35, 46, 56, 66), sc 5, slst, turn. x (x, x, x, 21) 32 (41, 52, 62, 72)
Row 13: Sk 2, sc 11, hdc x (x, x, x, 8) 19 (28, 39, 49, 59), turn. x (x, x, x, 19) 30 (39, 50, 60, 70)
Size XL proceed to “Top of shoulder”.
Row 14: Ch 2, hdc x (x, x, x, x) 18 (27, 38, 48, 58), sc 5, slst, turn. x (x, x, x, x) 24 (33, 44, 54, 64)
Row 15: Sk 2, sc 11, hdc x (x, x, x, x) 11 (20, 31, 41, 51), turn. x (x, x, x, x) 22 (31, 42, 52, 62)
Row 16: Ch 2, hdc x (x, x, x, x) 13 (19, 30, 40, 50), sc 5, slst, turn. x (x, x, x, x) 19 (25, 36, 46, 56)
Size 2x proceed to “Top of shoulder”.
Row 17: Sk 2, sc 11, hdc x (x, x, x, x) x (12, 23, 33, 43), turn. x (x, x, x, x) x (23, 34, 44, 54)
Size 3X proceed to Row 18b. All other sizes Row 18a.
Row 18a: Ch 2, hdc x (x, x, x, x) x (x, 22, 32, 42), sc 5, slst, turn. x (x, x, x, x) x (x, 28, 38, 48)
Row 18b: Ch 2, hdc 12, sc 5, slst, turn. x (x, x, x, x) x (18, x, x, x)
Proceed to “Top of shoulder”.
Row 19: Sk 2, sc 11, hdc x (x, x, x, x) x (x, 15, 25, 35), turn. x (x, x, x, x) x (x, 26, 36, 46)
Row 20: Ch 2, hdc x (x, x, x, x) x (x, 14, 24, 34), sc 5, slst, turn. x (x, x, x, x) x (x, 20, 30, 40)
Size 4X proceed to Row 21b. All other sizes Row 21a.
Row 21a: Sk 2, sc 11, hdc x (x, x, x, x) x (x, x, 17, 27), turn. x (x, x, x, x) x (x, x, 28, 38)
Row 21b: Sk 1 (slst), sc 6, hdc 13, turn. x (x, x, x, x) x (x, 19, x, x) Proceed to “Top of shoulder”.
Row 22: Ch 2, hdc x (x, x, x, x) x (x, x, 16, 26), sc 5, slst, turn. x (x, x, x, x) x (x, x, 22, 32)
Row 23: Sk 2, sc 11, hdc x (x, x, x, x) x (x, x, 9, 19), turn. x (x, x, x, x) x (x, x, 20, 30)
Row 24: Ch 2, hdc x (x, x, x, x) x (x, x, 14, 18), sc 5, slst, turn. x (x, x, x, x) x (x, x, 19, 24)
Size 5x proceed to “Top of shoulder”.
Row 25: Sk 2, sc 11, hdc x (x, x, x, x) x (x, x, x, 11), turn. x (x, x, x, x) x (x, x, x, 22)
Row 26: Ch 2, hdc x (x, x, x, x) x (x, x, x, 13), sc 5, slst, turn. x (x, x, x, x) x (x, x, x, 19) Proceed to “Top of shoulder”
Top of shoulder
Row 7 (8, 11, 12, 14) 17 (19, 22, 25, 27): Ch 2, sk slst (if you start with slst), hdc 18, turn. 18 all sizes
Row 8 (9, 12, 13, 15) 18 (20, 23, 26, 28) – Row 26 (28, 30, 32, 34) 37 (38, 40, 42, 44): Ch 2, hdc in each st across, turn.
Fasten off.
Shoulder #2 (back)
Reattach to the st after where you began shoulder #1. Be careful not to work your hdc2tog and chains on the inner neckline too tightly or it will be too tight/uncomfortable. You will be starting this row on the ws.
Row 1: Ch 2, hdc2tog 2x, sizes 3x, 4x, 5x, and 6x place 2 additional hdc2tog evenly in this row, hdc in each st until 4 remain, hdc2tog 2x, turn. 40 (51, 60, 73, 80) 93 (99, 111, 120, 131)
Row 2-4: Rep Row 1. 28 (39, 48, 61, 68) 81 (81, 93, 102, 113)
Row 5: Ch 2, hdc2tog 2x, hdc in each st across, turn. 26 (37, 46, 59, 66) 79 (79, 91, 100, 111)
Row 6: Ch 2, hdc in each st across until 4 sts remain, hdc2tog 2x, turn. 24 (35, 44, 57, 64) 77 (77, 89, 98, 109)
Row 7-9 (14, 19, 25, 29) 35 (35, 41, 46, 51): Rep rows 5-6. 18 (19, 18, 19, 18) 19 (19, 19, 18, 19)
Sizes – (-, -, L, -) 2X (3X, 4X, -, 6X) ONLY: Ch 2, hdc in each st across until 2 remain, hdc2tog, turn. x (x, x, 18, x) 18 (18, 18, x,18)
Size – (S, -, -, -) – (-, -, -, -) ONLY: Ch 2, hdc2tog, hdc in each st across, turn. x (18, x, x, x) x (x, x, x, x)
Row 10 (16, 20, 27, 30) 37 (37, 43, 47, 53) – Row 28 (30, 33, 35, 38) 40 (41, 44, 48, 53): Hdc in each st across, fasten off.
Seaming
Line up the shoulders and seam them across using your preferred method.
Optional: Line up the slit in the lace section and seam together using your preferred method.
Neckline Edging
Be careful not to work these sts tightly. If you make these too tight, your top will be too small around your neckline/under arm.
Rnd 1: Working on the ws, sc evenly around, working a multiple of 6, slst to beginning, turn.
Rnd 2: Ch 1, *sc, sk 2, 7 dc shell, sk 2;* rep from * to * around, slst to beginning, fasten off.
Bottom Edging: use the same hook you used for the lace!
If you seamed the lace, attach at the seam.
Rnd 1: Ch 1, sc, *shell in ch-1 sp that has v-shell in it, sc in next spike st;* rep from * to * around, slst to beginning sc, fasten off.
If you left the slit open, attach at the back edge, working on the rs.
Rnd 1: Ch 1, sc in corner ch, *shell in ch 1 sp that has sc in it, sc in next ch that has v-shell in it;* rep from * to * until the last shell, sc in corner ch, fasten off.
Armhole Edging
Rnd 1: Sc evenly around armhole, slst to beginning sc, fasten off.
Finishing
Weave in all your ends. Enjoy!
Beautiful top!